 1 month ago
29
1 month ago
29
This post may contain affiliate links. Please read my disclosure policy for details. As an Amazon Associate, I earn from qualifying purchases.
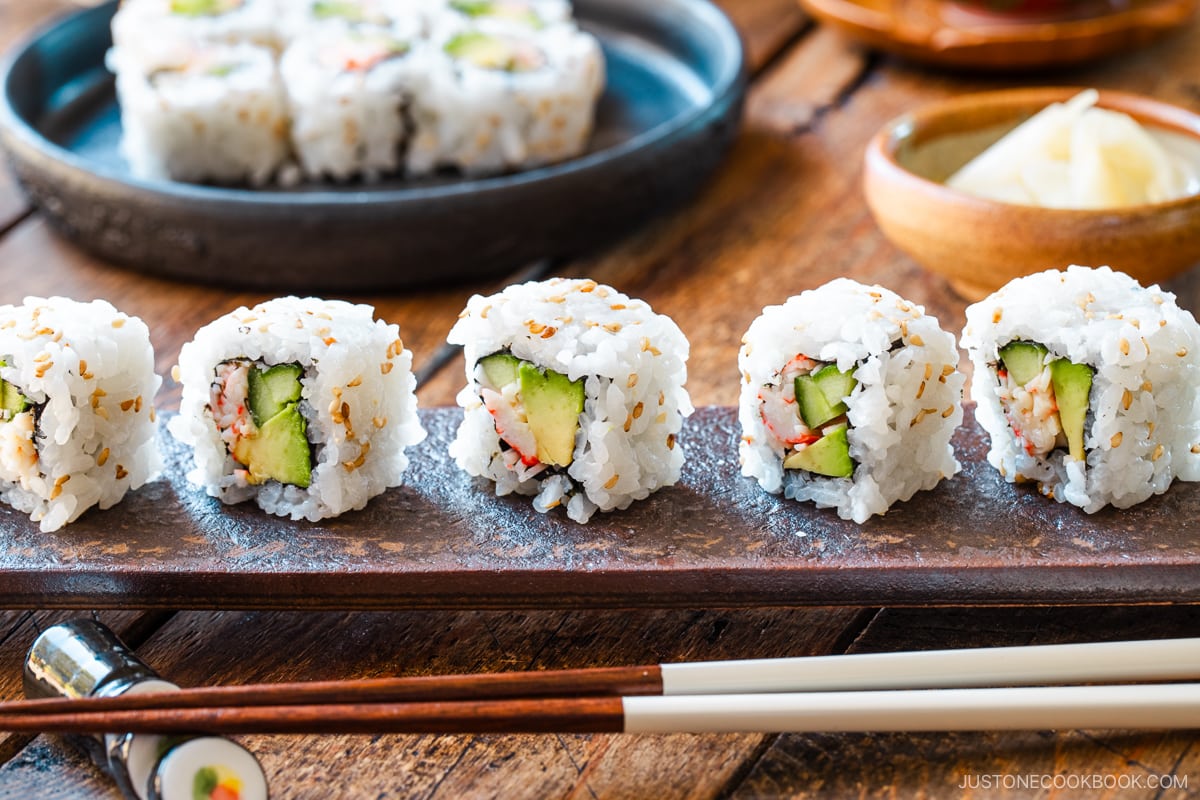
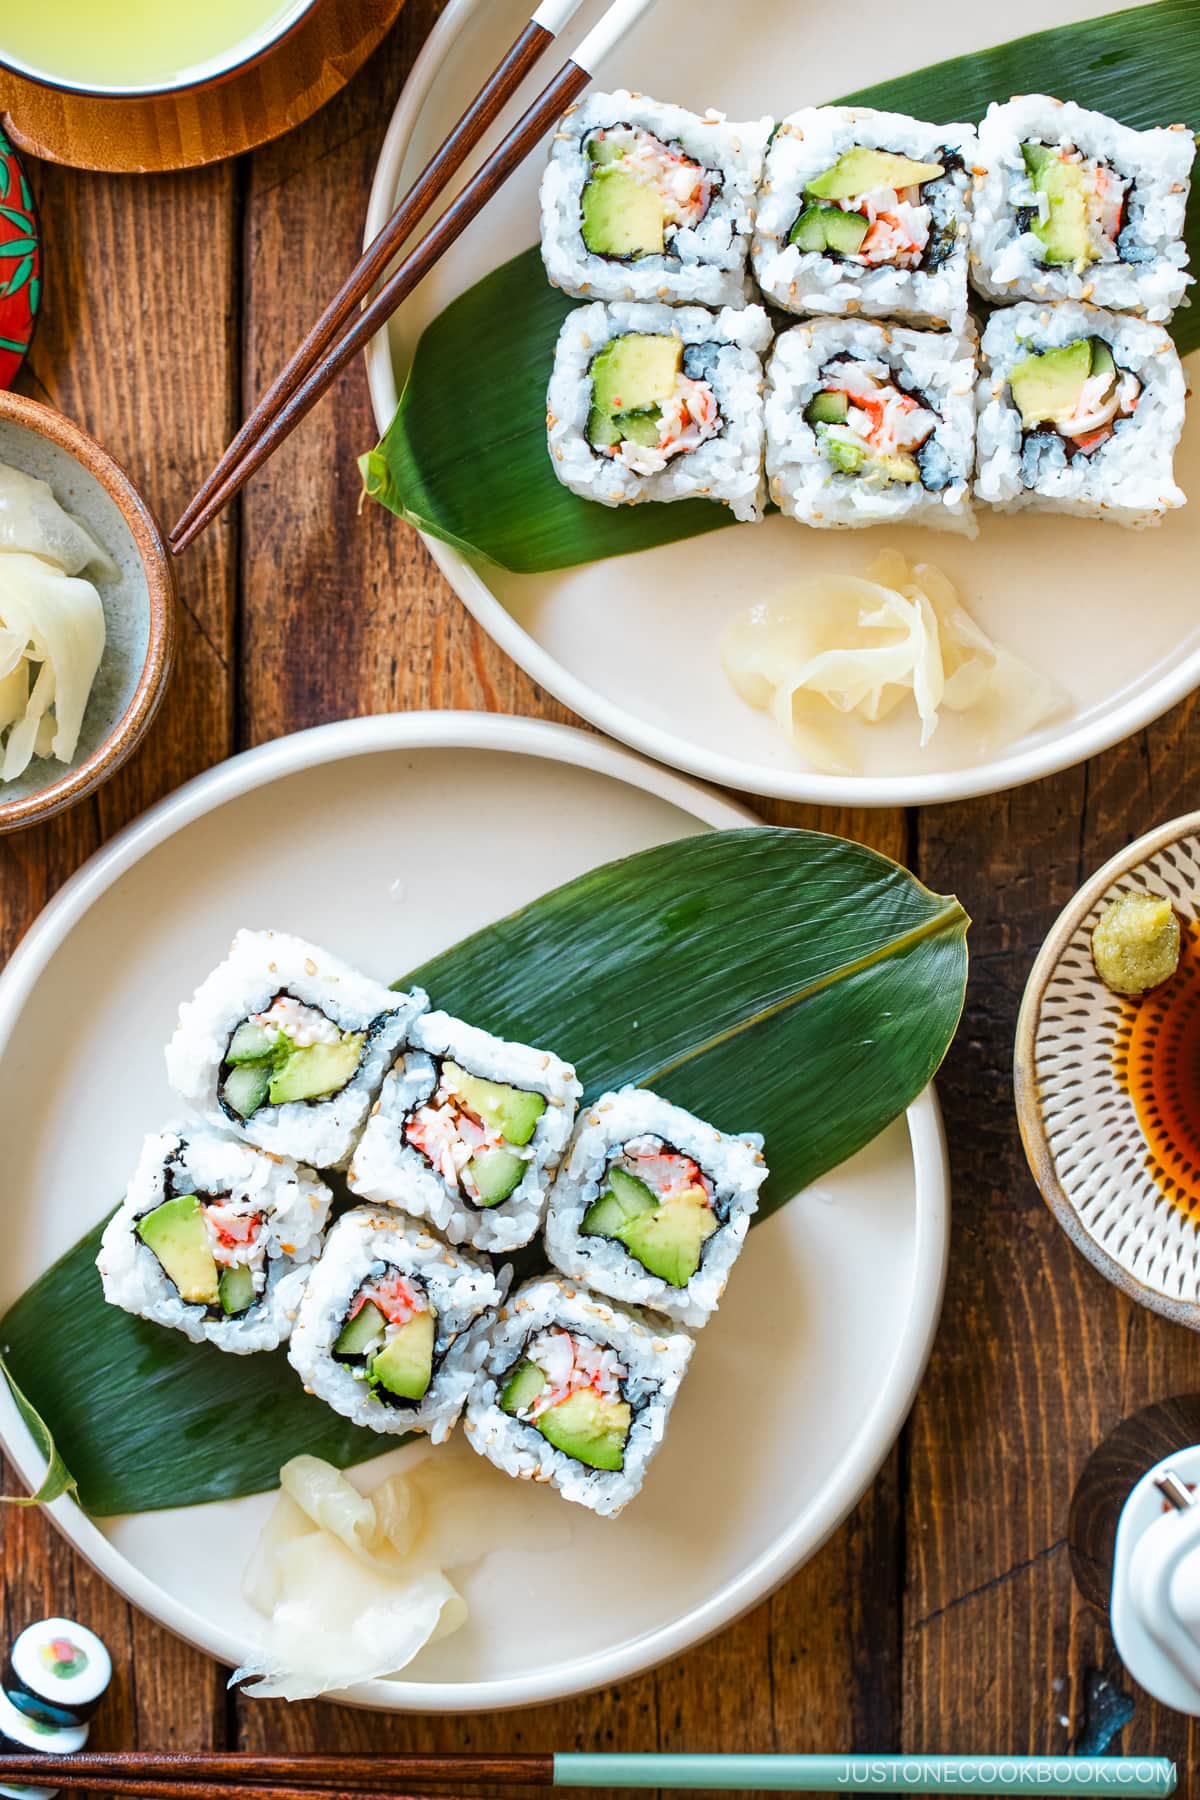
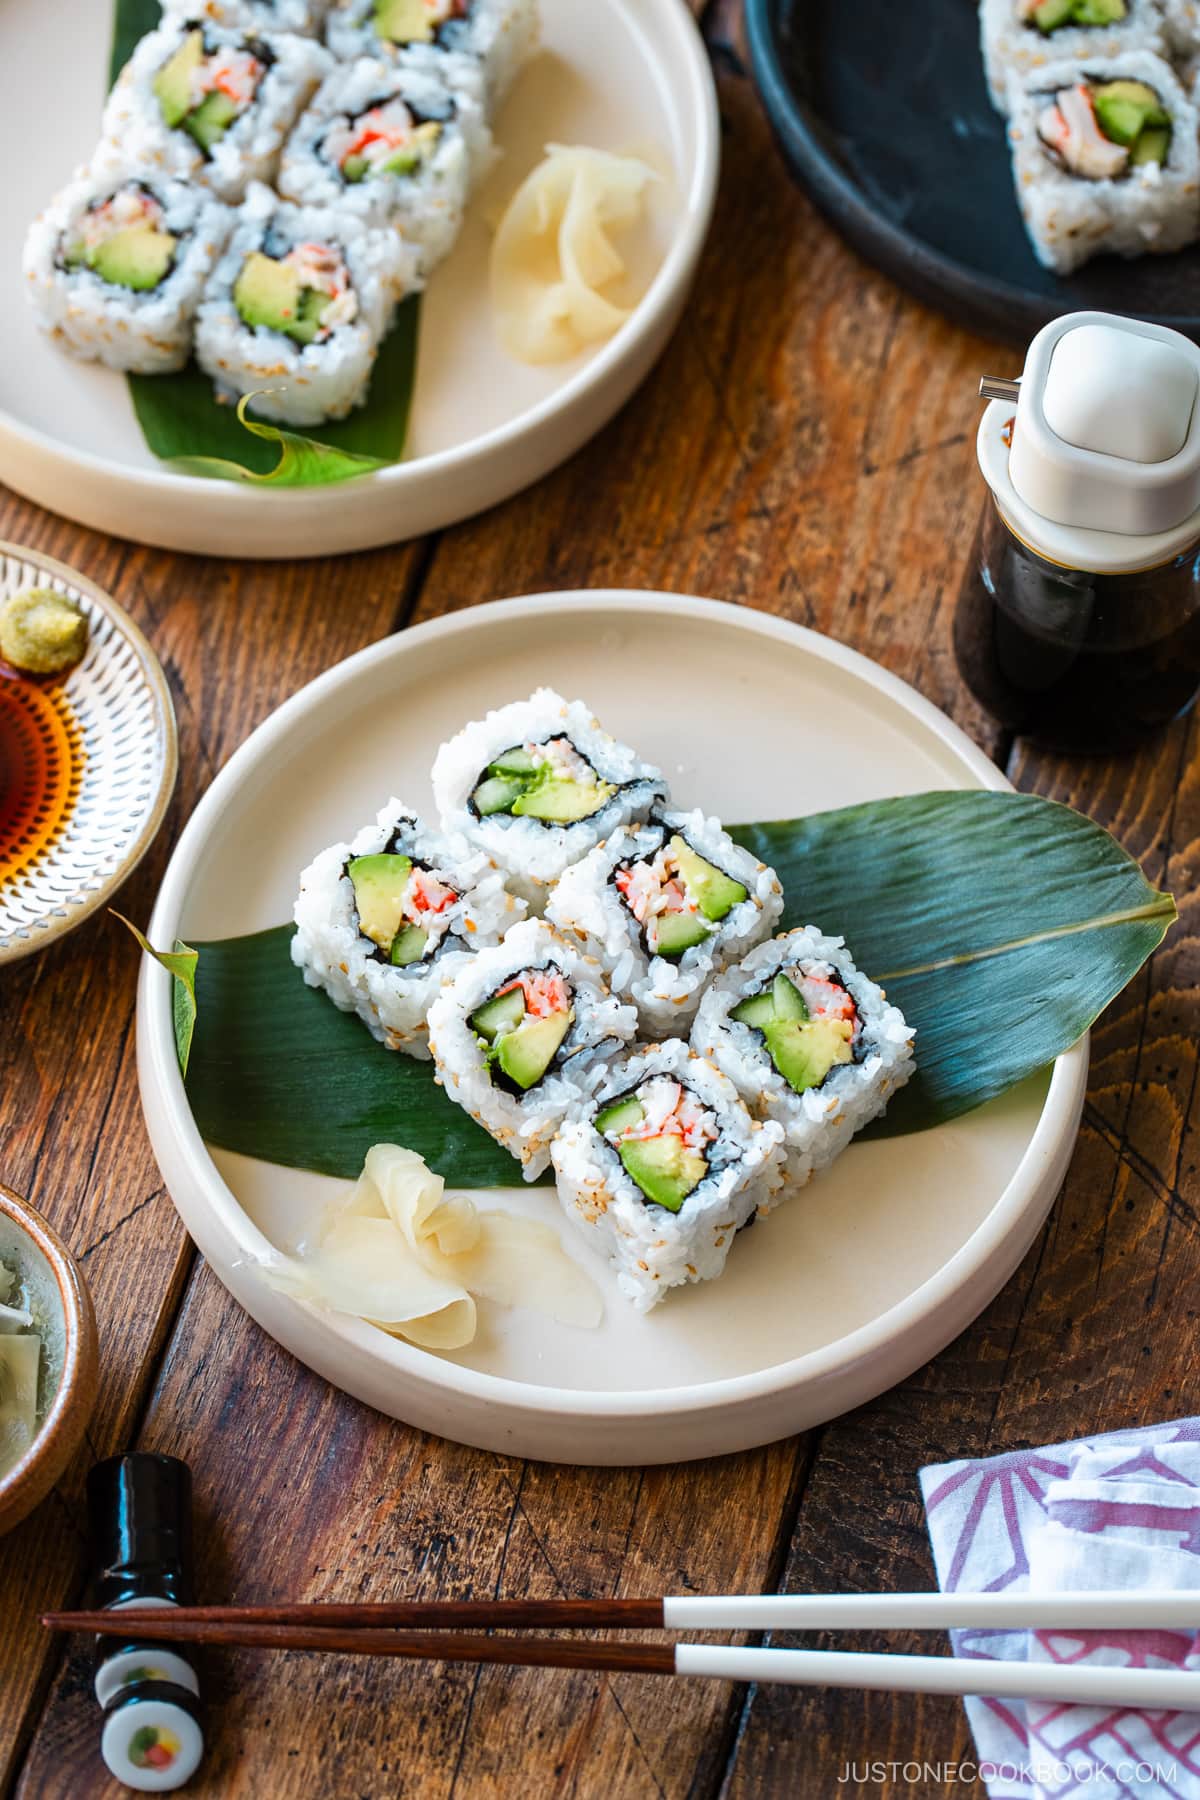
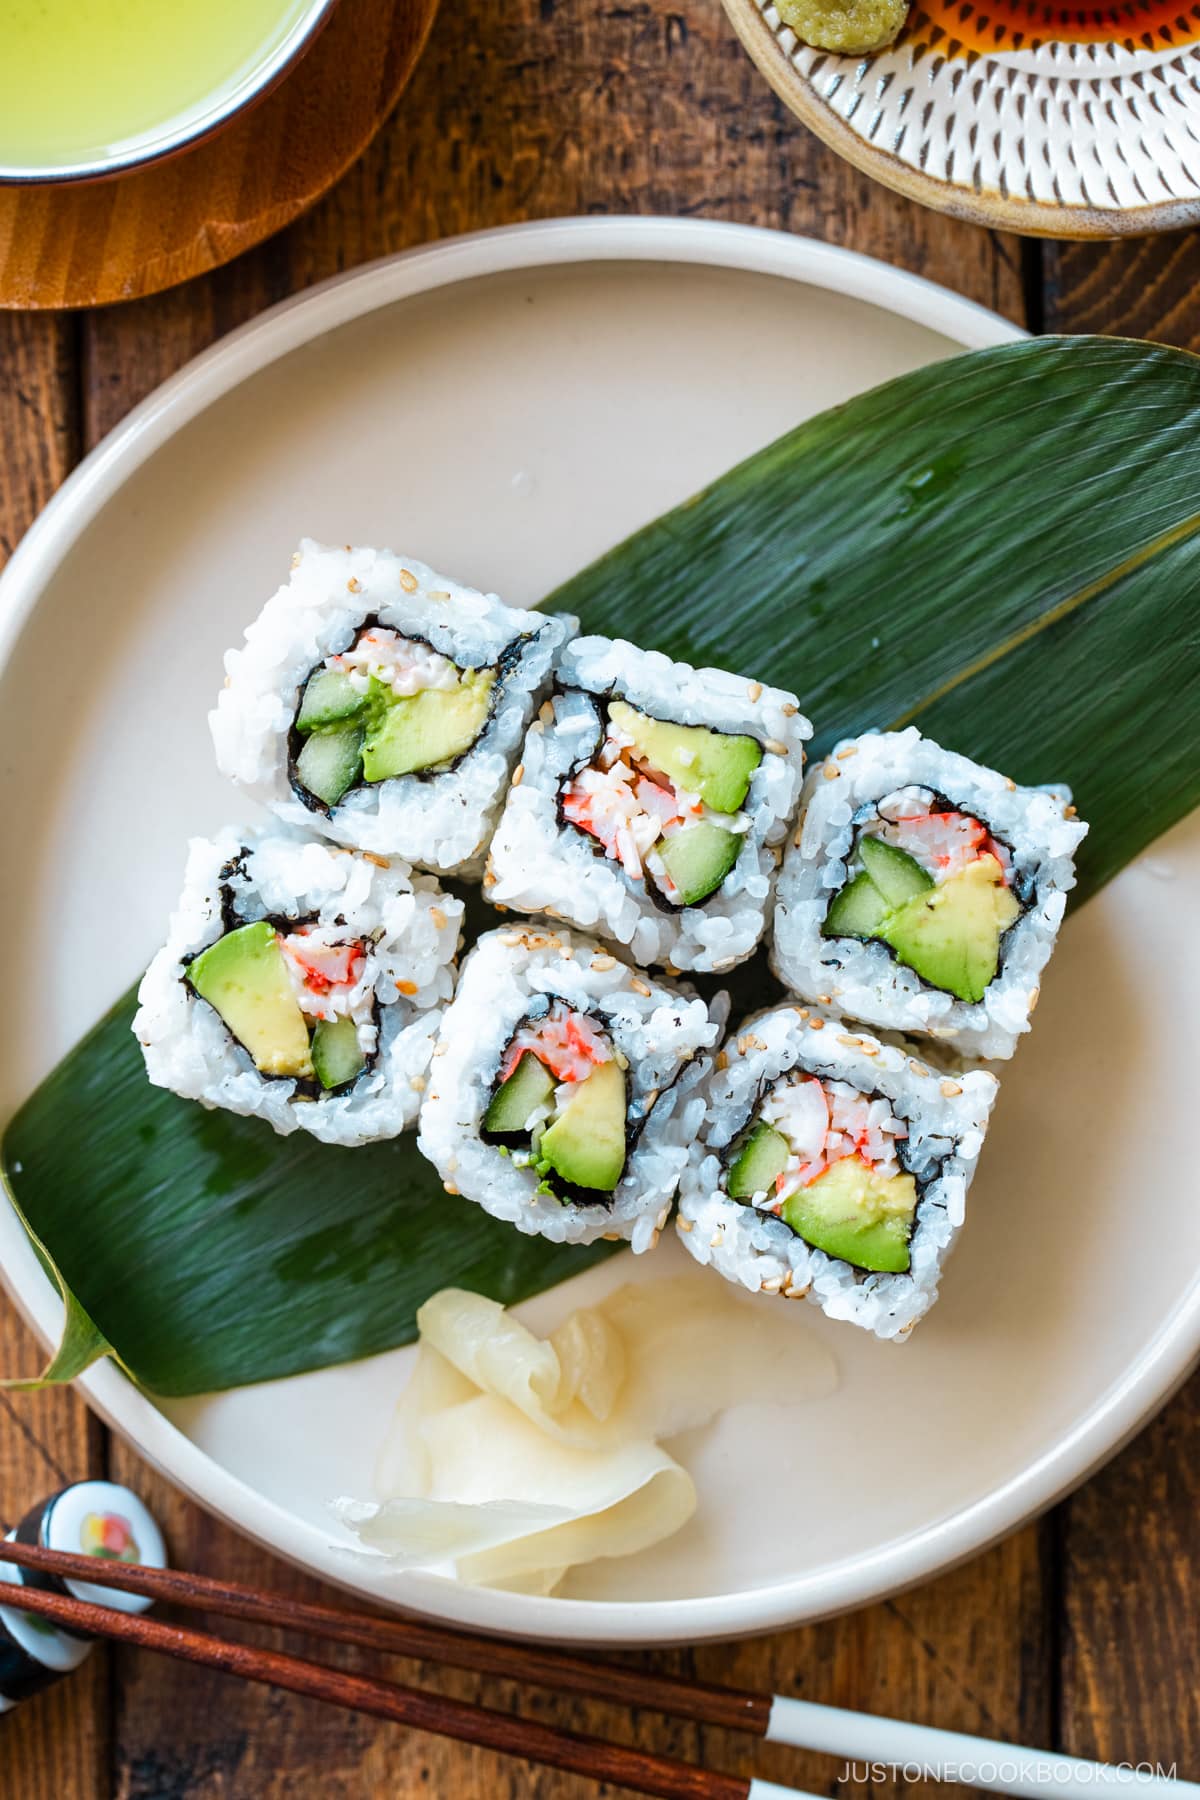
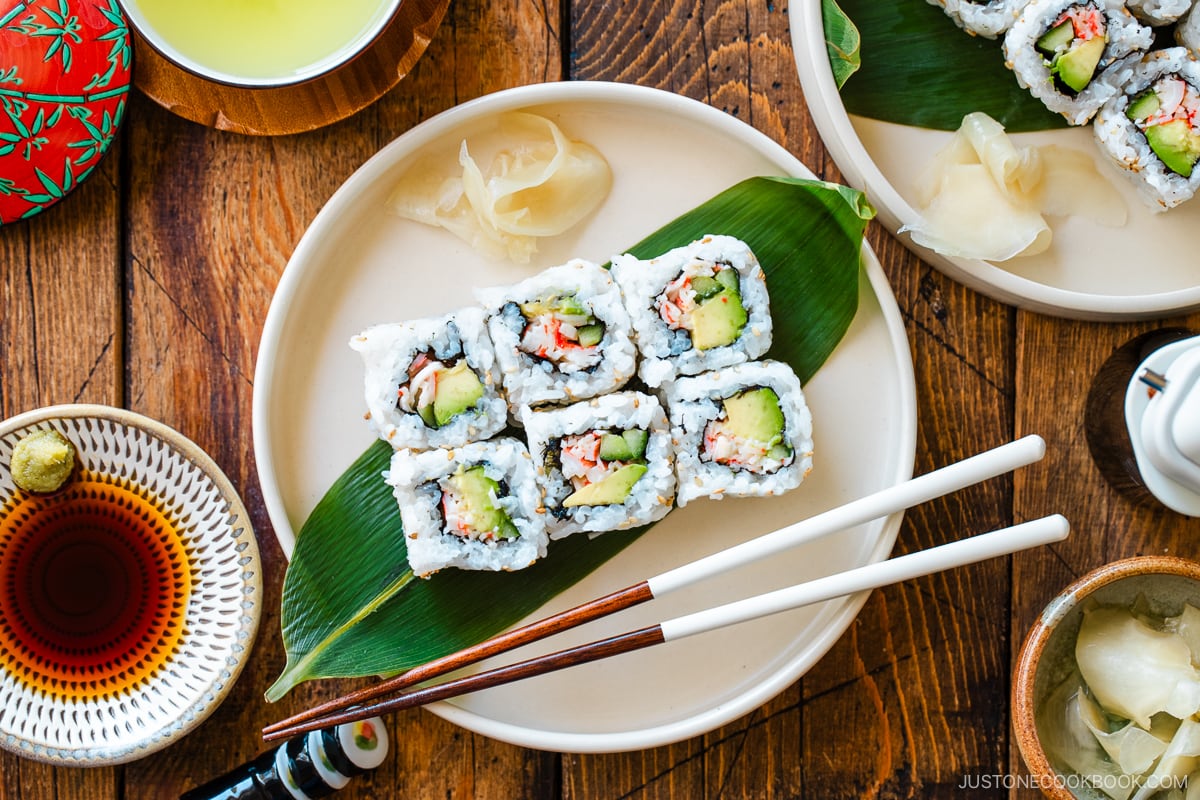
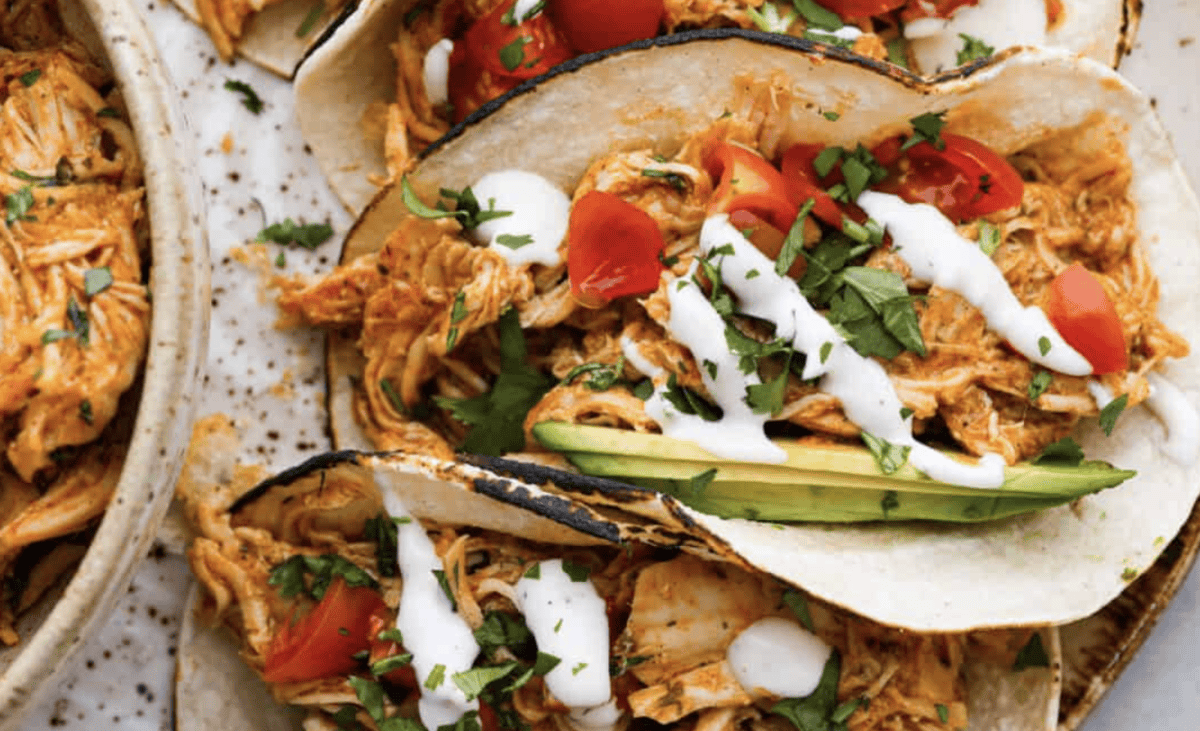
Filled with creamy avocado, sweet crabmeat, and crunchy cucumber, the California Roll is by far the most popular style of rolled sushi in the US. Learn how to make delicious, perfect rolls every time at home by following my step-by-step guide and photos.
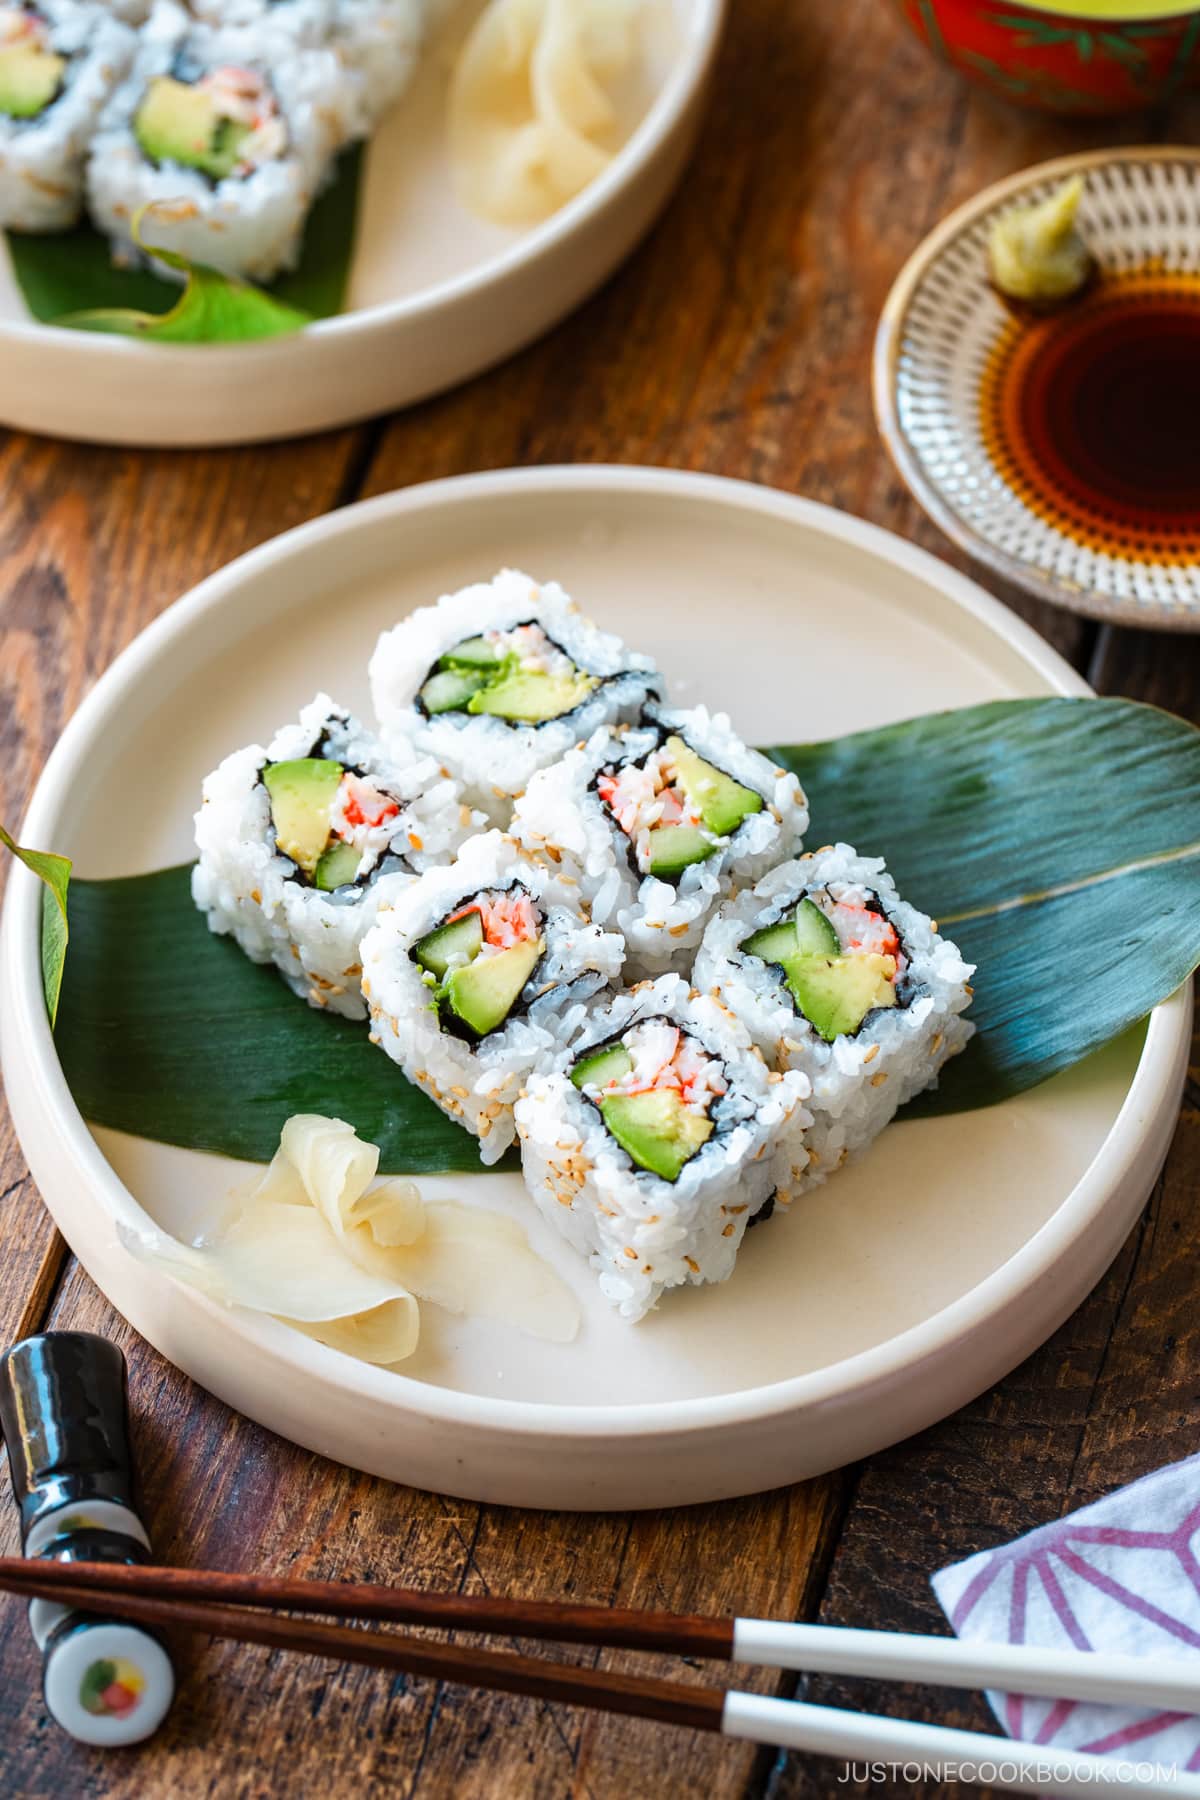
What was the first sushi roll that you tried at a Japanese restaurant? For many of you, it might be California Roll (カリフォルニアロール), as it is probably by far the most popular style of sushi in the U.S. Today, I’ll show you how easy it is to make California rolls at home.
What is a California Roll?
California roll is a type of sushi roll (makizushi 巻き寿司 or rolled sushi in Japanese) made with seasoned sushi rice, crabmeat (real or imitation), avocado, and cucumber.
It is an “inside-out” roll, known as uramaki (裏巻き), where the fillings and nori (dried roasted seaweed sheet) are rolled inside the sushi rice.
Who invented the California Roll?
Did you know many creatively named sushi rolls, such as the California Roll and Dragon Roll, do not originate from Japan?
There are a few chefs who have been cited as the creators of the California Roll, but the facts remain unclear. Every account of the original California Roll is slightly different, and the sushi’s description also varies greatly from what we see today.
The more recent and well-known story comes from Japanese-born sushi chef Hidekazu Tojo, a resident of Vancouver, who claims he created the California Roll at his restaurant in the late 1970s. He learned that most Western people didn’t eat raw fish and were not fans of nori seaweed. So, he substituted avocado for toro (fatty tuna) because it has a similar creamy texture. He hid the nori seaweed using the uramaki technique, ensuring that the nori was not visible outside.
Why do they call it a California Roll?
The sushi is called the “California Roll” because it consists of crab and avocado. The initials for these ingredients together are CA, which happens to be the abbreviation for the state of California. Thanks to this utterly random and uncanny coincidence, Chef Tojo decided to go with the name California Roll.
That’s how the California roll turned into a popular menu item!
In recent years, even fast-food-style sushi restaurants have started serving the California Roll on their menus. This tells the story of a successful adaptation and re-imagination of food.
What’s the difference between a Japanese sushi roll and a California roll?
You’ll find two main differences between a traditional Japanese sushi roll and a California roll:
- Presentation: In traditional Japanese-style sushi rolls, the fillings are wrapped in the center, surrounded by seasoned sushi rice and the nori sheet as the outer layer. On the contrary, the California roll wraps the fillings and the nori inside, with the rice as the outer layer.
- Ingredients: While avocado is a popular filling for Western-style sushi like California rolls, it is not typically used in traditional Japanese sushi rolls.
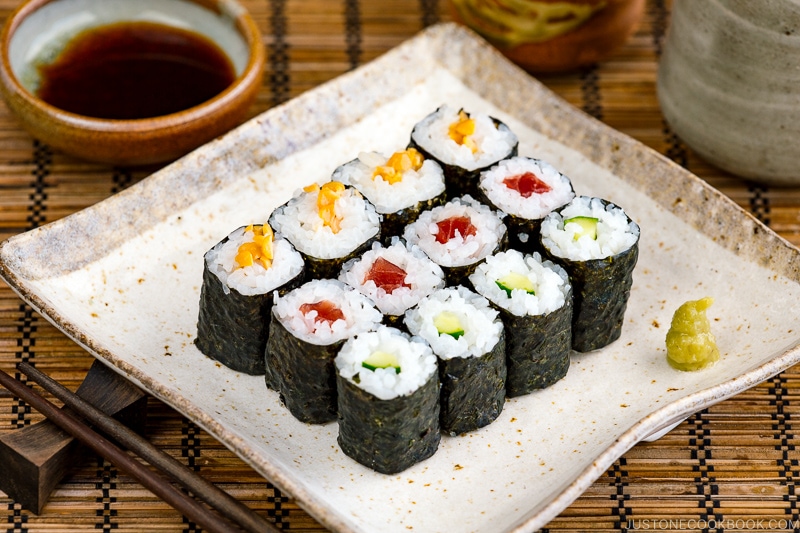
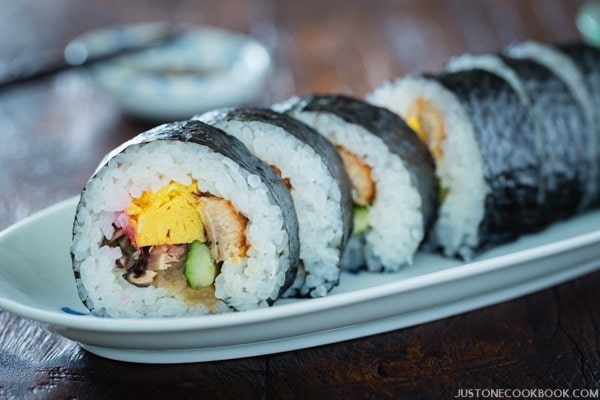
The most common styles of sushi rolls (makizushi) in Japan are Hosomaki (thin sushi roll) and Futomaki (big sushi roll), which feature various kinds of ingredients. As you can see, it’s quite different from the sushi roll menus in the United States!
Ingredients for California Roll
Unlike nigiri sushi or other sushi rolls, California rolls do not include raw fish. That means you can easily source the ingredients to make this sushi roll at home! Here are the key ingredients you need:
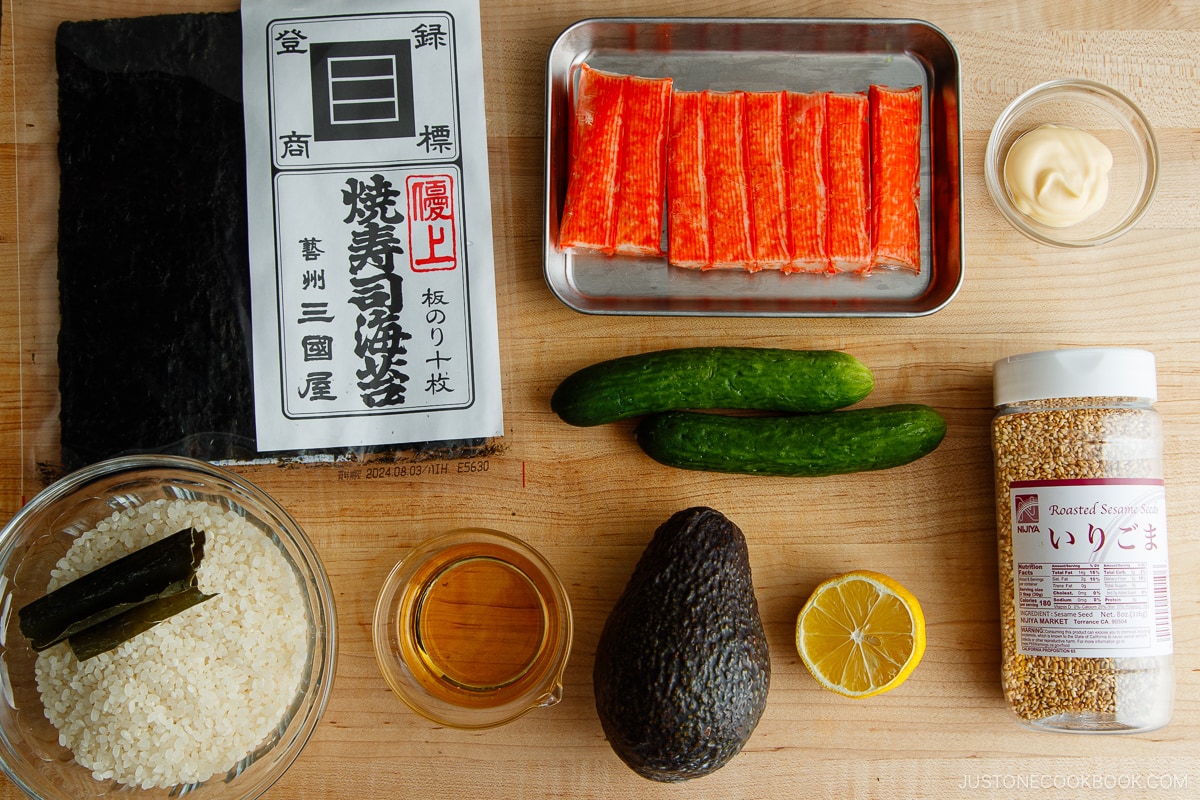
- Seasoned sushi rice: Quality Japanese short-grain sushi rice is what you need to make the best sushi rice. I recommend koshihikari rice, such as Tamanishiki Super Premium Short Grain Rice and Tamaki Gold, but you can choose the more affordable options, such as Kokuho Rose and Nishiki.
- Nori (toasted seaweed): High-quality nori has a delicate umami taste and does not taste fishy. I noticed that most grocery stores carry inexpensive nori, which becomes gummy when wrapped around the rice. If possible, I recommend getting the nori that’s imported from Japan. From my experience, it is far better than the ones available in English packaging.
- Avocado: Use only ripe, ready-to-eat avocados so your sushi roll tastes fresh, smooth, and creamy.
- Crab meat: You can use fresh, canned, or imitation. Unfortunately, I’m allergic to fresh crab meat, so I use imitation crab meat. Japanese crab-flavored surimi (I use the Kibun brand) has a great texture and flavor.
- Japanese cucumbers: For sushi making, use thin and long Japanese cucumbers with fewer seeds instead of regular American cucumbers. If you can’t find Japanese cucumbers, Persian or English cucumbers (with the seeds removed) are acceptable alternatives.
- Japanese mayonnaise: Japanese mayonnaise (known as Kewpie mayo) is creamier and tangier than regular American mayo. It is a key flavor, so do your best to find it (you can purchase it on Amazon). Please note that the Japanese packaged Kewpie tastes differently from American packaged Kewpie. Alternatively, you can make your own by following my homemade Japanese mayo recipe.
- Sesame seeds: If you have a few extra minutes, toast the sesame seeds in a non-greased frying pan until one or two seeds pop. This adds a wonderful nutty flavor and aroma.
Serve your California roll with Japanese soy sauce, wasabi, and pickled sushi ginger on the side.
- Bamboo sushi mat (makisu 巻き簾) – The Japanese sushi mat has flat and round sides.
- Plastic food wrap – To make inside-out rolls, we must cover the sushi mat with plastic wrap so the rice doesn’t stick.
- Sushi oke – You need to prepare sushi rice in it. You can use a large mixing bowl or salad bowl.
- Rice paddle – It’s not only needed for fluffing the freshly cooked rice, but it’s also useful to spread the rice evenly on the nori sheet.
- Damp towel – Cover the prepared sushi rice so it doesn’t get dry. Then, use it to clean the knife while slicing the sushi rolls.
Enjoy making sushi at home? You can buy a convenient sushi making kit of sushi oke, bamboo mat, and rice paddles.
How To Roll Sushi (Step-by-Step)
Put the sushi rice and filling:
 1
1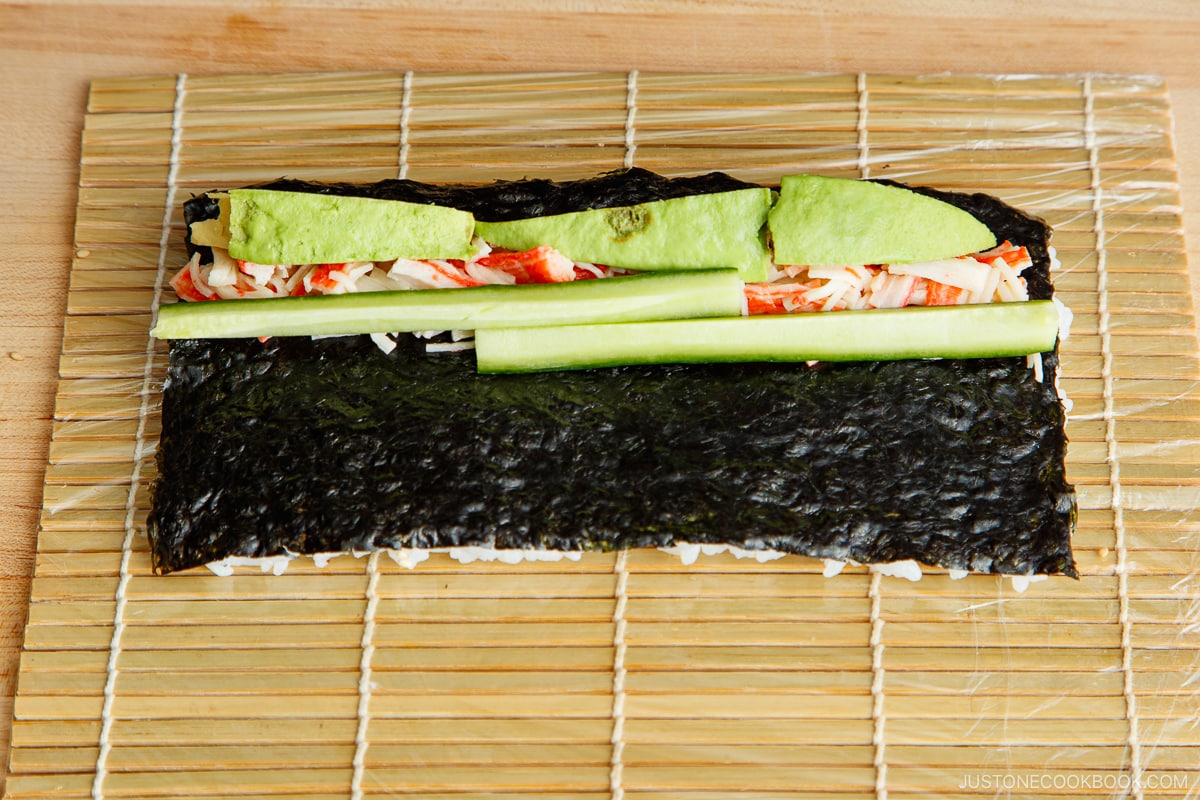 2
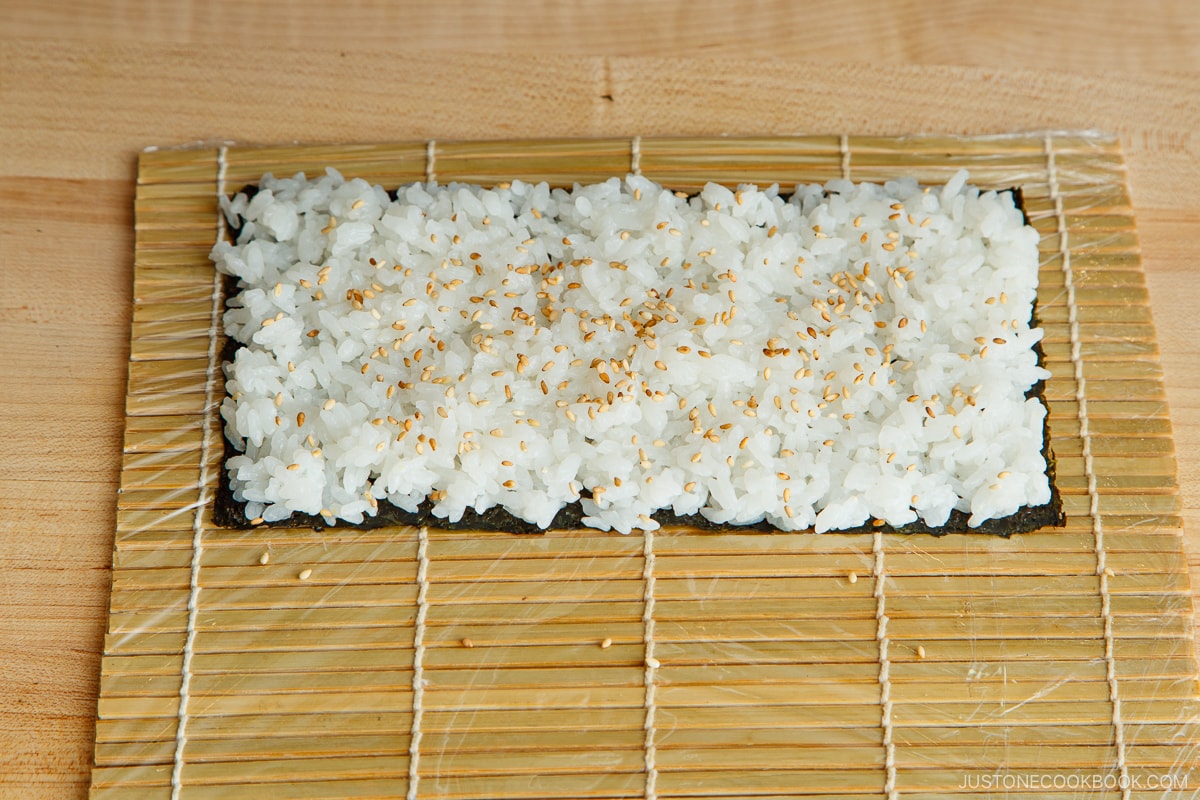
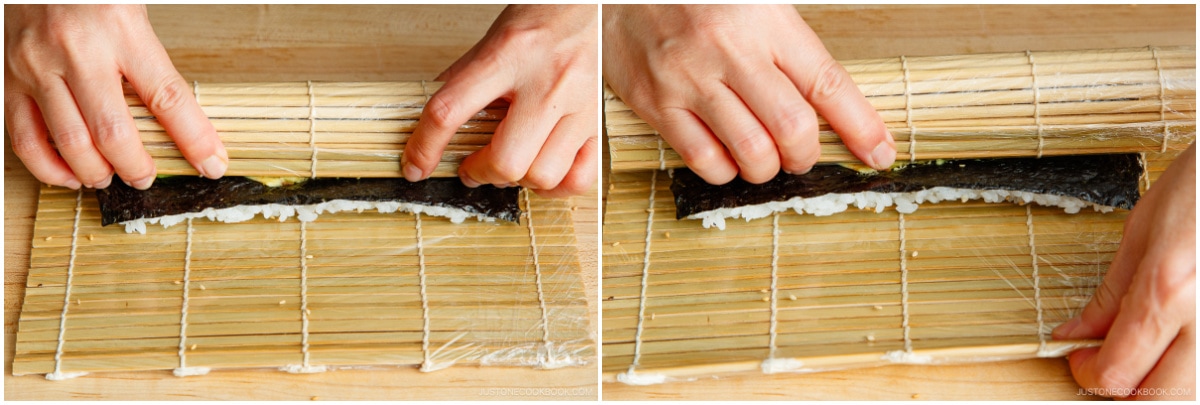
2- Lay a nori sheet, shiny side down, on the bamboo sushi mat. Spread ¾ cup (110 g) of the rice evenly onto the nori sheet. Sprinkle the rice with toasted sesame seeds.
- Turn the nori sheet over so that the rice is facing down. Leave ½ inch (1.3 cm) at the bottom edge of the nori sheet. Place the crabmeat (loose ingredient first), avocado, and cucumber at the bottom of the nori sheet. Don’t add too much filling, or it will be extremely difficult to seal the roll.
Start rolling the sushi!
 3
3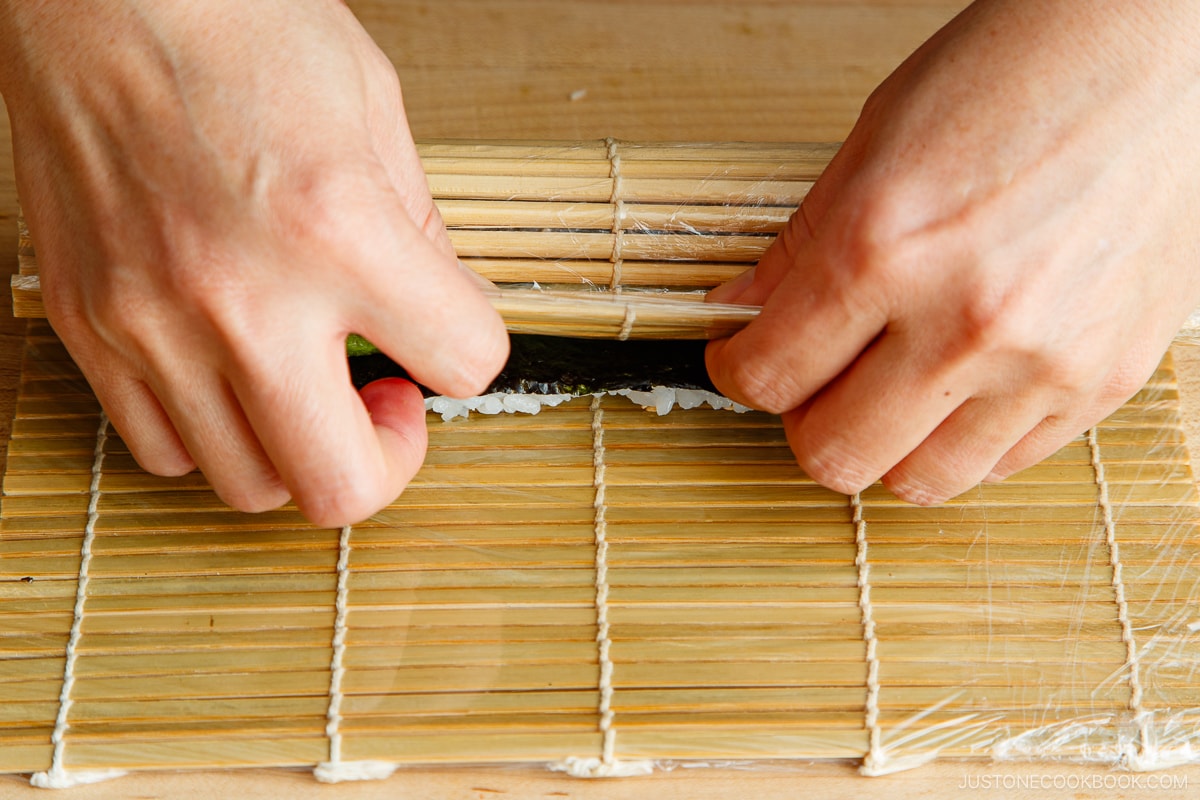 4
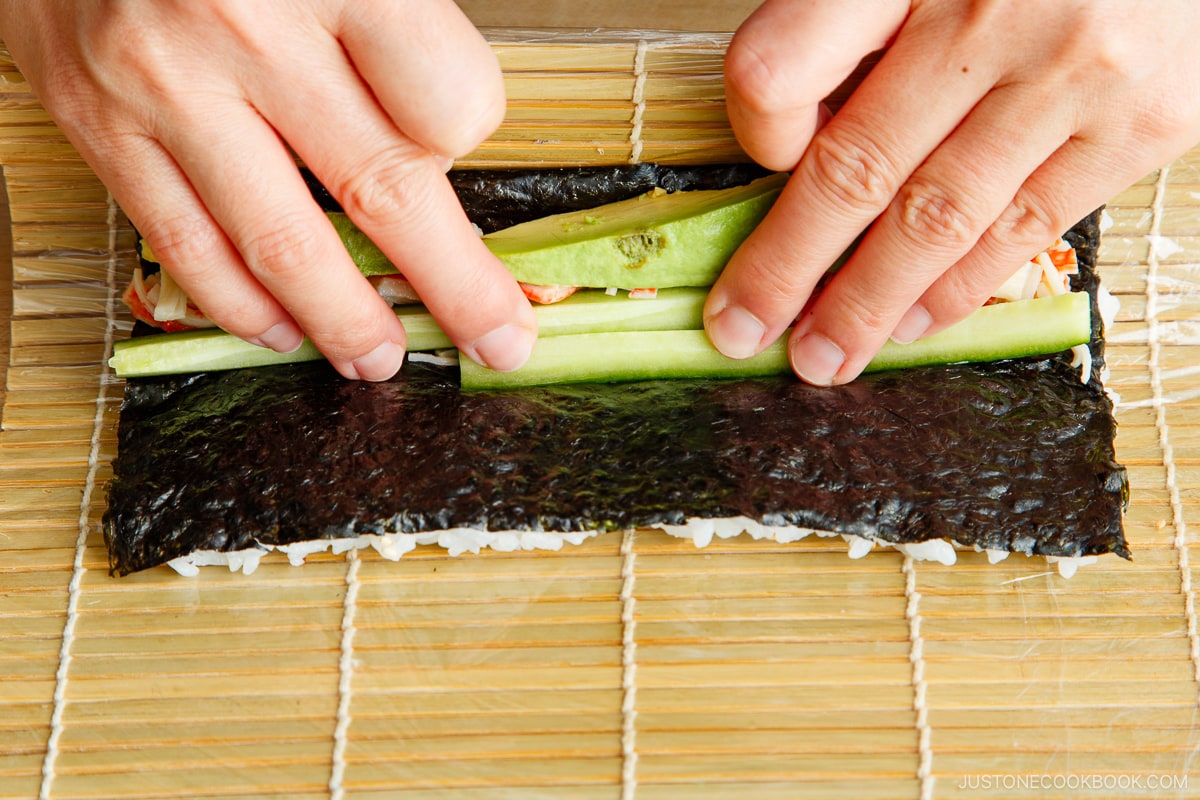
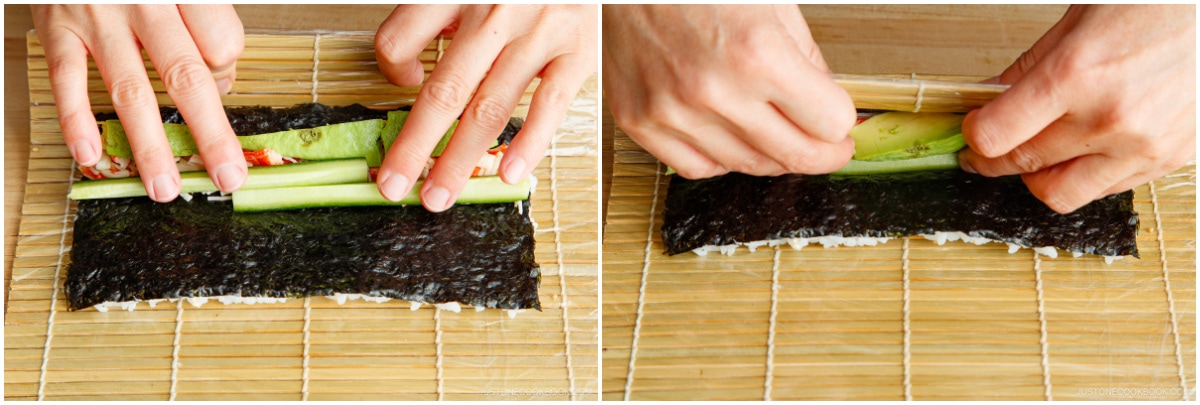
4- Grab the bottom edge of the mat with your index fingers and thumbs while holding the fillings in place with your other fingers.
- Roll the sushi mat over the filling until the rice on the bottom meets the nori near the top edge. Then flip back the bottom edge of the mat toward you.
 5
5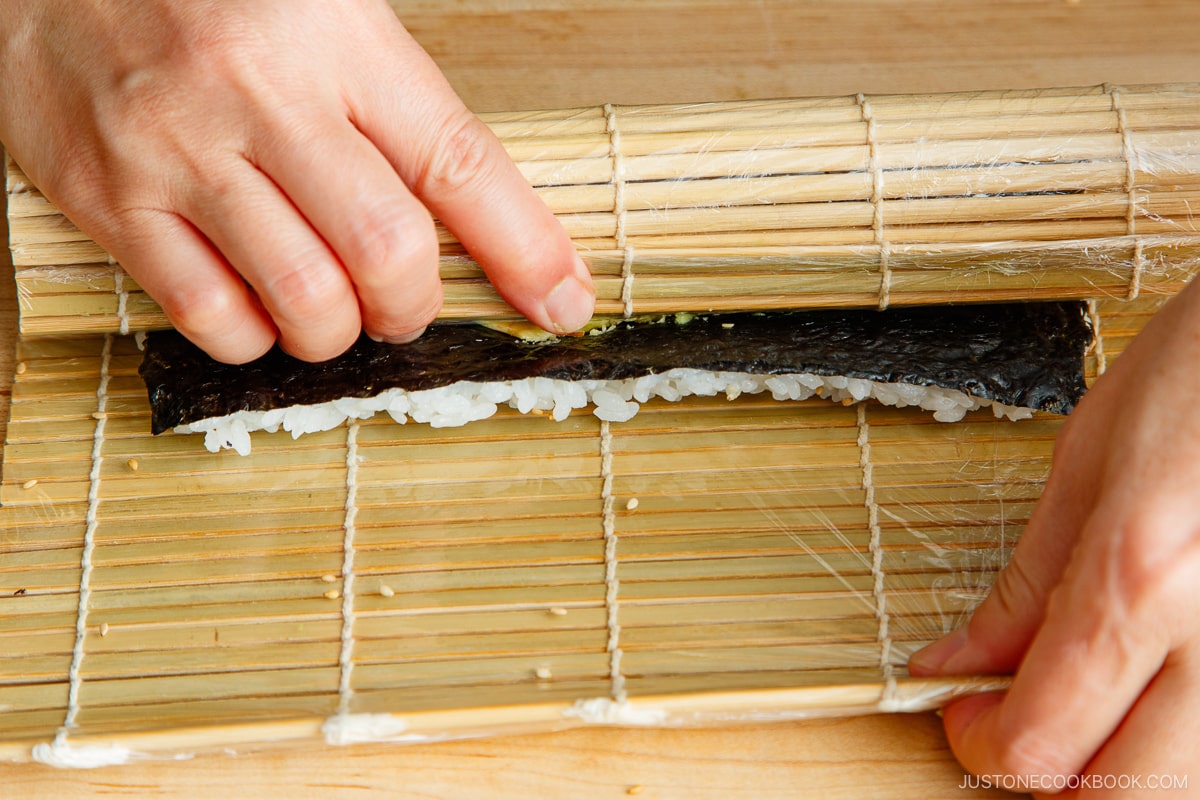 6
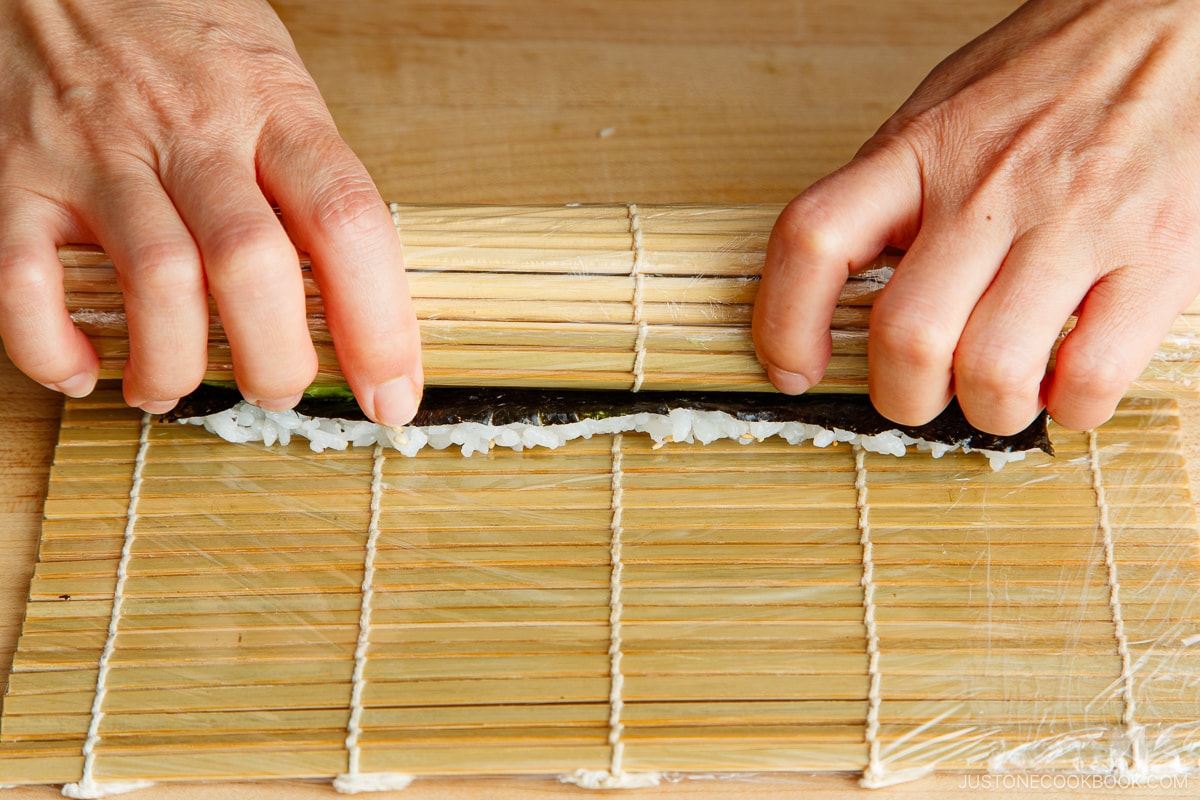
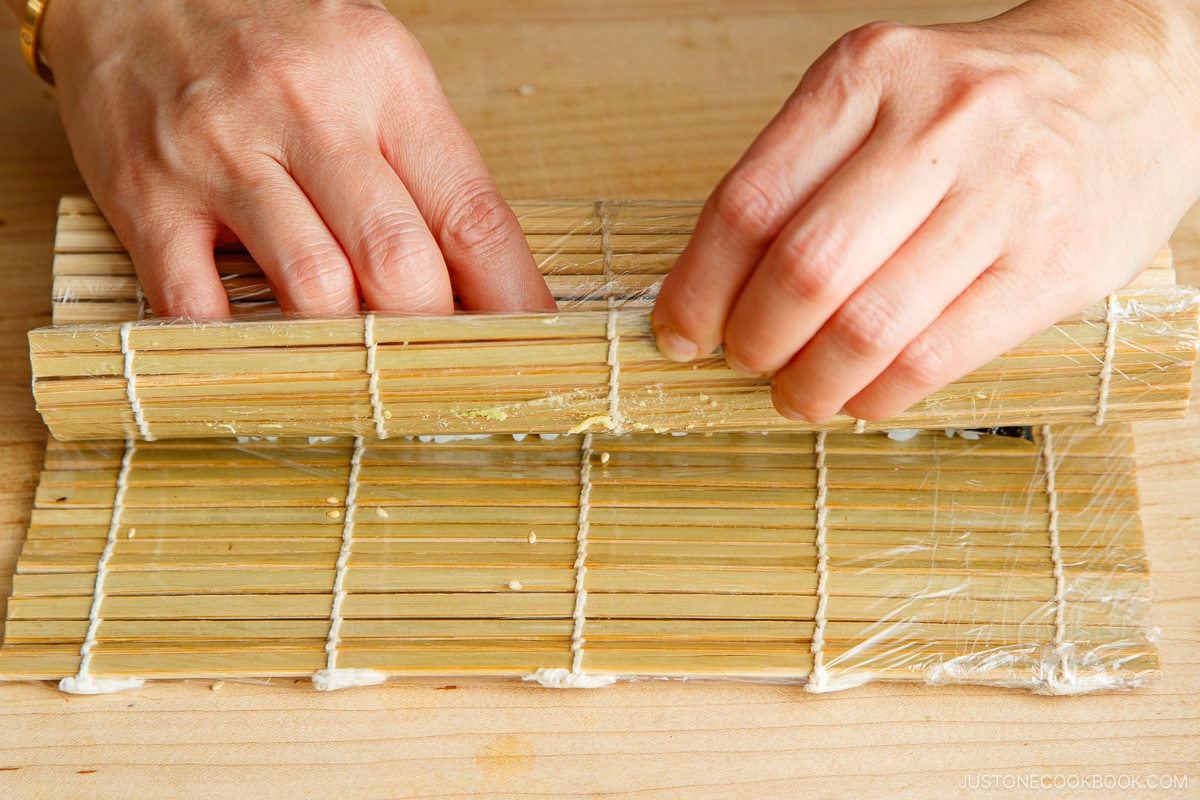
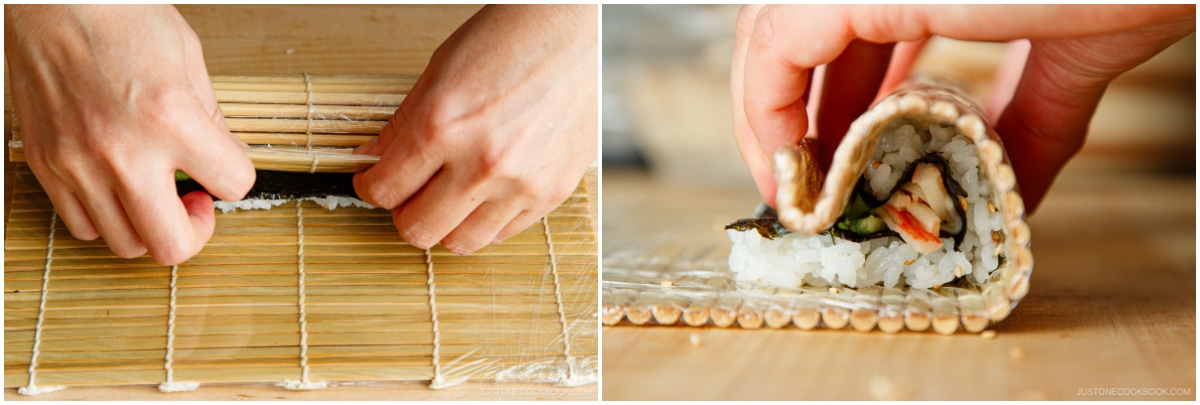
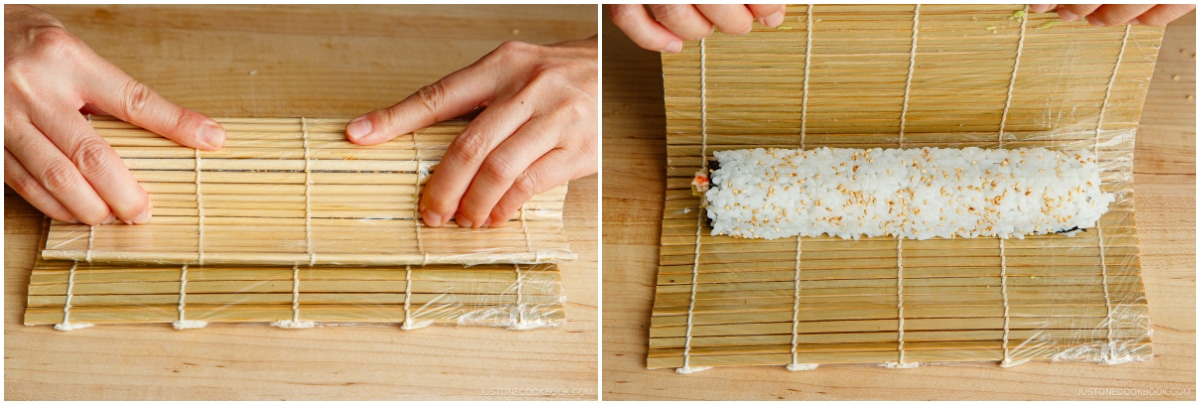
6- Firmly squeeze the sushi roll through the mat.
- Pull the top of the sushi mat to shape it into a tight cylinder.
 7
7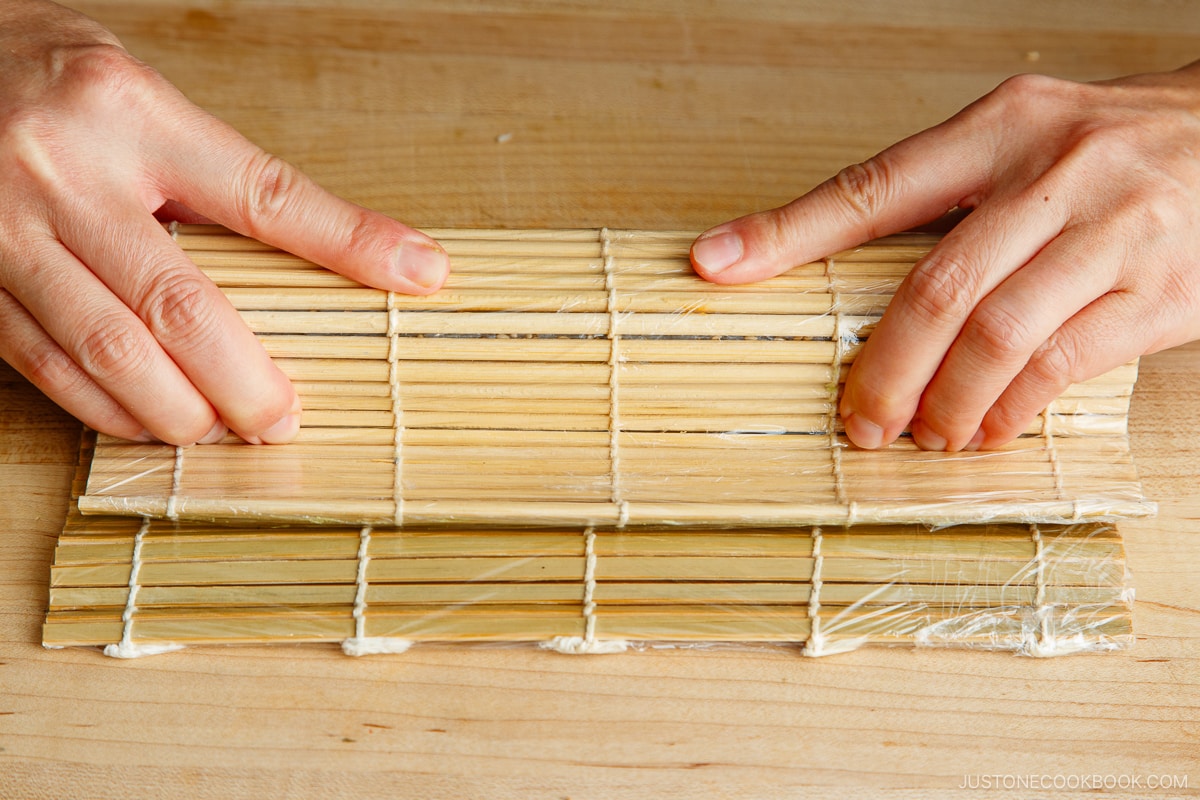 8
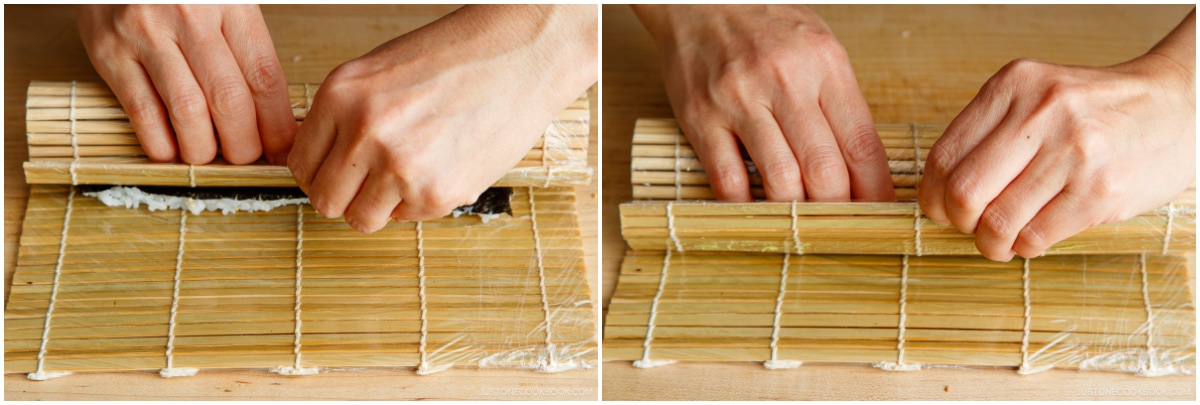
8- Lift the bottom edge of the bamboo mat slightly and roll the sushi forward while keeping gentle pressure on the mat.
- To shape the roll, press the top with your index fingers while squeezing the sides with your thumbs and other fingers.
- Transfer to a plate or tray and cover with a damp cloth at all times to prevent drying. Continue making the rest of the rolls.
Check out my recipe card below for detailed instructions on how to assemble a sushi roll.
Tips for Making California Rolls
Many people feel intimidated by the sushi rolling process, but you can relax and take it one step at a time by following my recipe and tips. Here are important tips to remember:
- Evenly distribute the sushi rice. The sushi roll will become lopsided if the rice and ingredients are not evenly spread out.
- Do not overstuff the sushi. It may seem basic, but you’d be surprised how easily we overstuff the sushi, making it difficult to seal the rolls. Start with a small amount of filling and gradually increase to an amount that you can easily roll.
- Roll the sushi compactly. If loosely rolled, the sushi roll may fall apart. Pull the bamboo mat in opposite directions and use tension to tighten the roll.
- Having a hard time rolling sushi? You can always make “regular” sushi rolls (forget “inside-out” sushi rolls) or use a 3/4–1 nori sheet instead of a half sheet. It’s much easier to handle!
Even though I make regular sushi rolls once in while, I find uramaki or inside-out rolls hard to make, and I think you can see my struggle a little in the pictures. Don’t worry, even though they don’t look like California rolls sushi chef make, they are equally delicious!
California Roll Variations
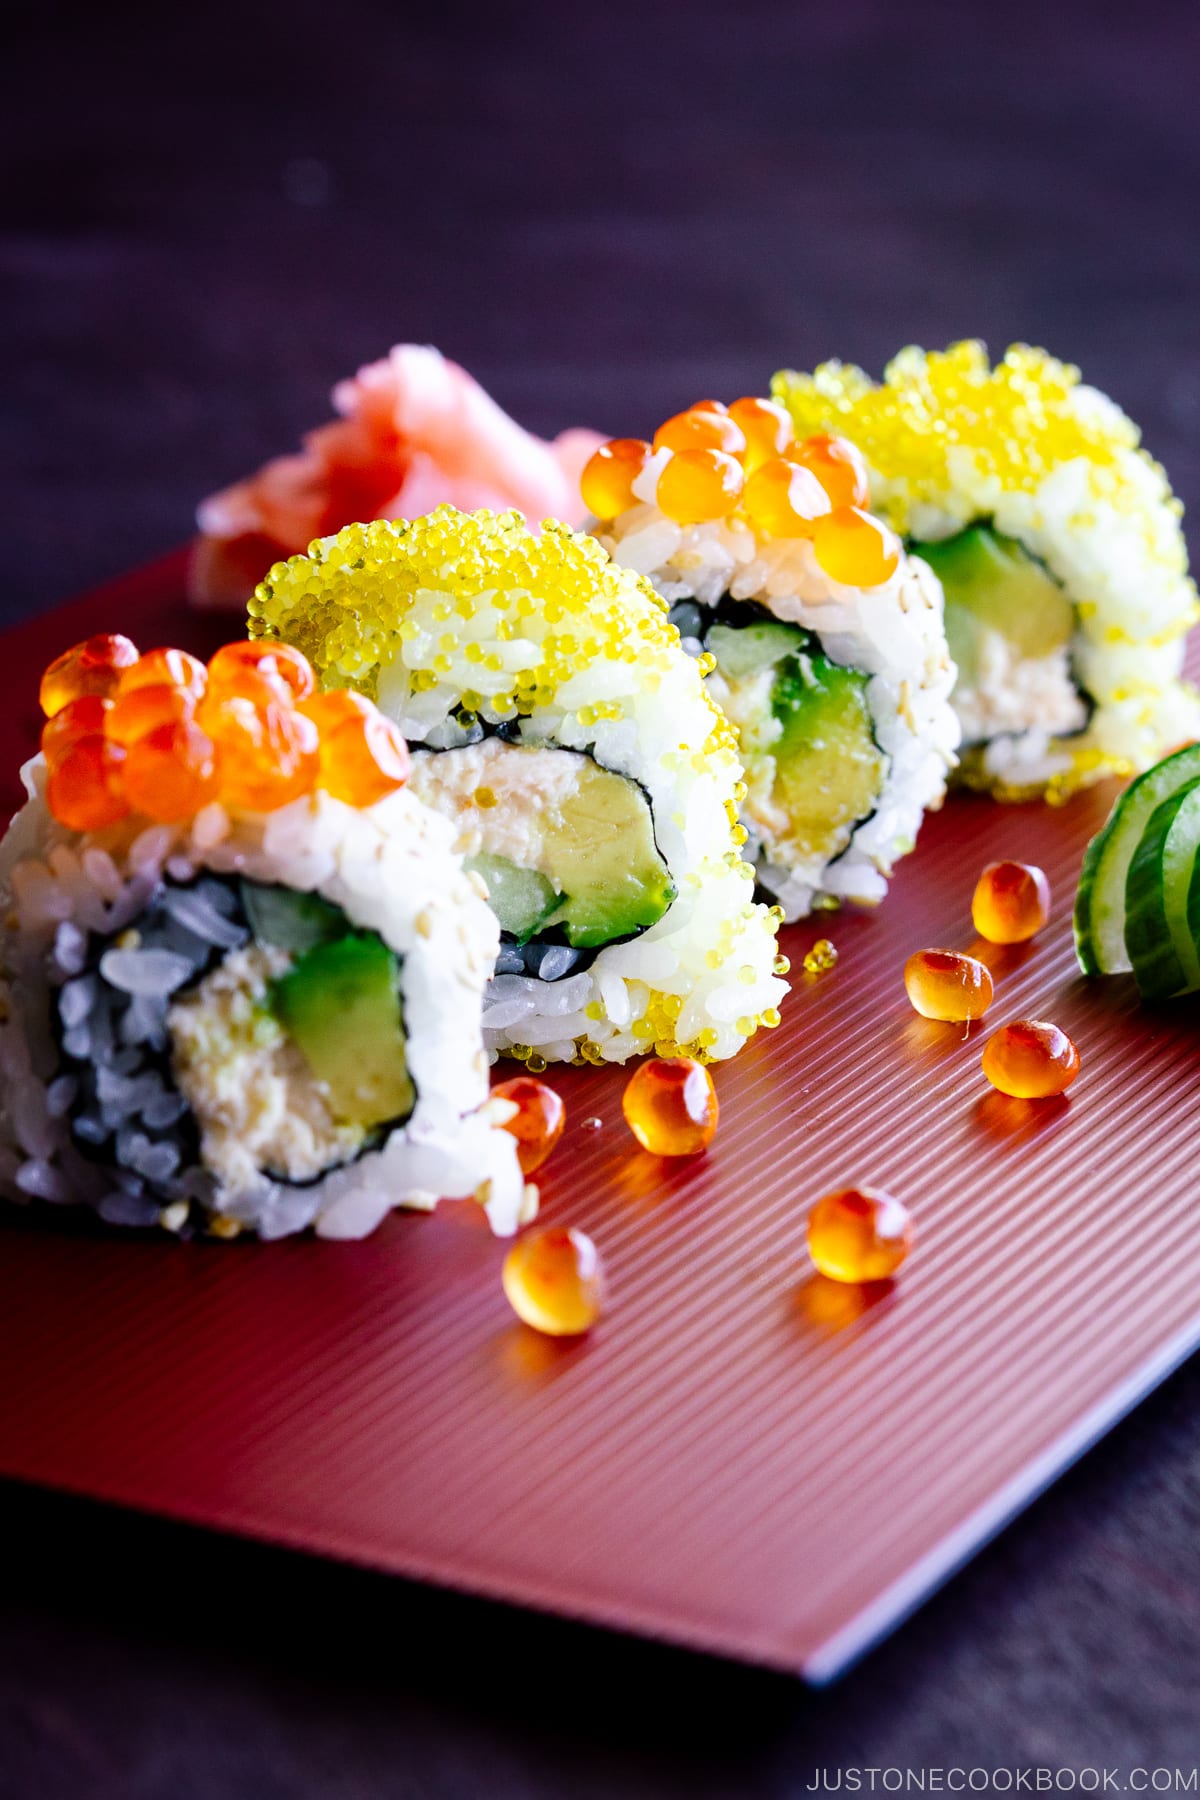
I love my California Roll to be more colorful. As you can see in the pictures, I placed ikura (salmon roe) on individual pieces of California Rolls after slicing. You can spread tobiko (fish roe) instead of sesame seeds. I used yuzu-flavored tobiko, so it’s yellow-colored tobiko instead of standard orange-colored tobiko.
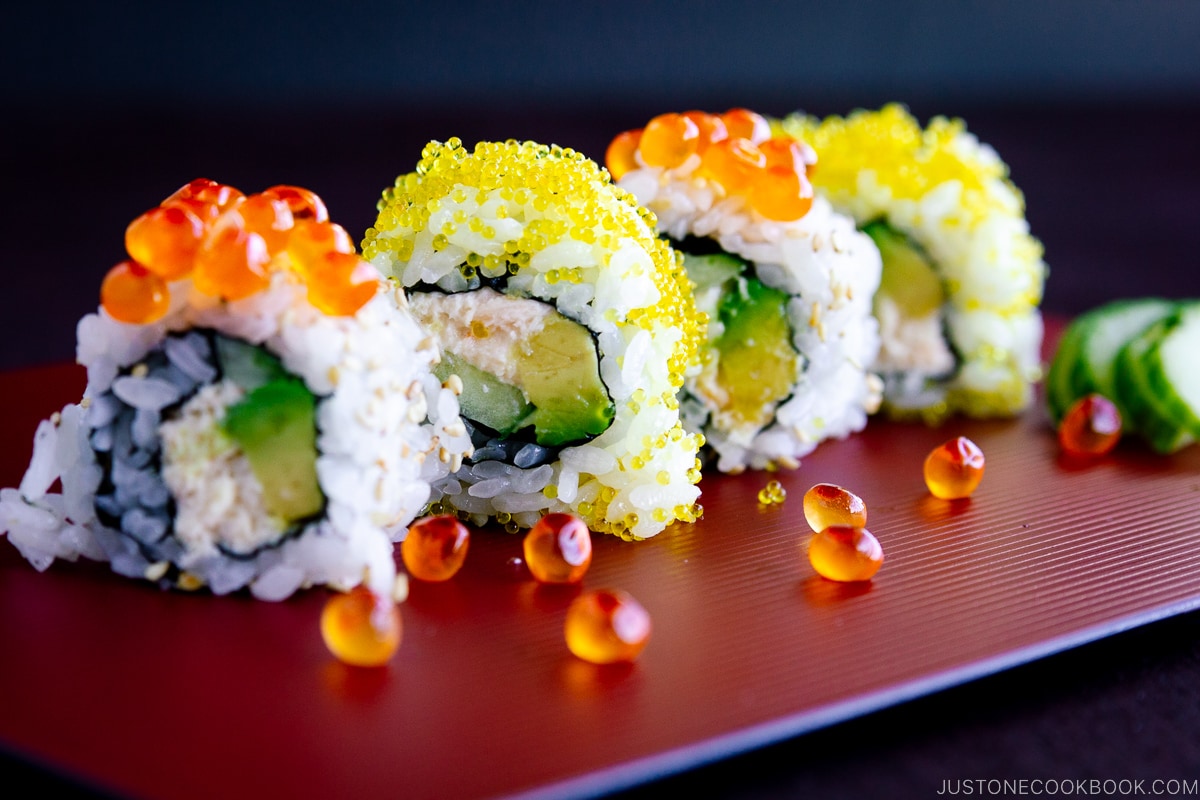
Since I use fish eggs (ikura/tobiko/masago) to decorate the sushi rice, I add toasted sesame seeds to the crab meat mixture. I love that these California Rolls look more lively than the standard style.
More Popular Sushi Recipes
I hope you enjoy making California rolls as they make a great appetizer or finger food for parties and potlucks! Here, I’d like to share other popular sushi recipes on Just One Cookbook.

- Mosaic Sushi
- Temaki Sushi (Hand Roll Sushi)
- Inari Sushi
- Dragon Roll
- Sushi Rolls
- Ultimate Sushi Guide: Sushi Types, Recipes, and Etiquette
Wish to learn more about Japanese cooking? Sign up for our free newsletter to receive cooking tips & recipe updates! And stay in touch with me on Facebook, Pinterest, YouTube, and Instagram.

California Roll
Filled with creamy avocado, sweet crabmeat, and crunchy cucumber, California Roll is by far the most popular style of rolled sushi in the US. Learn how to make delicious, perfect rolls every time at home following my step-by-step guide and photos.
Prep Time: 1 hour
Rice Cook Time: 1 hour
Total Time: 2 hours
Servings: 8 rolls (8 cut pieces per roll)
Japanese Ingredient Substitution: If you want substitutes for Japanese condiments and ingredients, click here.
Instructions
Gather all the ingredients. Each California Roll requires ¾ cup (110 g) of sushi rice, so you‘ll need about 6 cups (880 g) of sushi rice to make 8 rolls.

To Prepare the Sushi Rice
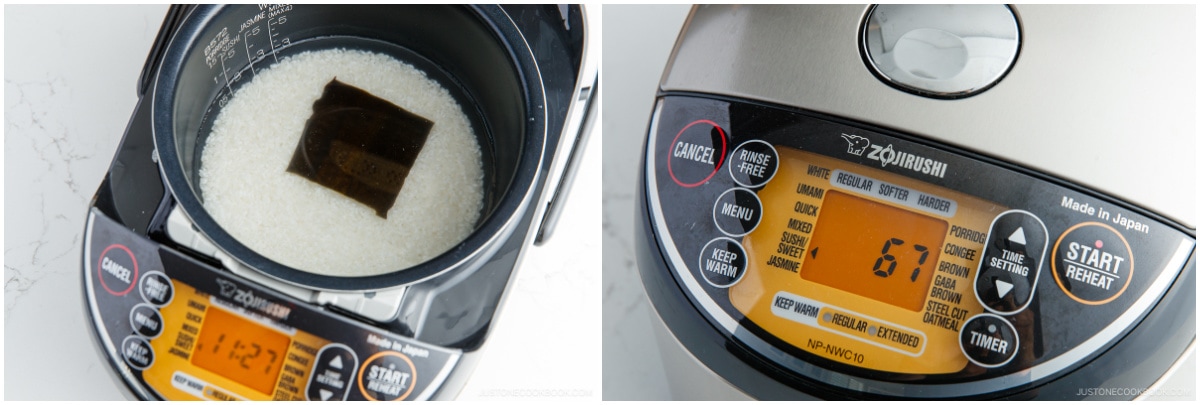
Wash and Rinse: Put 2¼ cups uncooked Japanese short-grain white rice in a large bowl. Add enough cold tap water to wet the rice, then drain. Use your fingers to gently agitate and “wash“ the wet rice grains in a circular motion for 10–15 seconds. Using very little water allows the grains to rub against each other. Next, add water to the bowl to rinse, then immediately pour off the cloudy water. Repeat this wash and rinse step two more times or until the water is almost clear. Then, drain the rice well in a fine-mesh sieve and shake off any excess water.

Soak and Cook: Transfer the well-drained rice to the inner pot of a rice cooker. Add 2¼ cups water to the pot. Level the rice, then place 1 piece kombu (dried kelp) on top. Let the rice soak in the water for 20–30 minutes. Then, start cooking. If you don‘t have a rice cooker, cook the rice in a pot on the stove, Instant Pot, or donabe with the measured water I specified in this recipe.

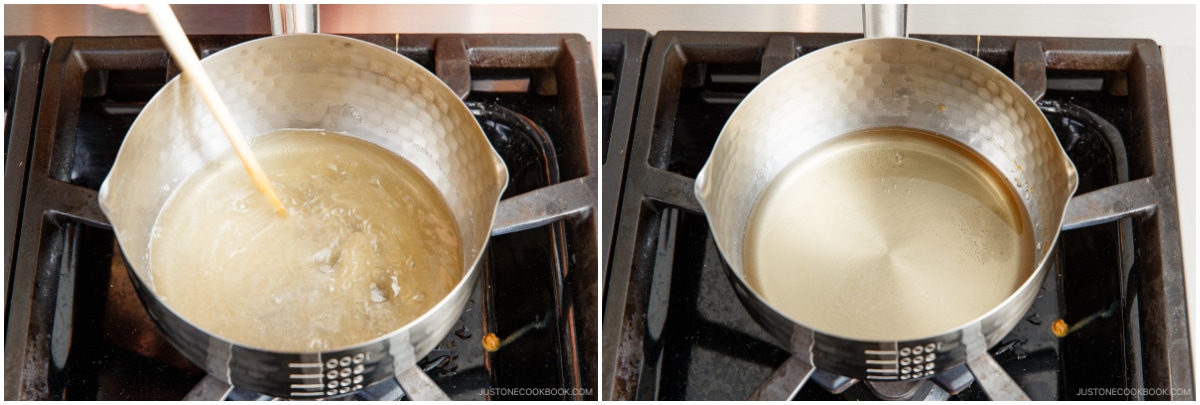
Homemade Sushi Vinegar (optional): Combine ⅓ cup rice vinegar (unseasoned), 3 Tbsp sugar, and 1½ tsp Diamond Crystal kosher salt in a small saucepan. Bring it to almost simmering over medium-high heat. Whisk until the sugar completely dissolves. You can also put the ingredients in a microwave-safe bowl and heat in the microwave for 1 minute, or until the sugar dissolves. Set aside to let it cool.
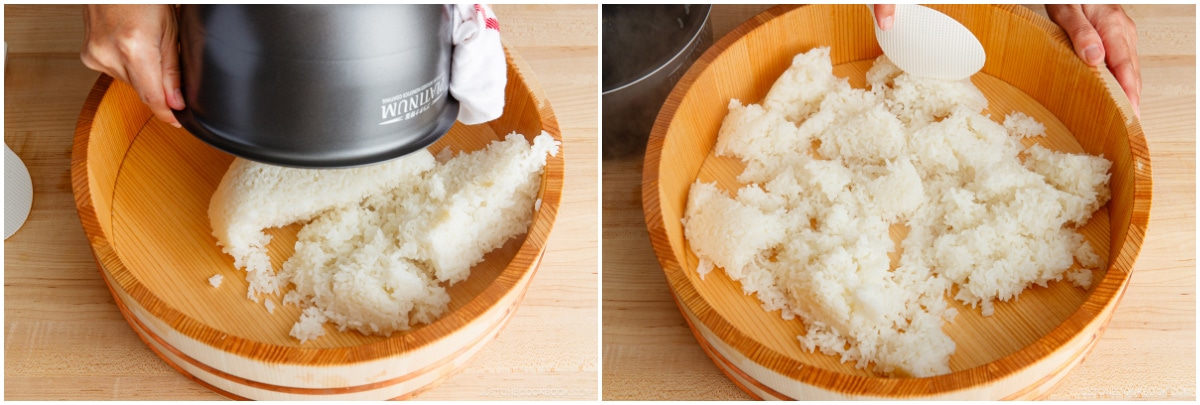
Season the Rice: When the rice is cooked, discard the used kombu (or repurpose it to make simmered kombu).
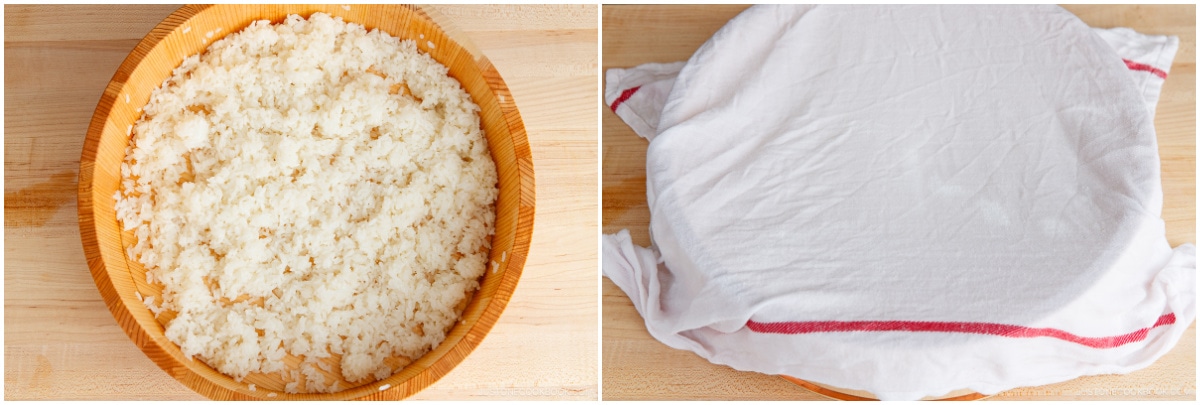
If using a sushi oke (hangiri), first moisten it with running water, drain well, and dry with a clean towel. Next, transfer the hot cooked rice to the sushi oke or a large salad bowl or baking sheet lined with parchment paper. Then, spread out the rice evenly so it will cool faster. Tip: A wooden tub helps absorb excess moisture while a ceramic bowl can‘t.
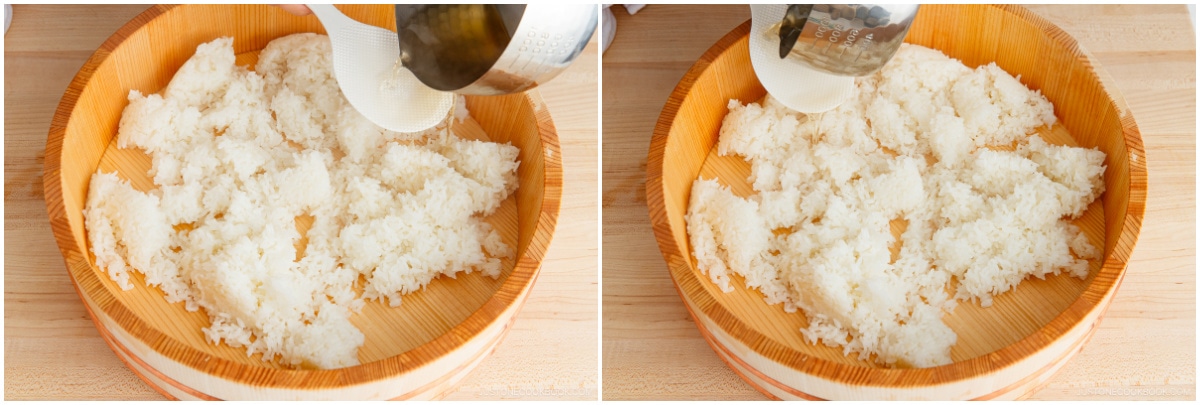
Immediately pour ⅓ cup seasoned rice vinegar (sushi vinegar) or the cooled homemade sushi vinegar over the hot rice.
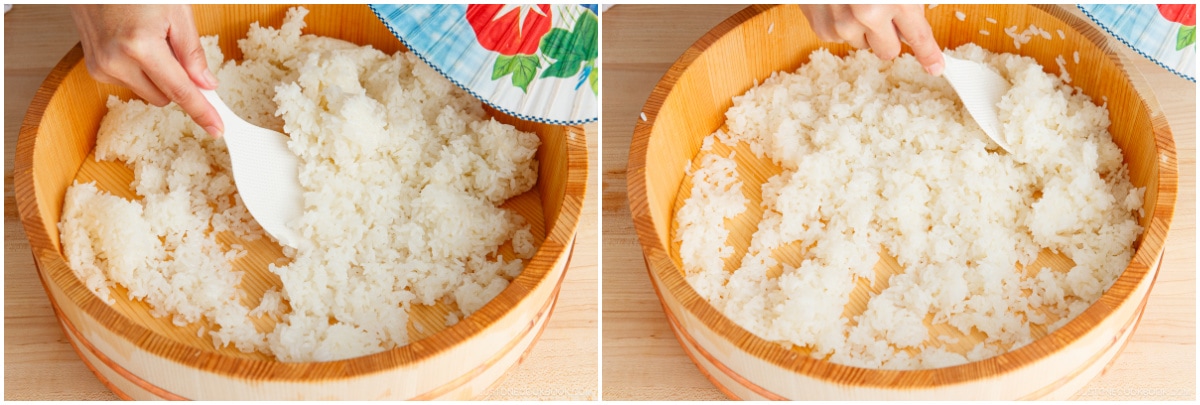
With a rice paddle, gently “slice” the hot rice at a 45-degree angle to incorporate the sushi vinegar and separate the rice chunks. Do not stir or mash the rice because that may break the grains and make the rice mushy. While slicing, vigorously fan the rice with a paddle fan or other fan to remove the excess moisture and make the rice shine.
Cover the prepared sushi rice with a damp cloth at all times to prevent it from drying.


To Prepare the Fillings
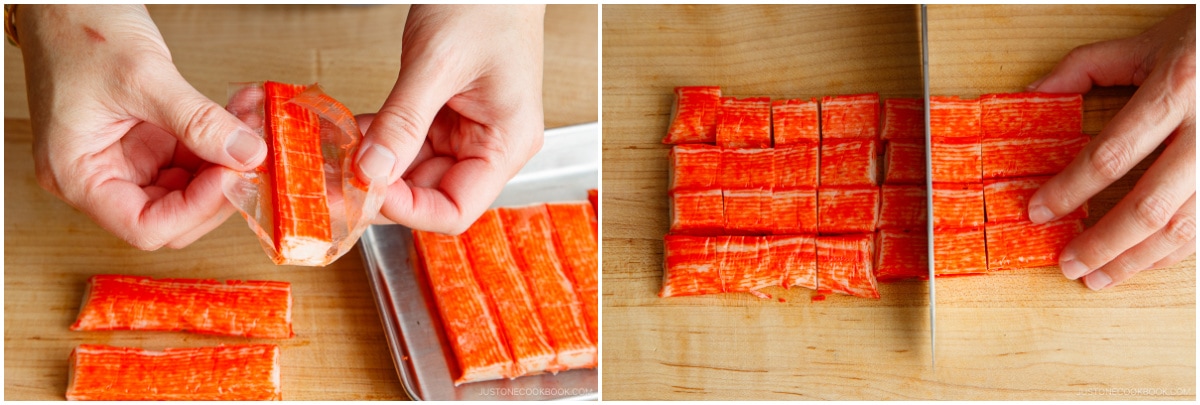
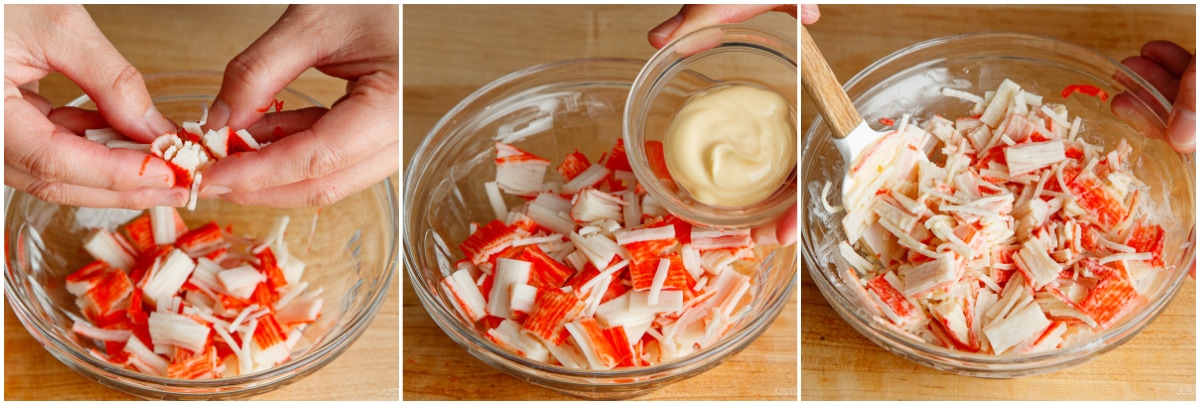
Crabmeat: Remove 5 oz real or imitation crabmeat from the packaging. Cut it into smaller pieces, about 1 inch (2.5 cm) wide.
Separate and shred the crabmeat with your fingers and place in a bowl. Add 1 Tbsp Japanese Kewpie mayonnaise and mix it all together.
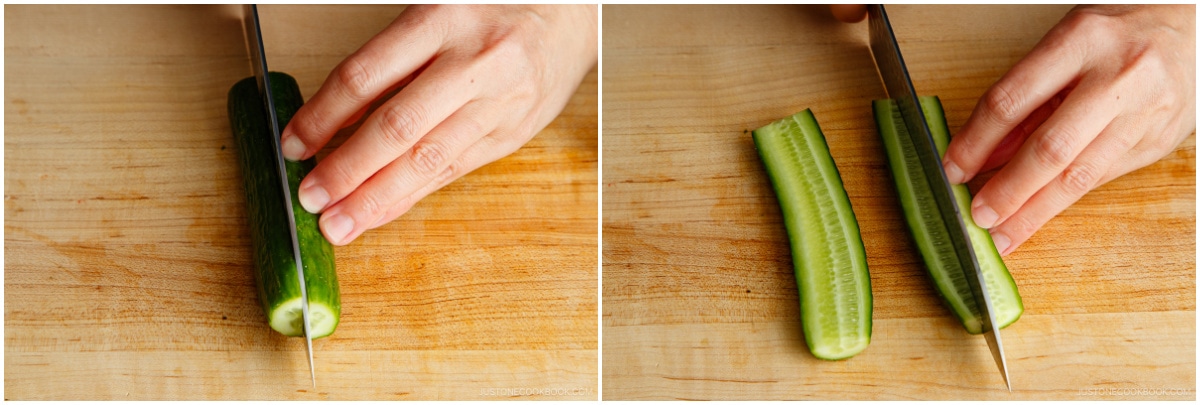
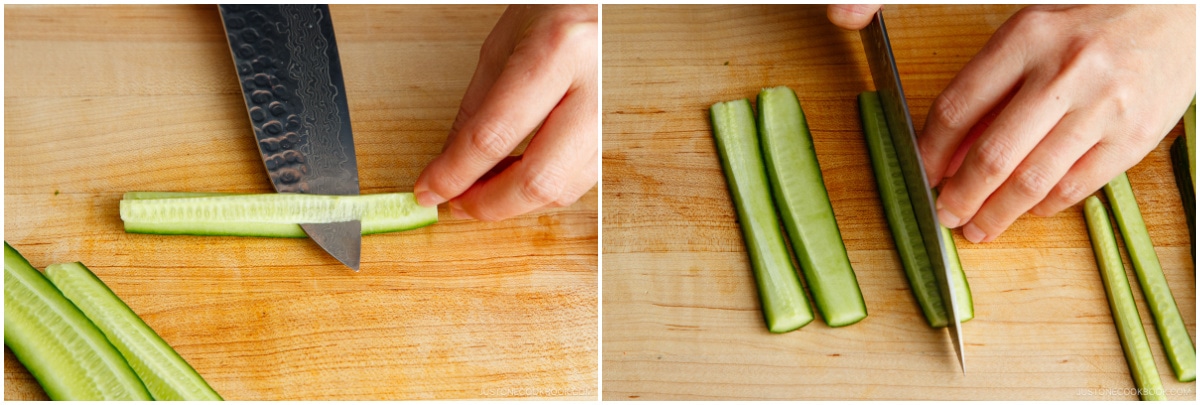
Cucumber: Cut 2 Japanese or Persian cucumbers into quarters lengthwise.
Remove and discard the seeds. Then, cut the cucumber lengthwise into thin, long strips.
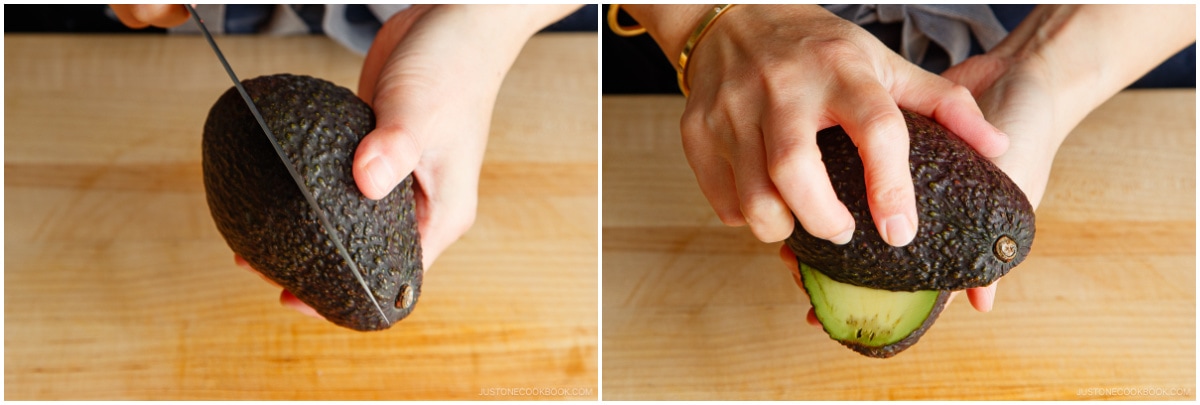
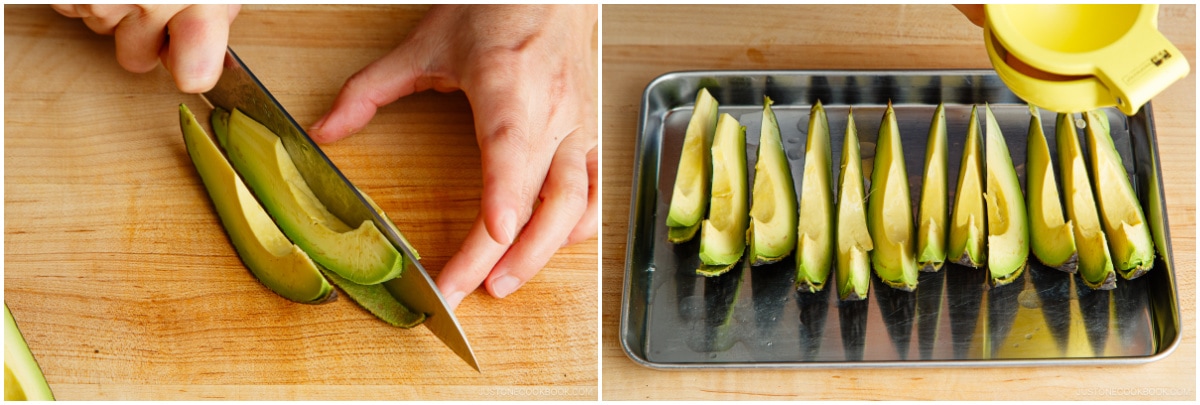
Avocado: Cut 1 avocado (large) in half lengthwise around the seed. To do this, insert the knife through the skin and flesh until it meets the pit. Holding the knife in place, rotate the avocado with your other hand so the knife slices all the way around the pit. Next, twist the two halves until they separate.
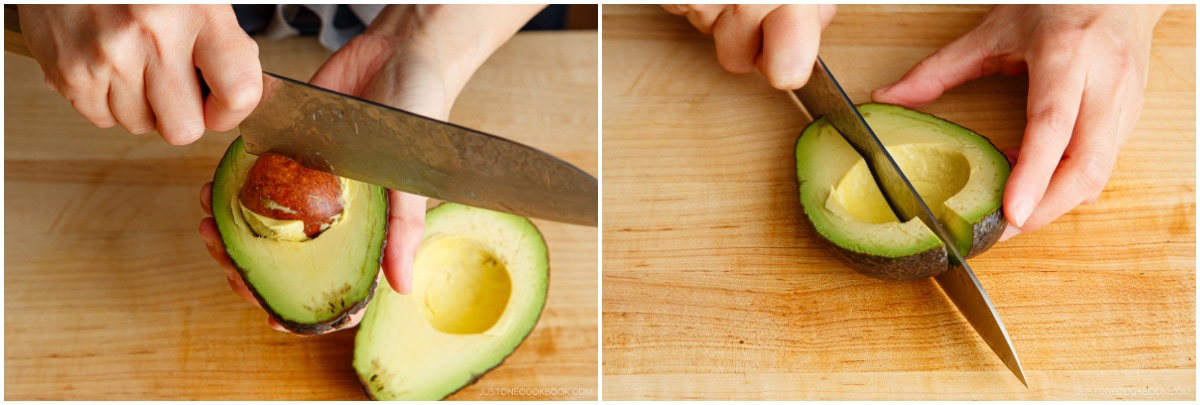
To remove the pit, set the avocado half on the cutting board or hold it in your non-dominant hand with a folded kitchen towel for safety. Gently hack into the pit with the heel of the knife to embed its edge. Then, twist the knife and pit in a counter direction to the avocado. The pit will come out smoothly. To make thin slices, first cut the avocado halves in half again lengthwise (leave the skin on, for now).
Then, carefully cut them lengthwise into thin, ¼-inch (6-mm) slices, again leaving the skin on. Squeeze the juice of ½ lemon over the cut avocados to prevent them from turning brown.
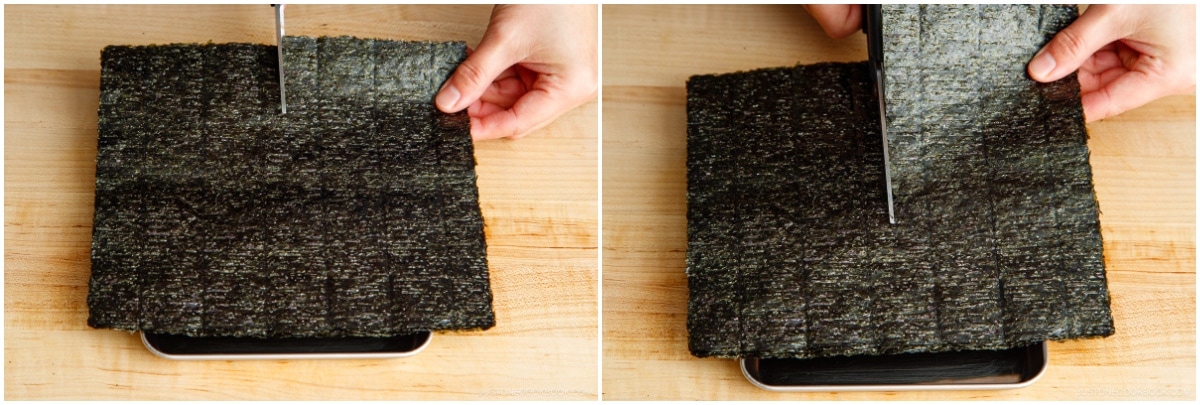
Nori: Cut 4 sheets nori (dried laver seaweed) in half crosswise to make 8 half sheets.
To Roll the Sushi
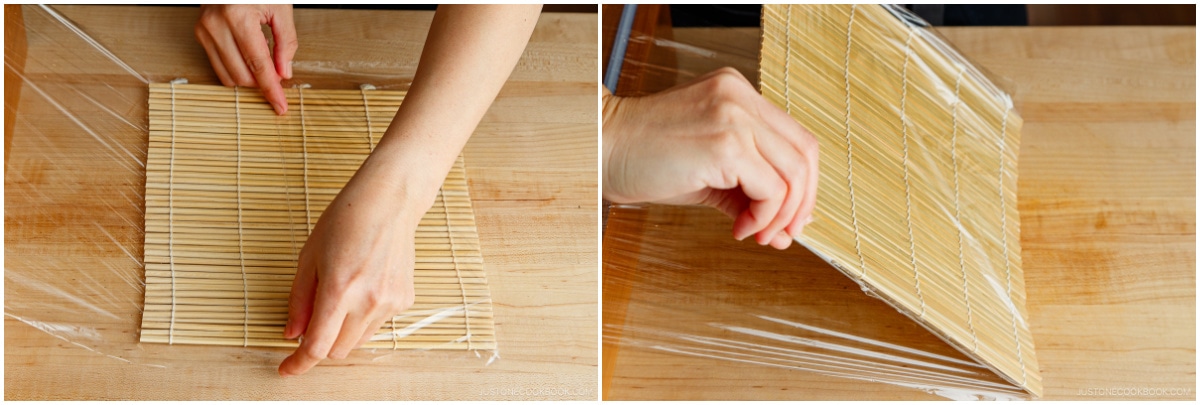
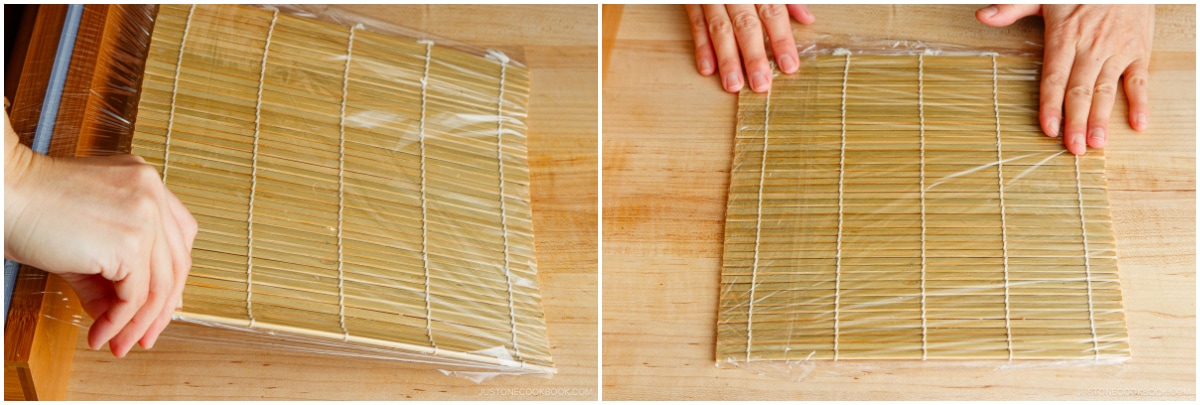
Cover the front and back surfaces of the bamboo sushi mat with plastic wrap.
Keep the sides uncovered so no air gets trapped.
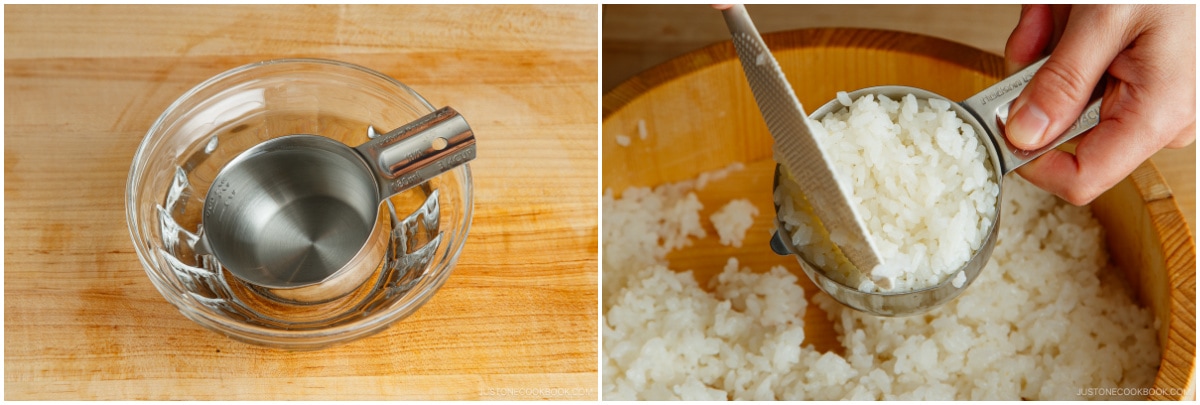
Dip a ¾-cup measuring cup into a bowl of water to wet it and fill the cup with sushi rice.
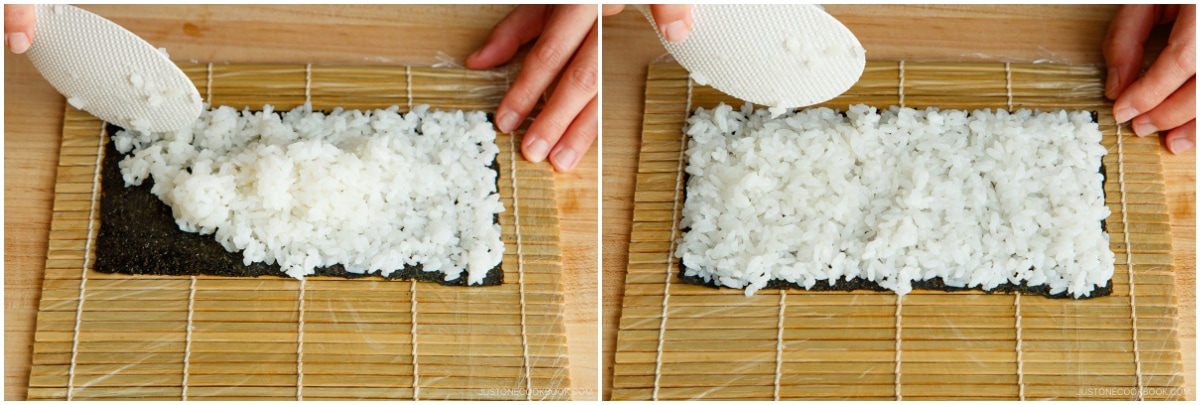
Lay a nori half sheet, shiny side down, on the bamboo sushi mat. Wet your fingers in the water bowl and evenly spread ¾ cup (110 g) sushi rice across the nori. Apply very gentle pressure so you don‘t mash the rice grains. Alternatively, you can use a plastic rice paddle to keep your hands clean.
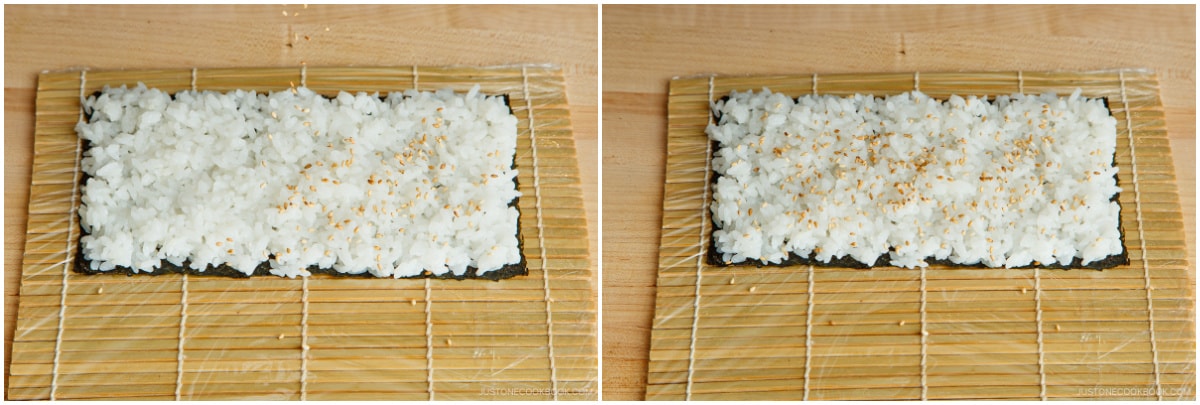
Sprinkle the rice with about ½ Tbsp toasted white sesame seeds.
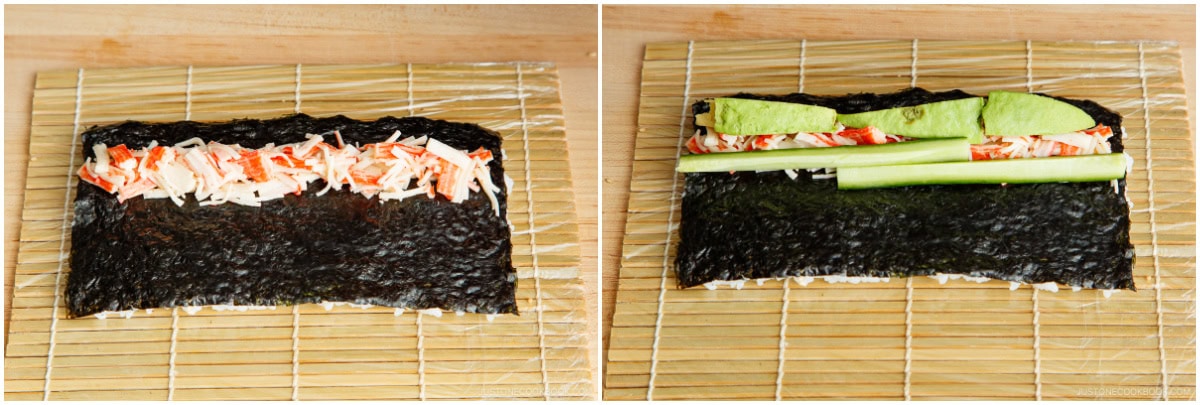
Flip over the nori sheet so that the sushi rice is now facing down on the bamboo mat. Align the nori about 1 inch (2.5 cm) away from the bottom edge of the mat. Next, line up a portion of the crabmeat, avocado (skins removed), and cucumber across the width of the nori about ½ inch (1.3 cm) away from the nori‘s bottom edge. Don‘t add too much filling, or else it‘ll be extremely difficult to seal the roll.
To roll the sushi, grab the bottom edge of the mat with your index fingers and thumbs while holding the filling in place with your other fingers.
Roll the sushi mat over the filling until the rice at the bottom edge meets the nori near the top edge. Then, flip back the mat‘s bottom edge toward you.
Firmly squeeze the roll through the mat with one hand while you use your other hand to pull the top of the bamboo mat away from you. This helps form the roll into a tight cylinder.
Next, use one hand to lift and pull the bottom edge of the bamboo mat slightly as you use your other hand to roll the sushi forward through the bamboo mat. Keep gentle pressure on the mat as you roll.
To shape the roll, press on the top with your index fingers while squeezing the sides with your thumbs and other fingers. Your sushi roll is now done.
Transfer the roll to a tray or plate and cover with a damp cloth at all times to prevent it from drying. Continue making the remaining rolls.
To Serve
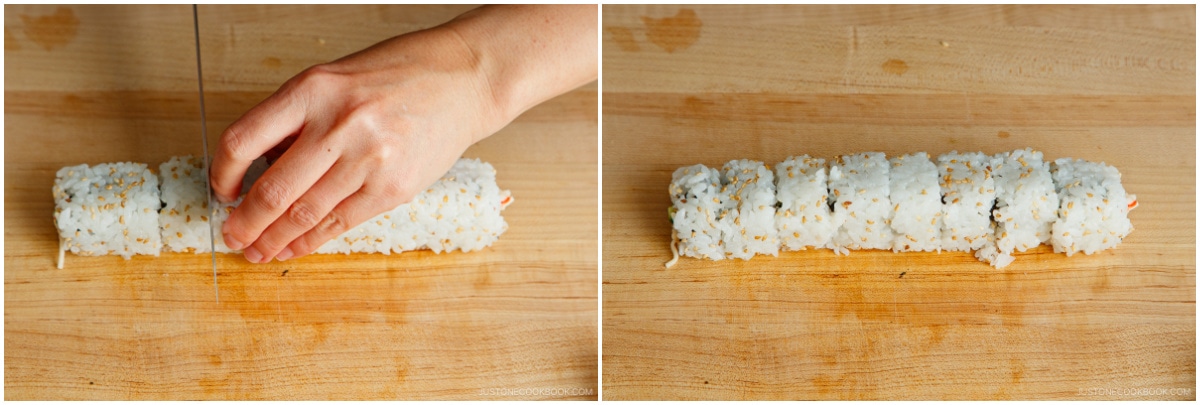
With a very sharp knife, cut each roll in half crosswise. Then, cut each half into 4 pieces. Clean the knife with a damp cloth after every few cuts.
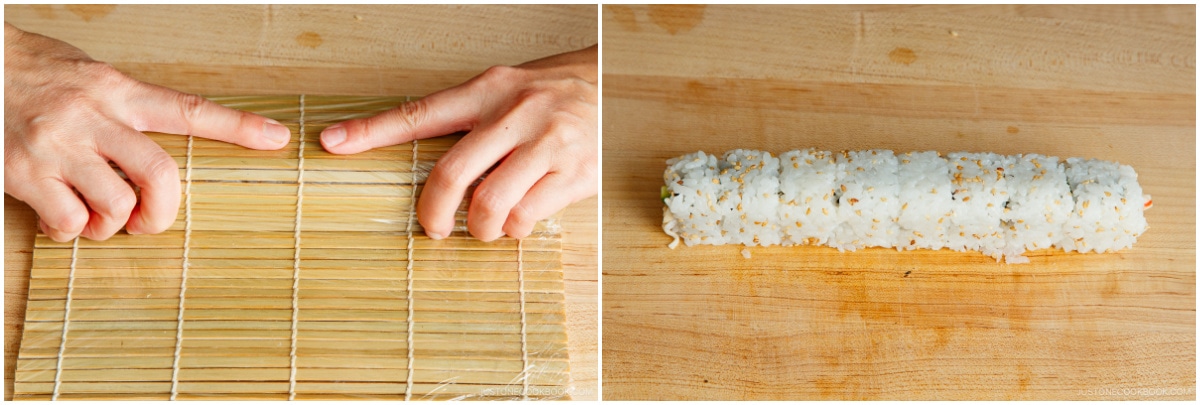
Place the bamboo sushi mat over the cut roll and re-shape it one last time. Remove the mat and add the optional toppings of your choice, like ikura (salmon roe) or yuzu-flavored tobiko (flying fish roe).
Serve the California Rolls with a small dish of soy sauce and wasabi for dipping and pickled sushi ginger (optional) on the side. Enjoy!
To Store
It‘s best to enjoy sushi rolls the same day you make them. Rice gets hard and dry in the refrigerator. If you really want to refrigerate them, my recommendation is to cover them with plastic and a thick kitchen towel, so the rice will stay cool and safe but not become cold.
Nutrition
Nutrition Facts
California Roll
Amount per Serving
% Daily Value*
* Percent Daily Values are based on a 2000 calorie diet.
Author: Namiko Chen
Course: Main Course
Cuisine: Japanese
Keyword: avocado roll, sushi
©JustOneCookbook.com Content and photographs are copyright protected. Sharing of this recipe is both encouraged and appreciated. Copying and/or pasting full recipes to any website or social media is strictly prohibited. Please view my photo use policy here.
Did you make this recipe?If you made this recipe, snap a pic and hashtag it #justonecookbook! We love to see your creations on Instagram @justonecookbook!
Editor’s Note: This post was originally published on Aug 19, 2011. The content has been updated in May 2017. The post was updated with a revised recipe and more helpful content on April 1, 2024.
Subscribe Now!
5 Secrets to Japanese Cooking: Simple Meals & Authentic Flavors!
Sign up to receive our FREE email series on Japanese cooking tips and weekly newsletter.


 English (US) ·