 5 days ago
29
5 days ago
29
1 hour 15 minutes
Have you ever made gyoza skins from scratch? They have a soft, chewy bite that makes Japanese pan-fried dumplings taste extra special. If you’ve only used store bought, don’t worry—homemade is easier than you think. I’ll share my best tips for How to Make Gyoza Wrappers thin, round, and perfectly tender—and how to freeze the extras for later. Let’s dive in!
Once you make these easy homemade wrappers, try my Gyoza, Vegetable Gyoza, and Gyoza with Miso Dipping Sauce next!
Table of ContentsWhat Are Gyoza Wrappers?
Gyoza wrappers (餃子の皮) are thin, round sheets of wheat dough used to wrap Japanese gyoza dumplings. Compared with Chinese potsticker skins, they’re slightly smaller and thinner, which makes them easier to fold and pleat. They also cook quickly, giving gyoza a delicate, chewy texture.
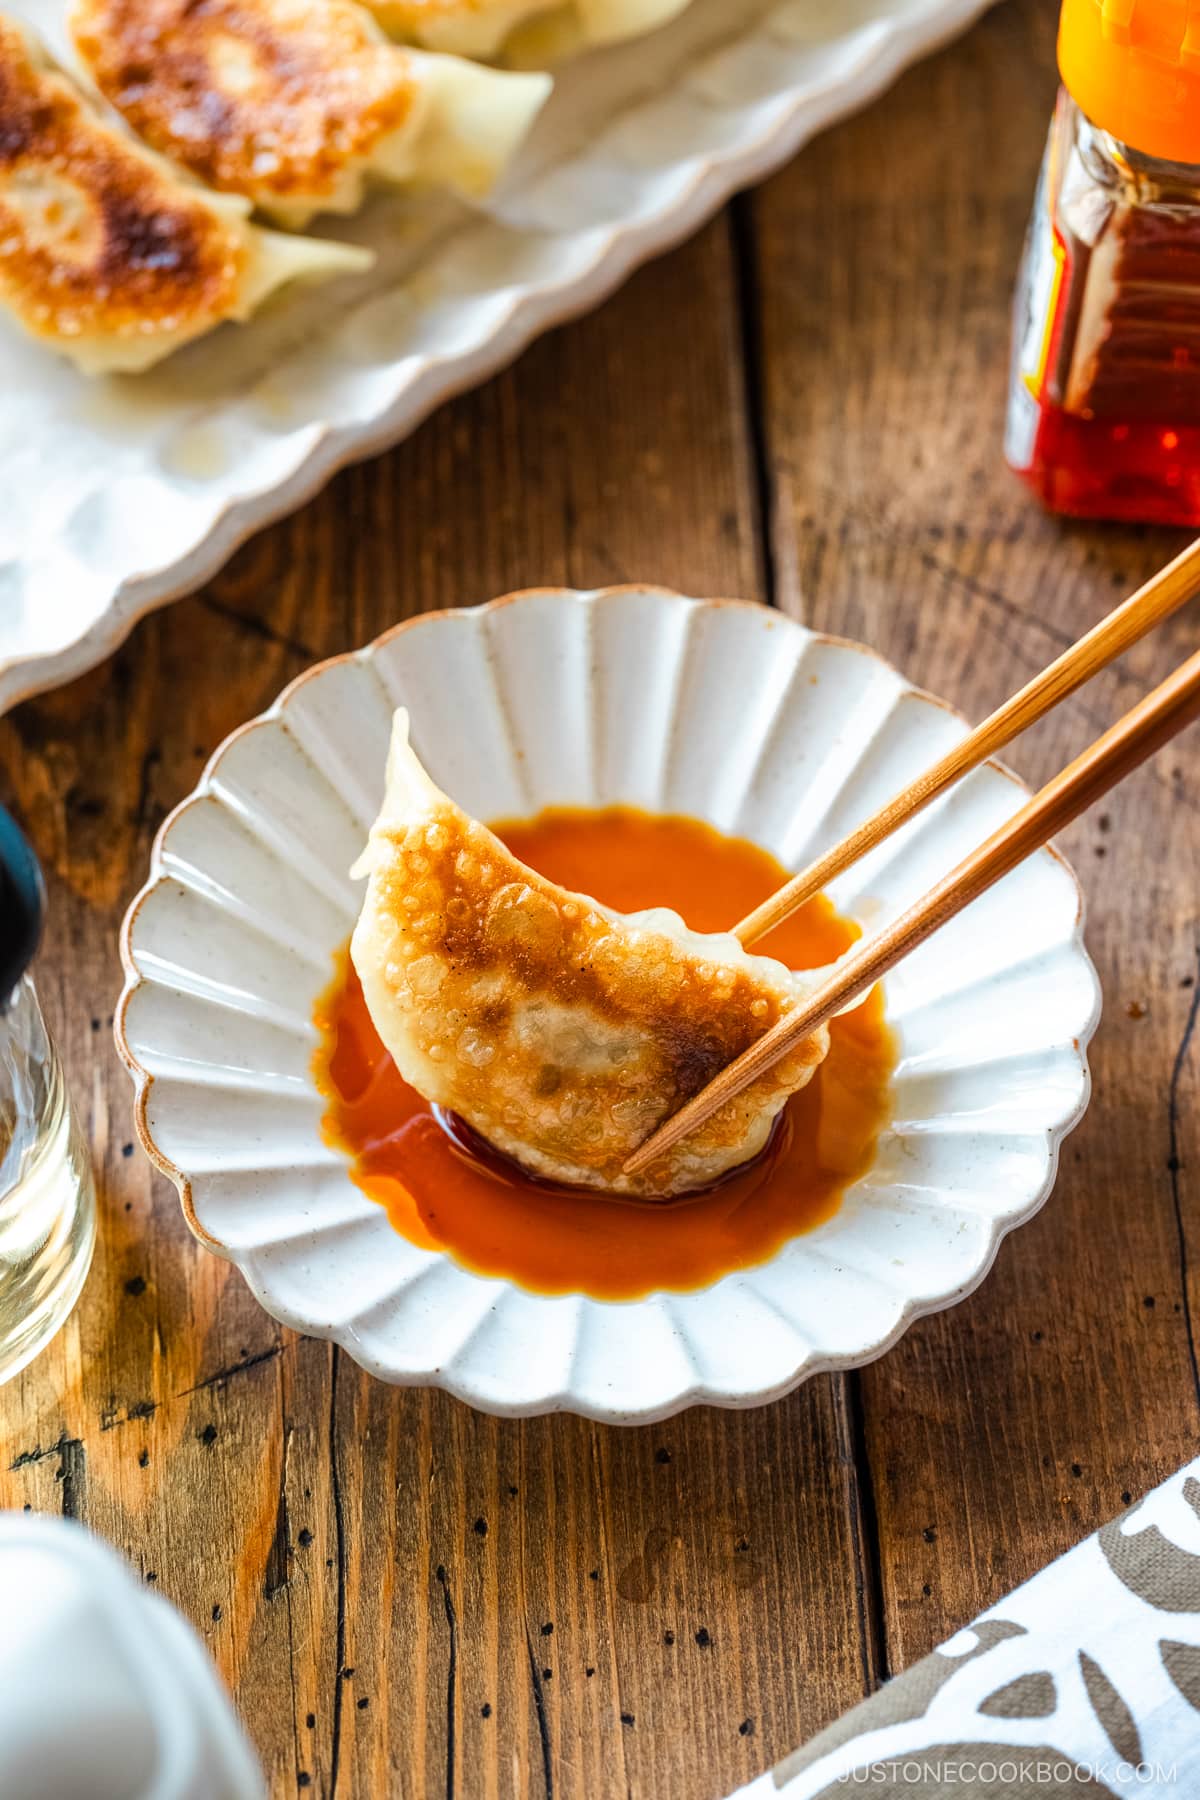
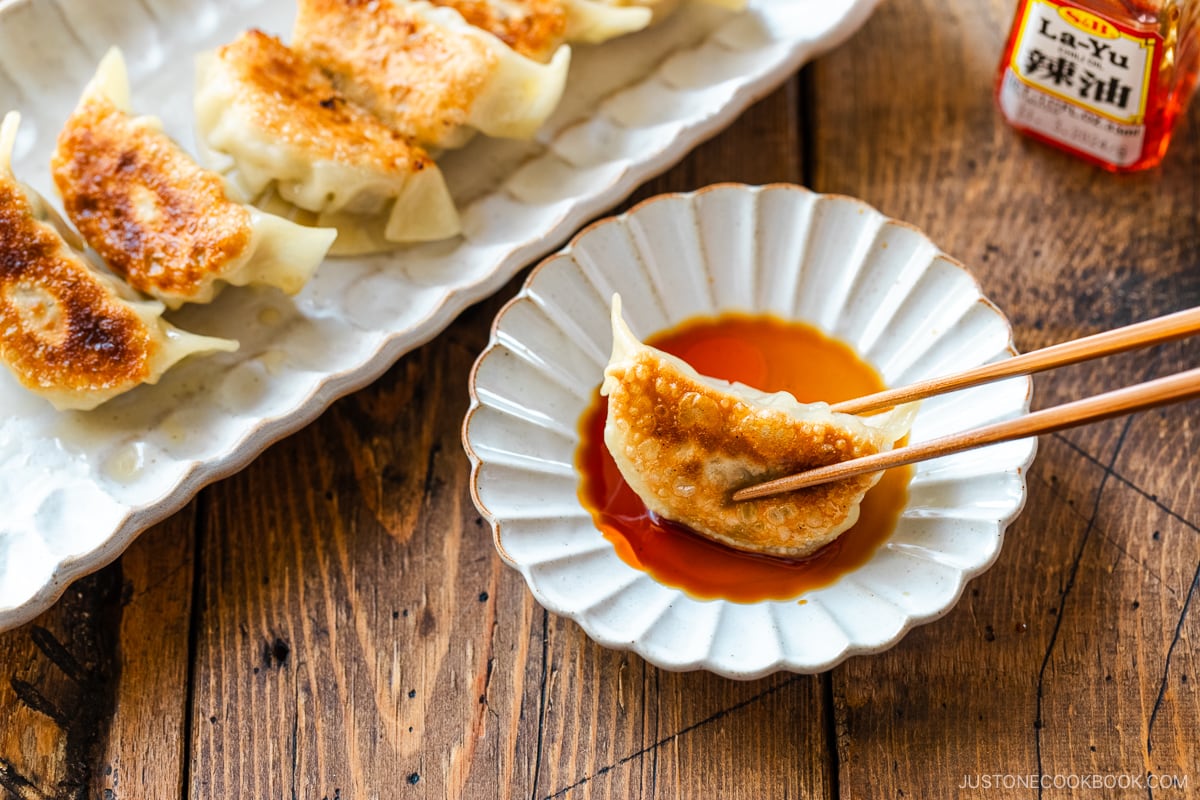
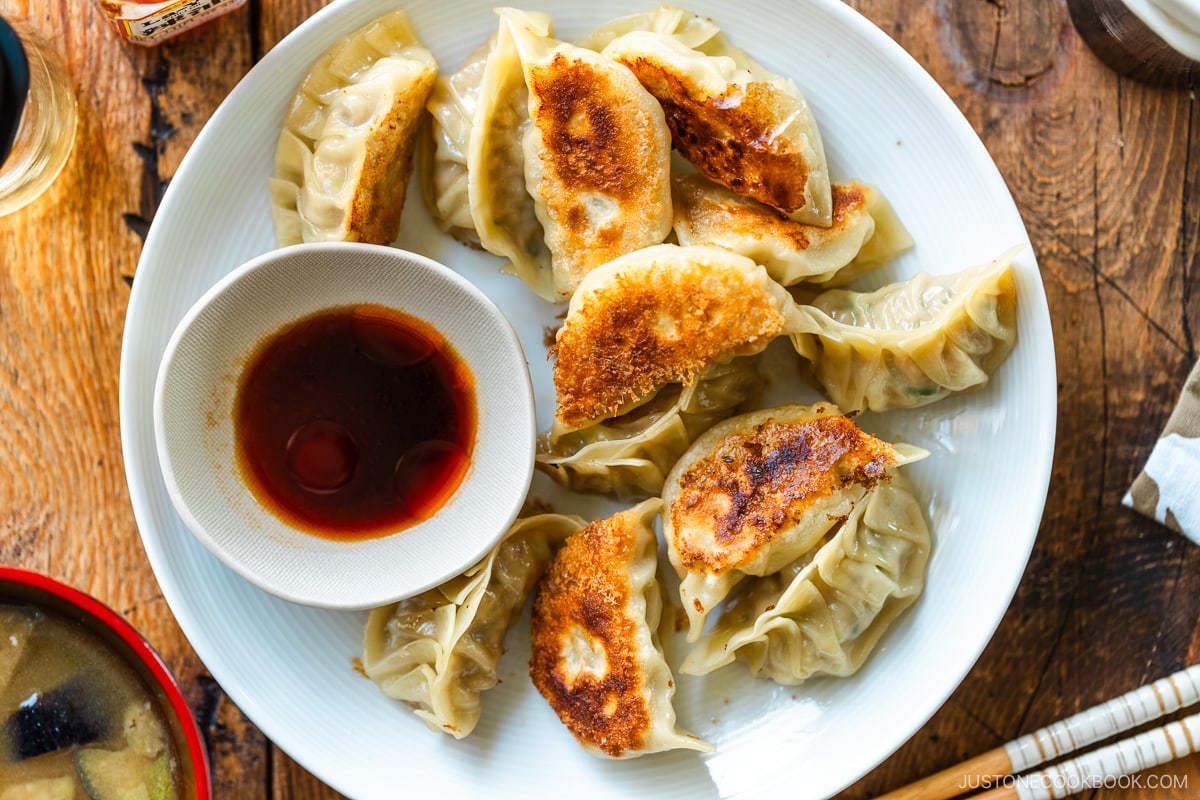
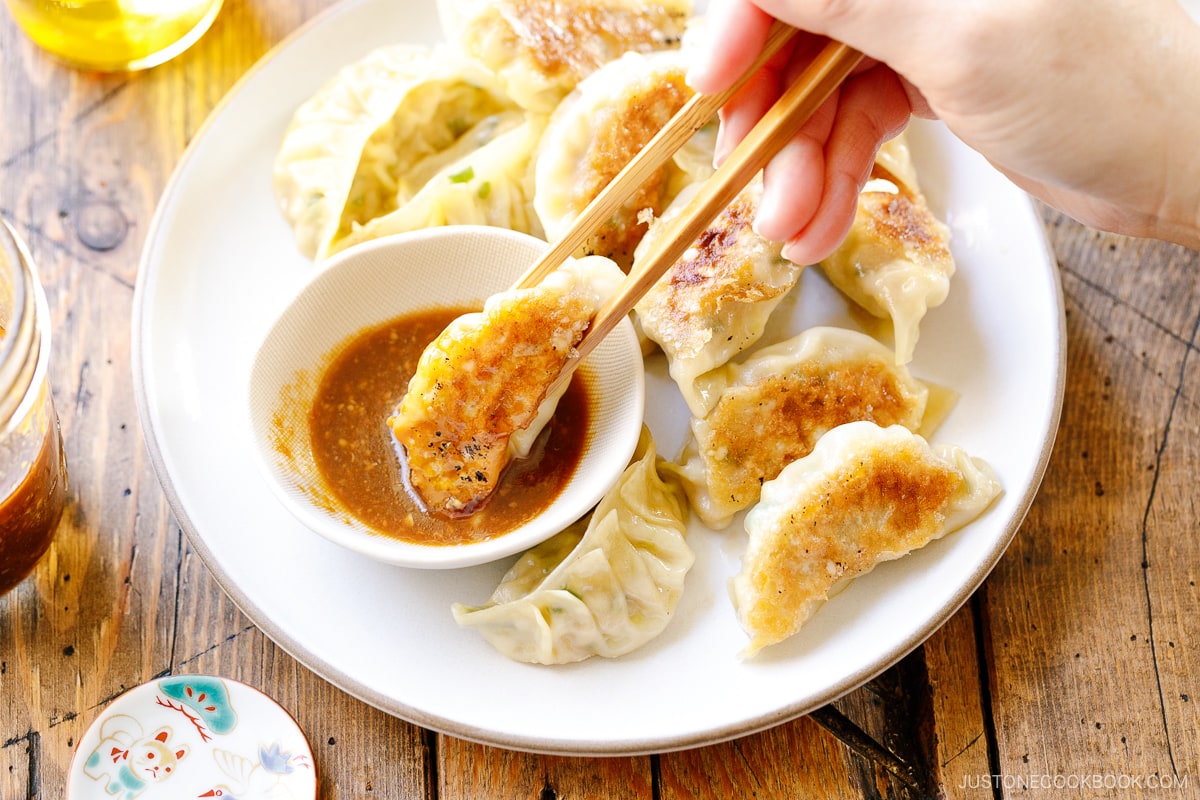
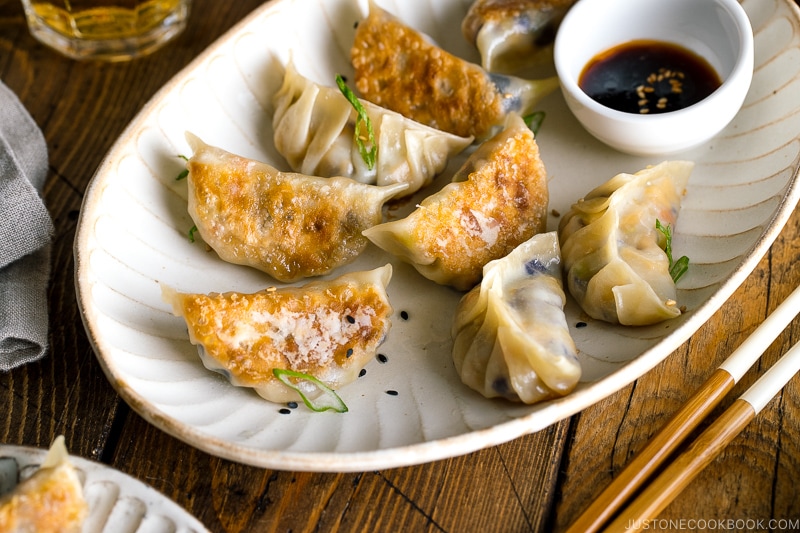
Simply fill them with your favorite gyoza filling, fold, seal, and pan-fry until the bottoms are golden brown and crisp. Finish with a quick steam for tender, juicy dumplings.


Why Make Gyoza Wrappers at Home
- Fresher and tastier – Homemade wrappers have a clean wheat flavor and soft chew that store-bought ones can’t match. You’ll taste the difference—and no preservatives!
- Tender, chewy texture – That perfect bite is the hallmark of good gyoza!
- Customizable – Roll them thinner for delicate dumplings or thicker for a heartier bite. You can also adjust the size to match your filling portions.
- Fun to make together – Turn it into a gyoza party! Making wrappers is hands-on, and kids love helping. Cooking together makes it even more special.
Ingredients for Gyoza Wrappers
- all-purpose flour – I recommend medium-gluten flour; see below for more
- kosher salt
- hot water – just off the boil, to soften the proteins and make the dough elastic
- potato starch or cornstarch – for rolling and dusting, to prevent sticking
Find the printable recipe with measurements below.
Jump to RecipeBest Flour for Gyoza Wrappers
Most gyoza wrappers are made with chūrikiko (中力粉), or medium-gluten flour, which has about 8–10% protein. This gives the dough a chewy but easy-to-handle texture.
By contrast, American all-purpose flour usually has 10–12% protein, so it develops slightly stronger gluten and makes the dough a bit chewier.
For a closer match, you can blend equal parts bread flour and cake flour to mimic medium-gluten flour. Be sure to weigh it with a digital kitchen scale for the best results.
How to Make Gyoza Wrappers
Make the Dough
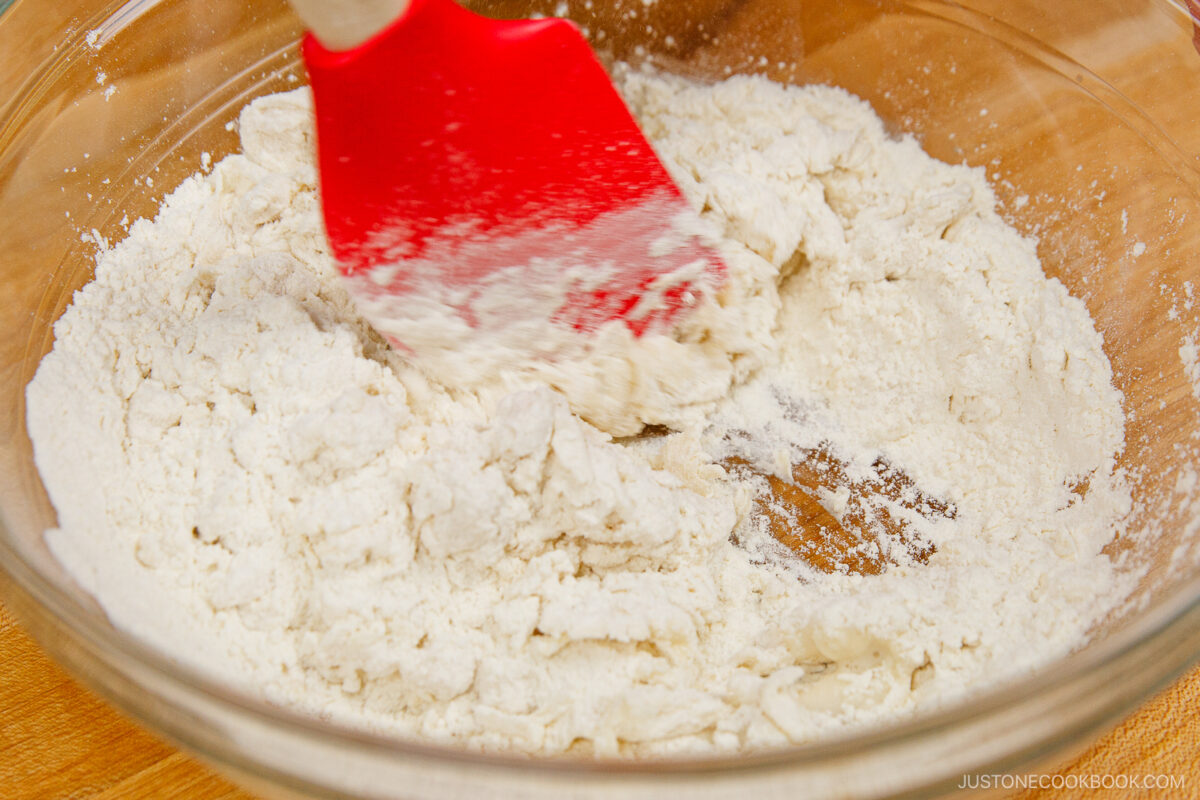
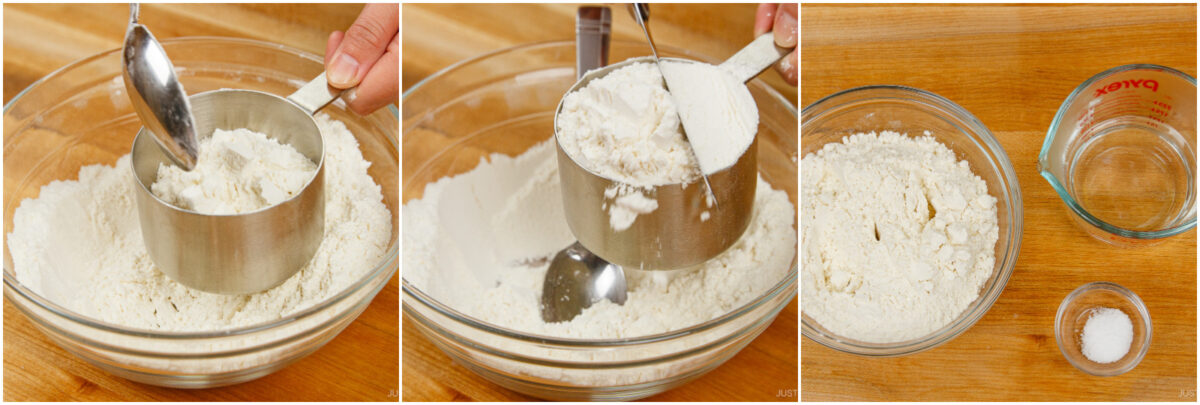
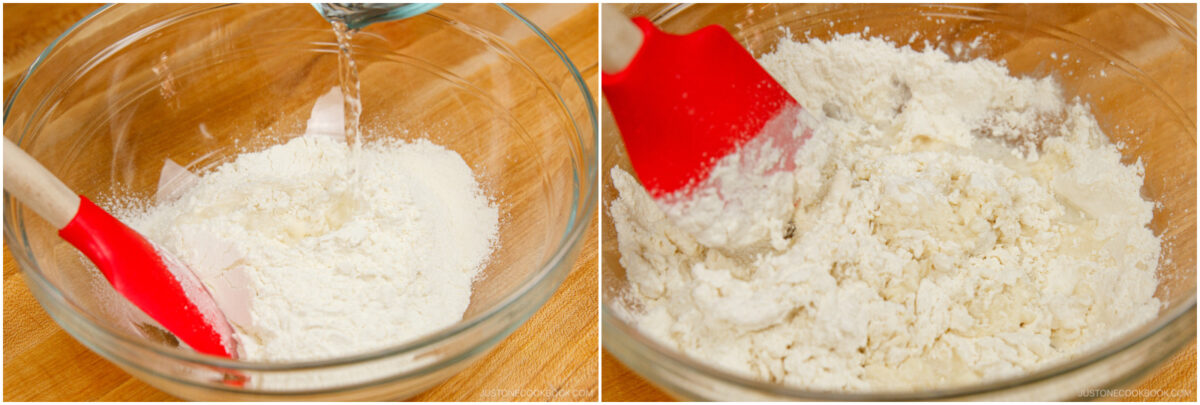
- Mix the dough. Sift flour into a large bowl. Dissolve salt in just-boiled hot water, then pour it into the flour in the mixing bowl a little at a time, stirring with a spatula until a shaggy ball forms.
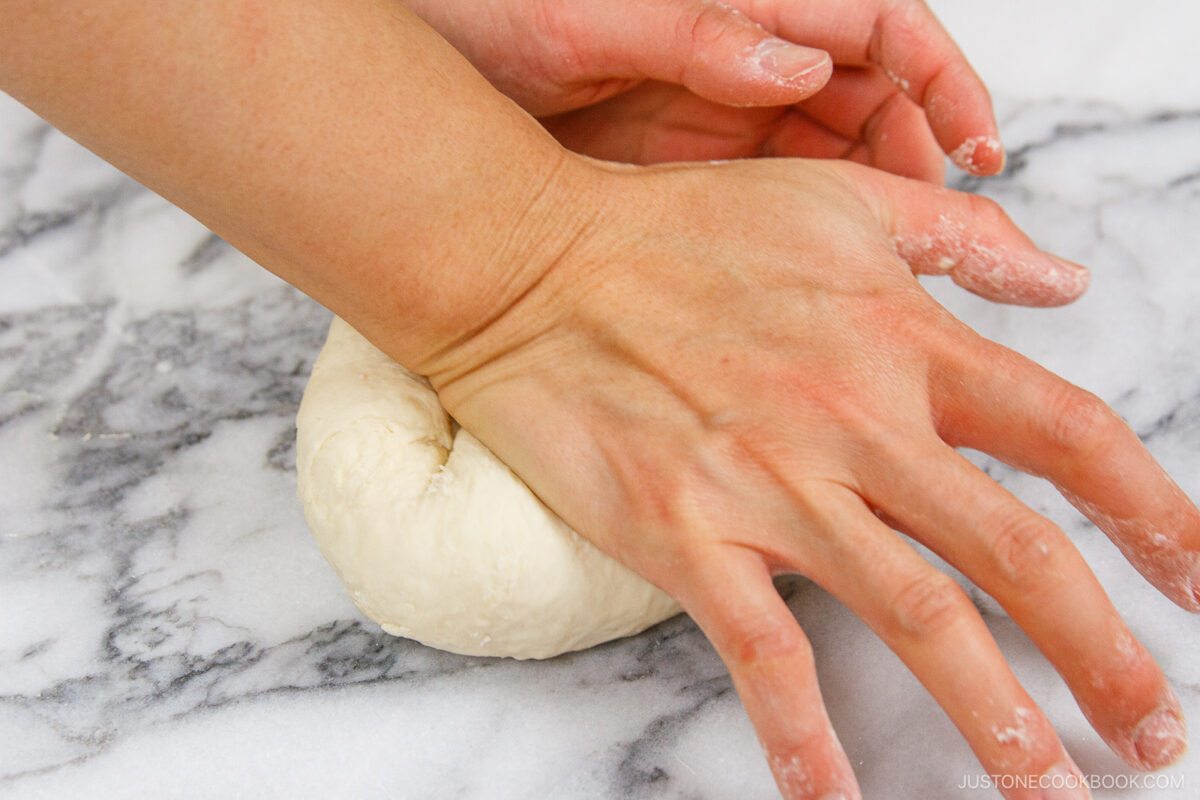
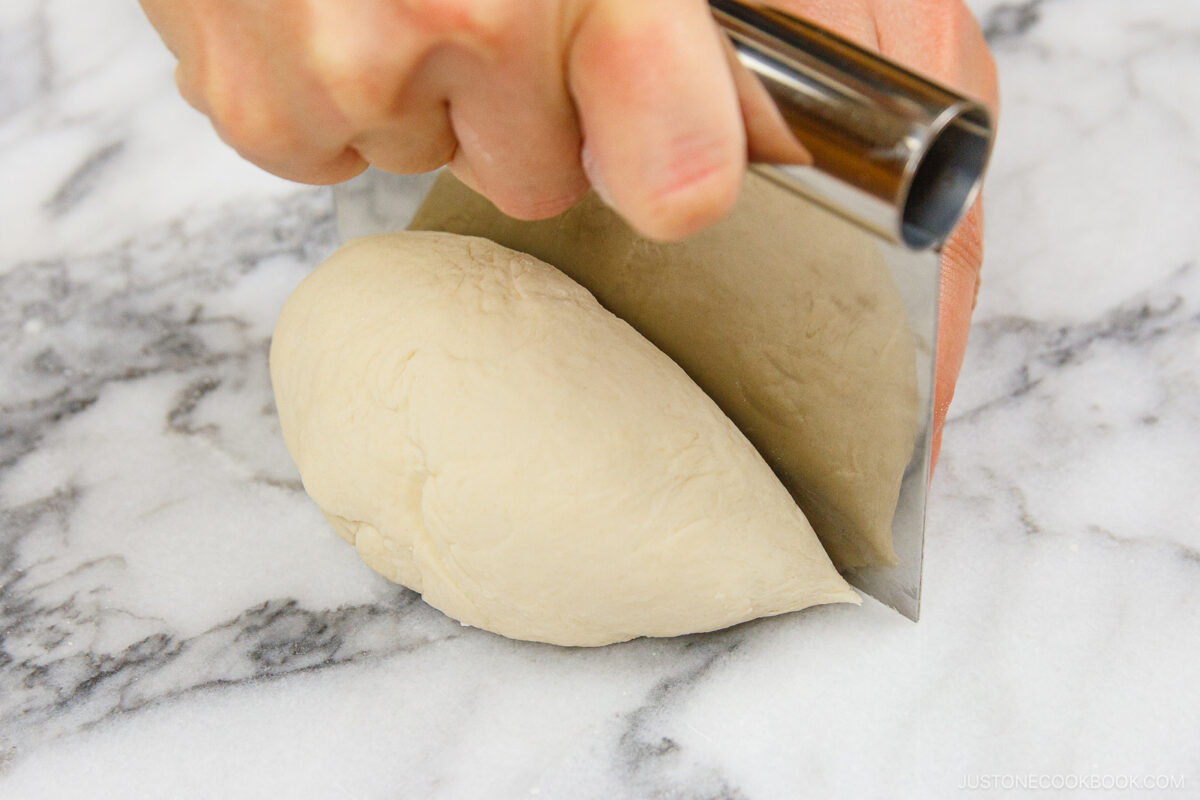
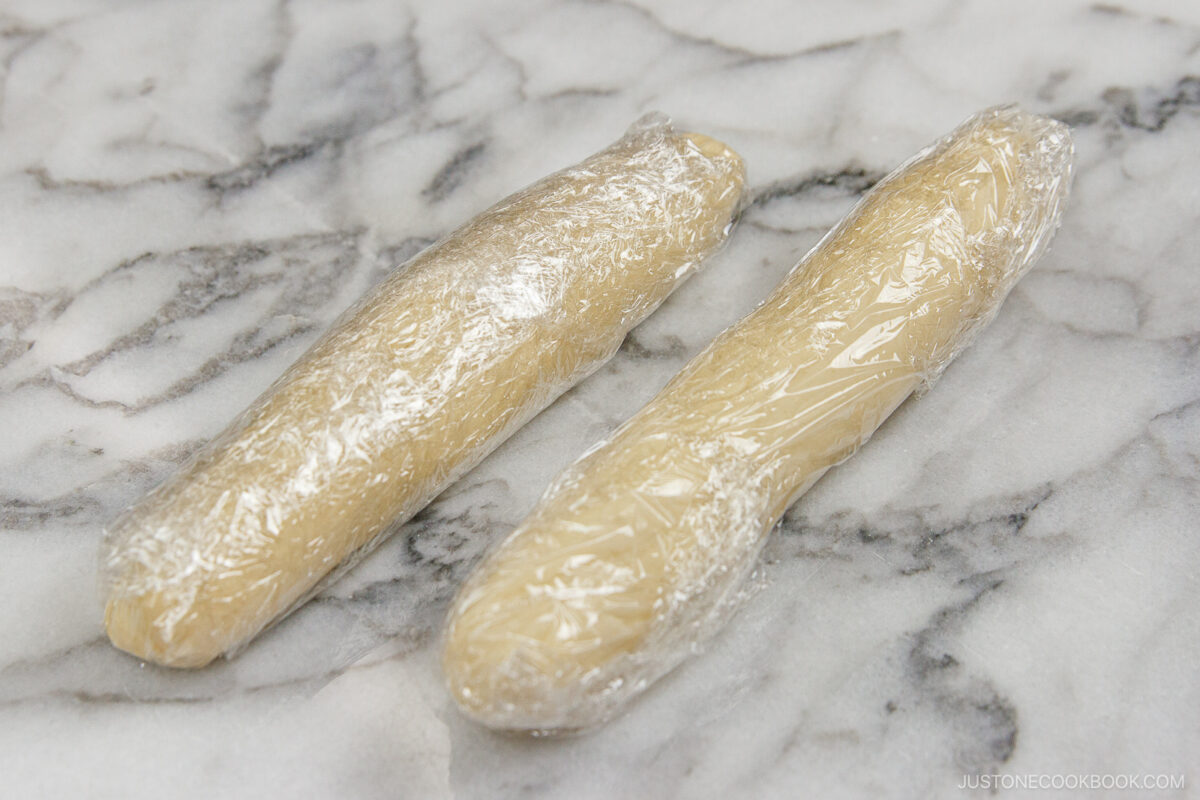
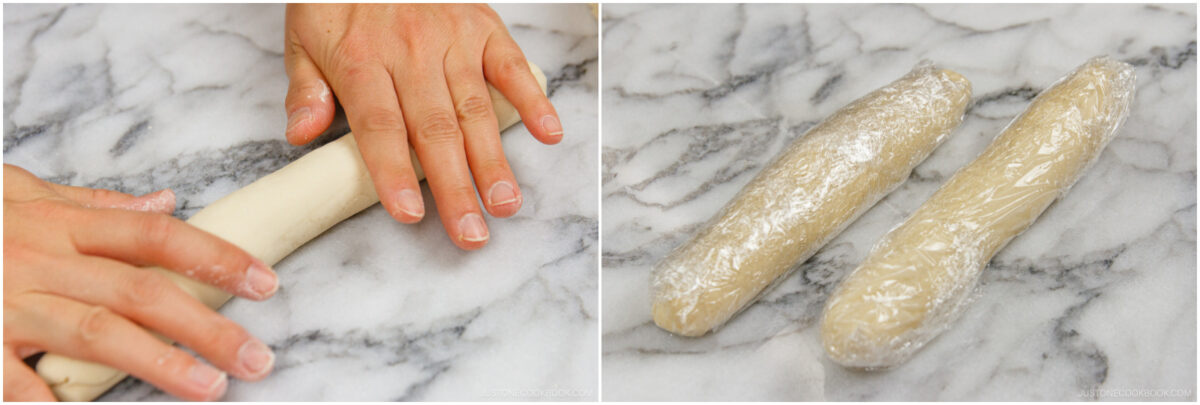
- Knead and rest. Knead the dough mixture by hand for 10 minutes until smooth. Divide the dough in half and shape each into a log 1½ inches (3.8 cm) thick. Wrap in plastic and rest 30 minutes at room temperature.
Roll
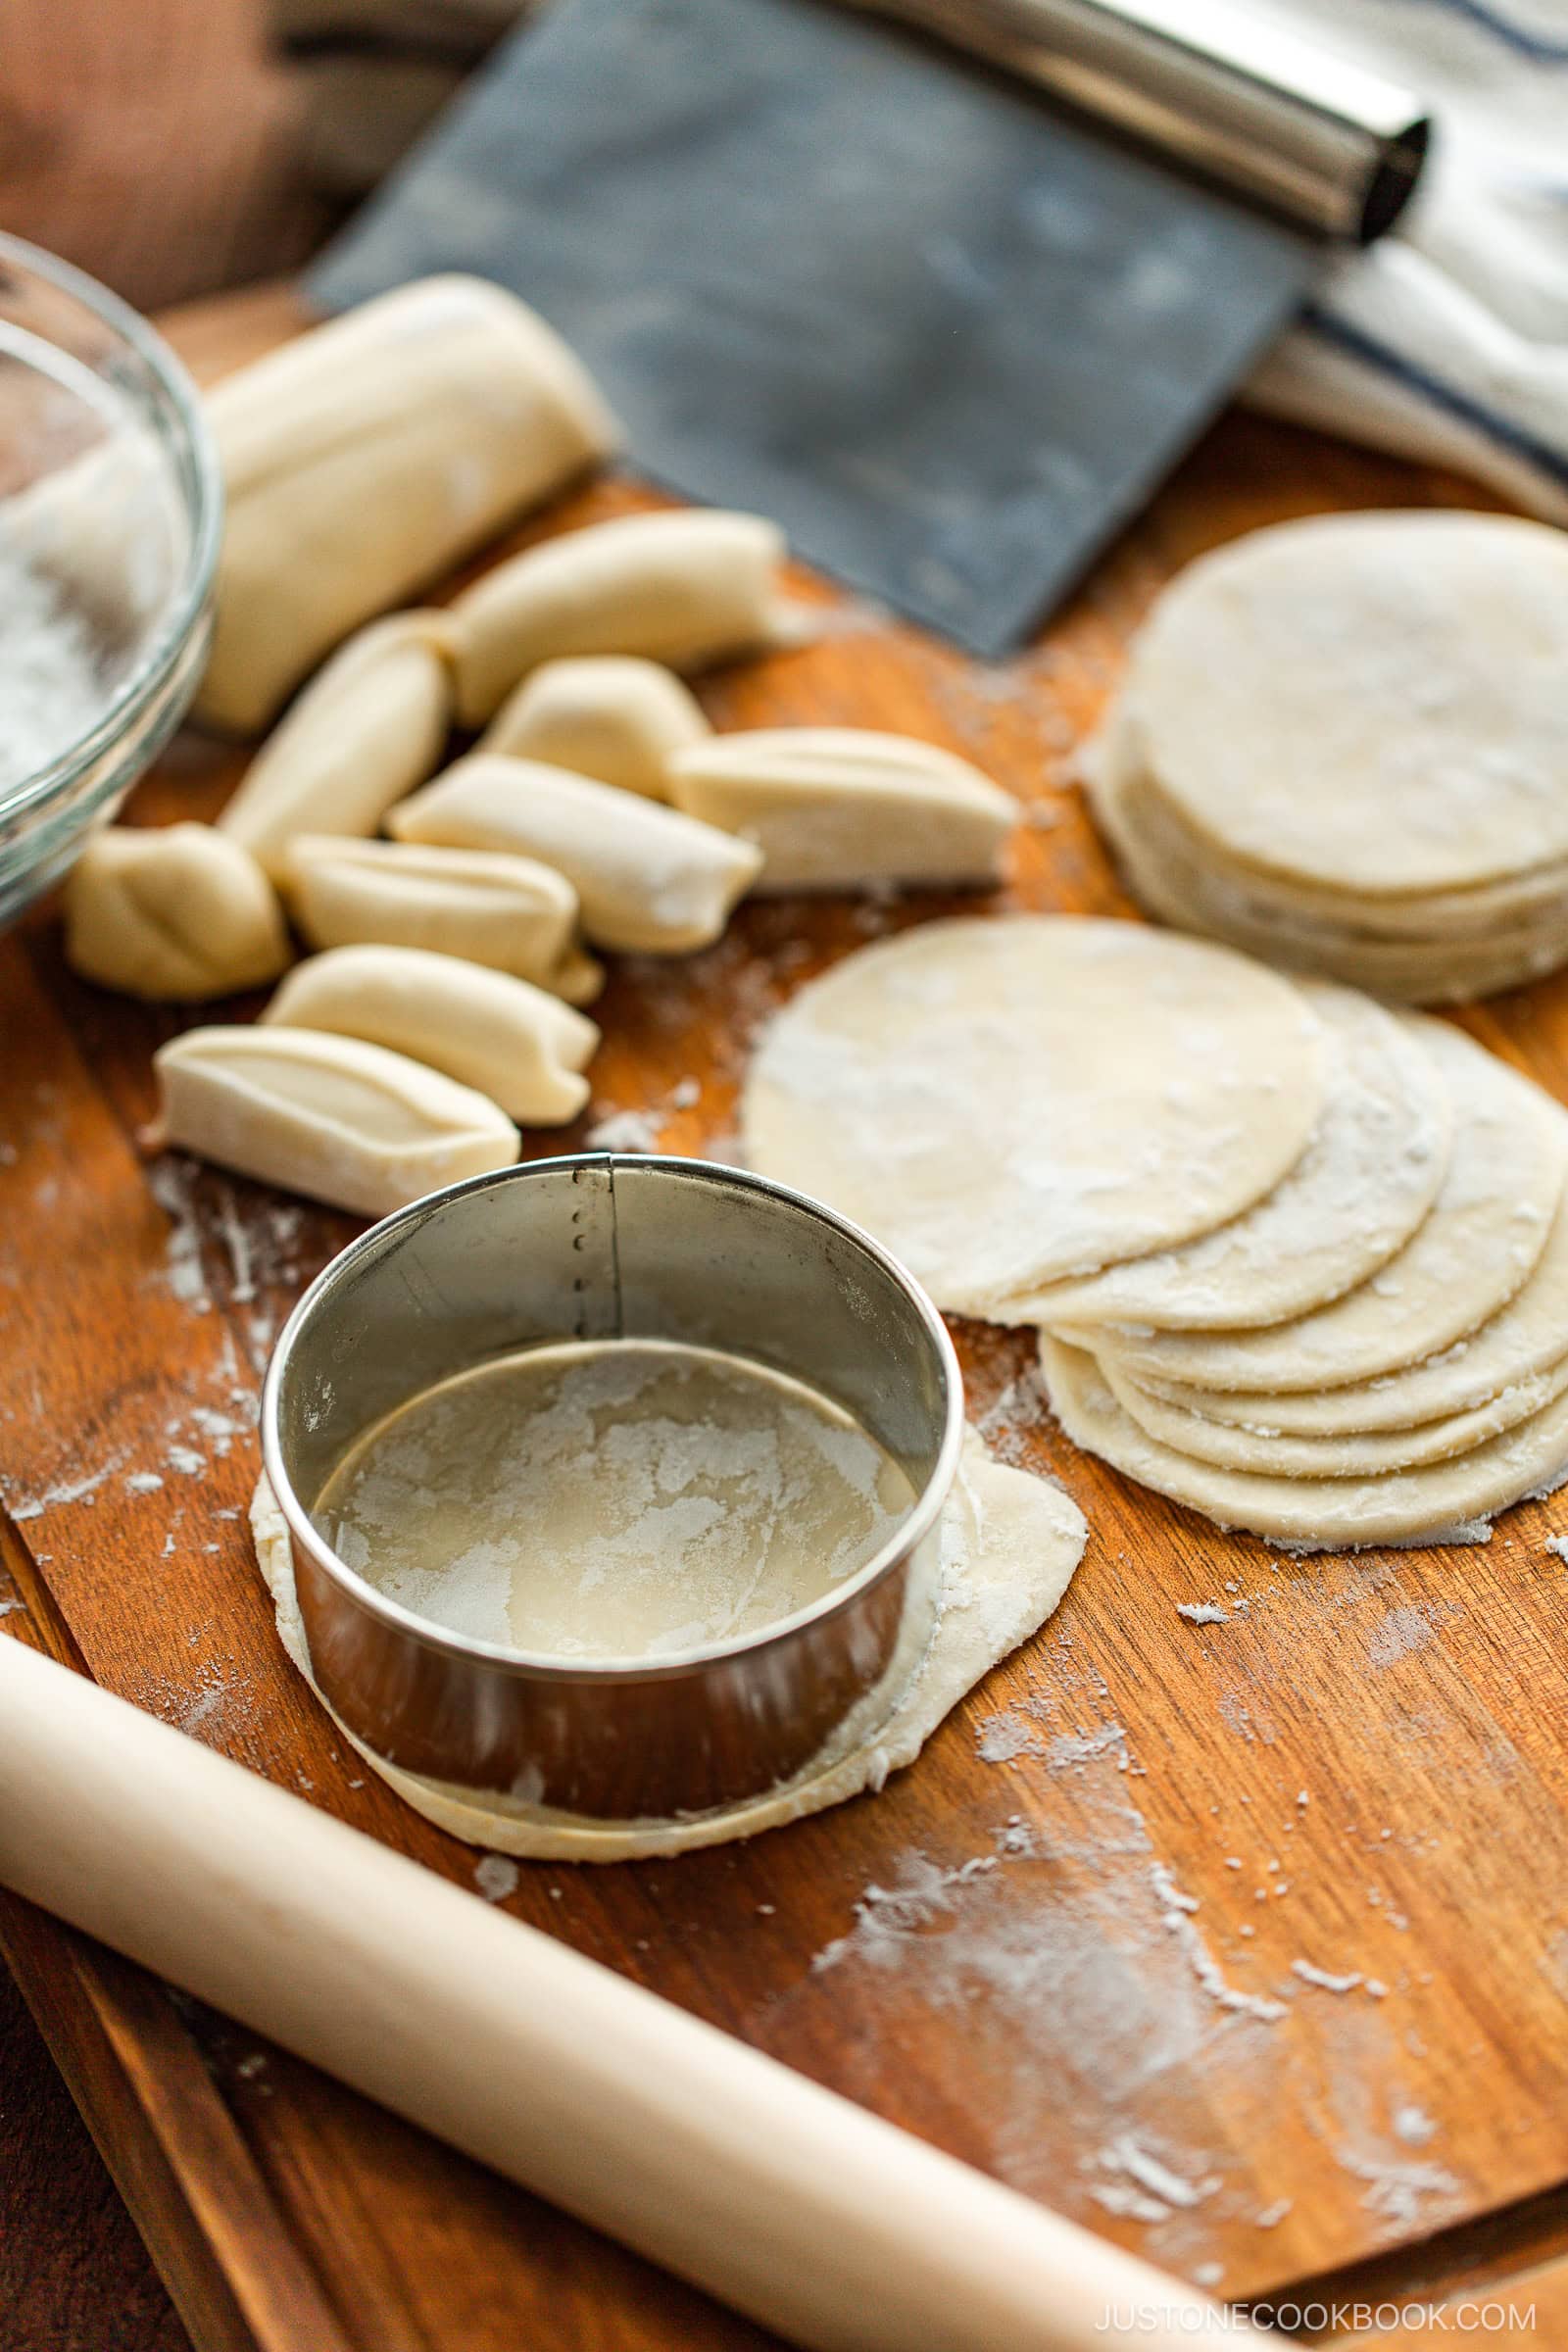
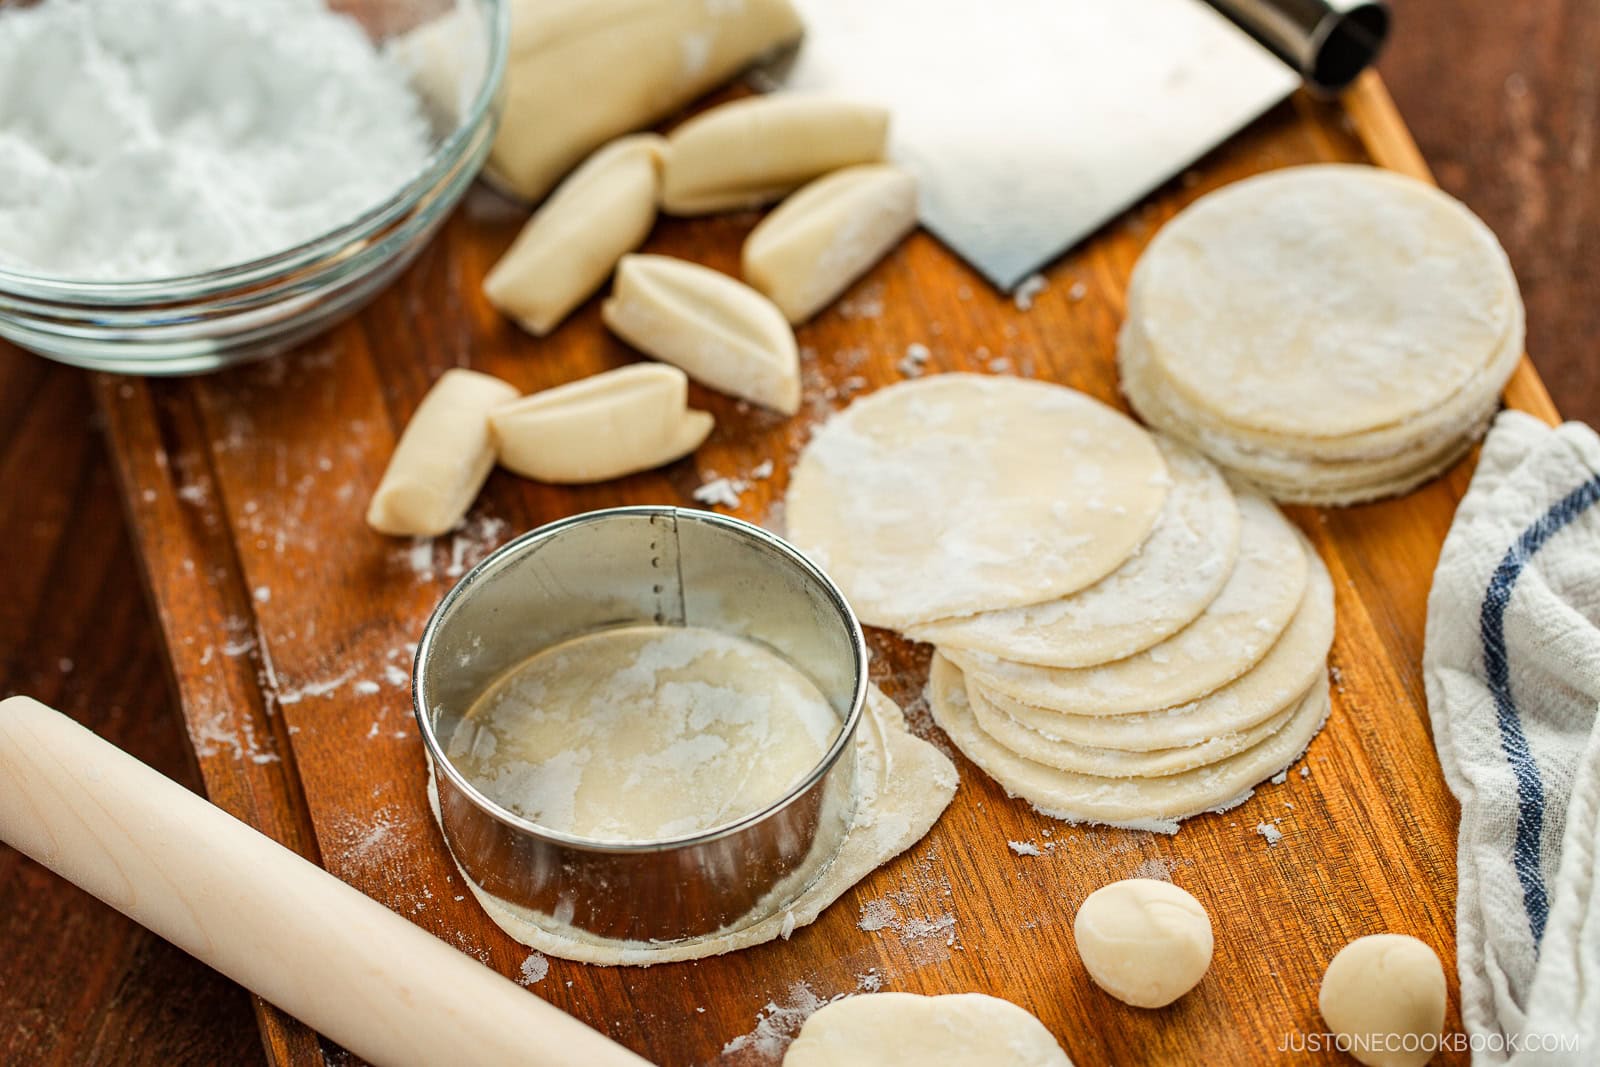
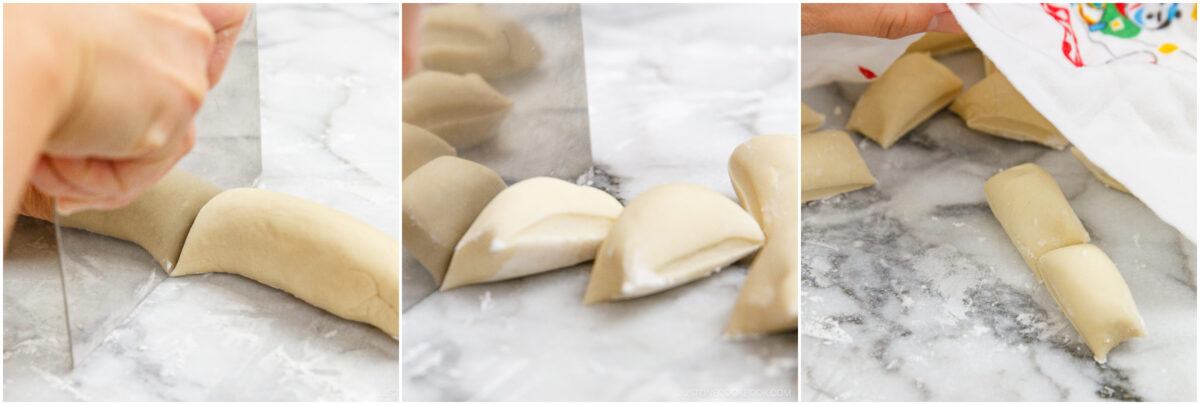
- Cut into pieces. Unwrap and cut the log crosswise into ¾-inch (2 cm) pieces. Keep them covered with a damp towel.
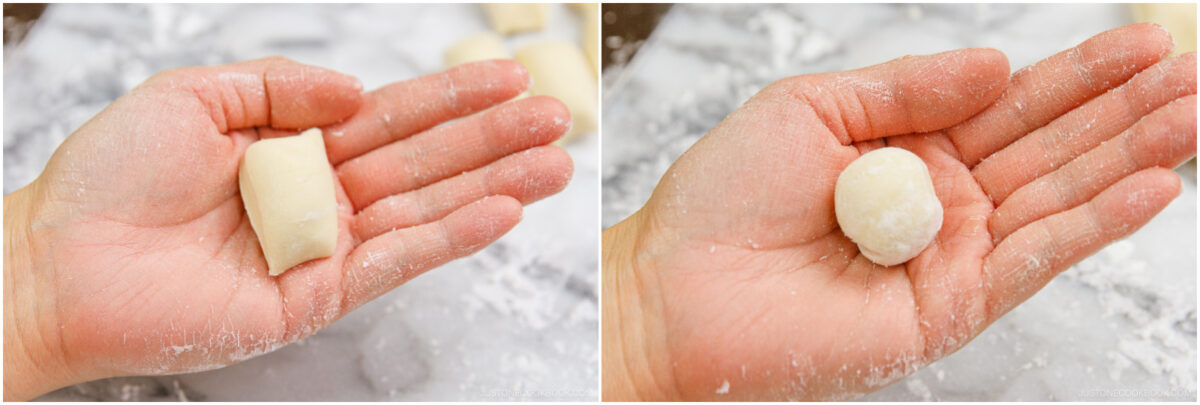
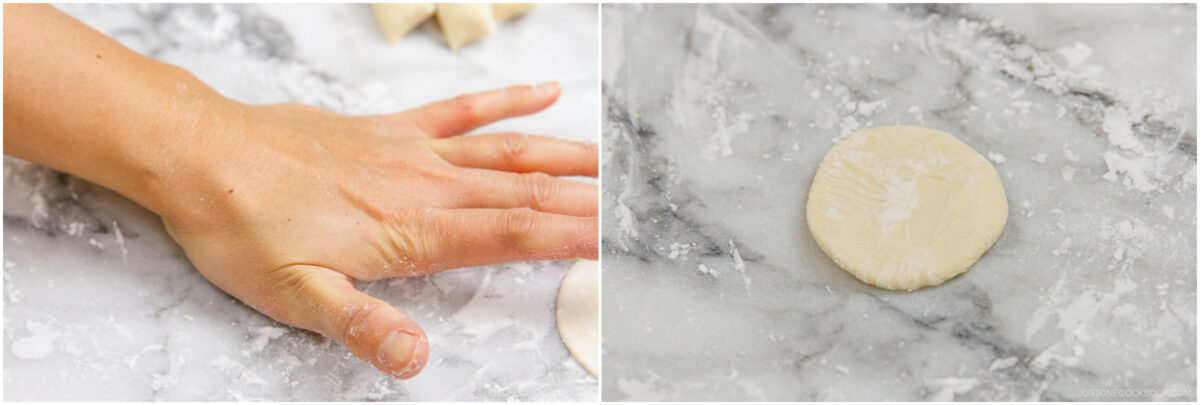
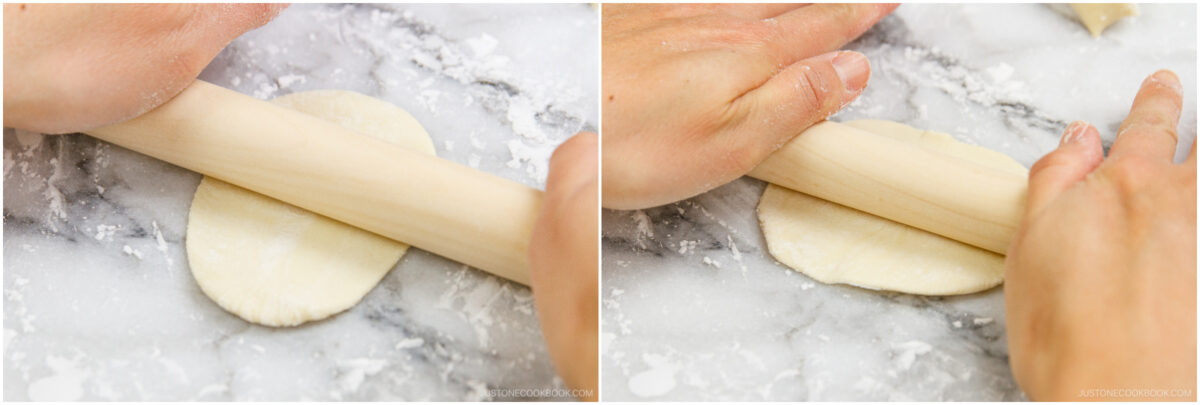
- Roll out. Form each piece into a small ball, and press it flat. Then, use a rolling pin to roll away from the center. Rotate 90 degrees and repeat until you roll a thin circle about 1 mm thick and just over 3 inches (8 cm) across.
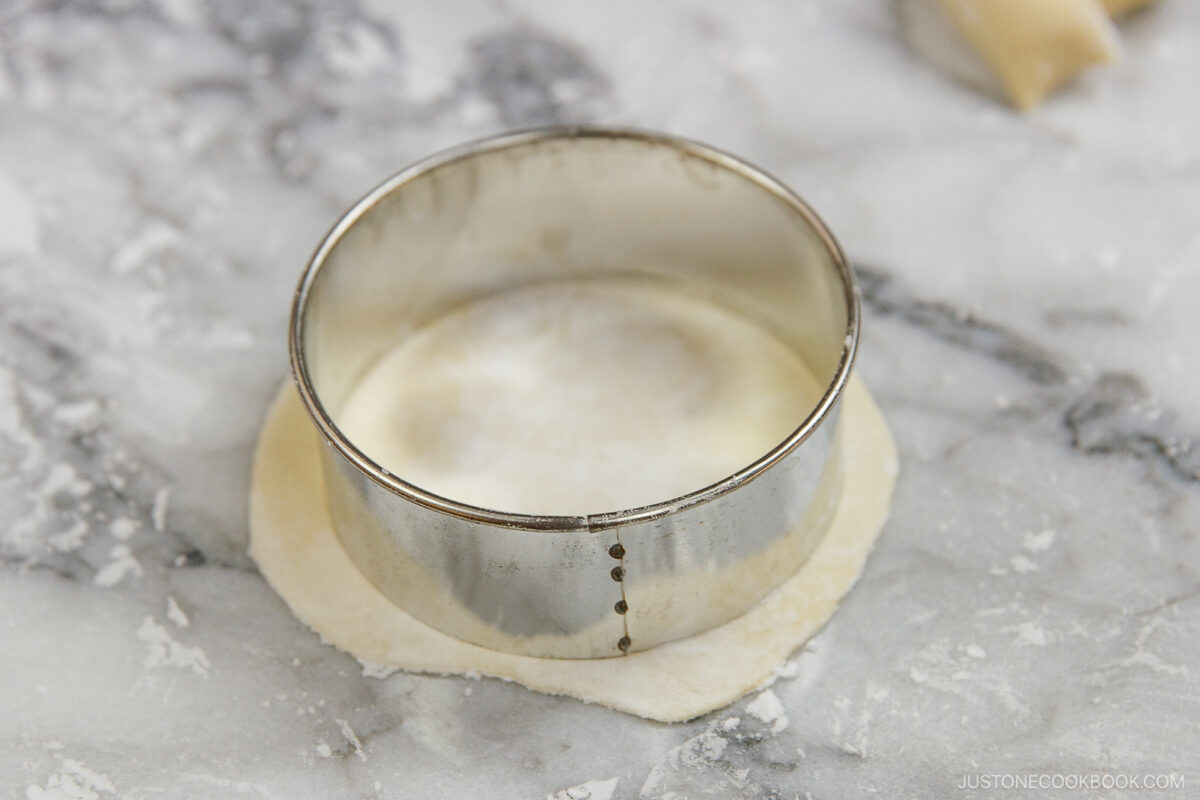
Cut Wrappers
- Cut, dust, and stack. For perfect rounds, stamp with a 3-inch (8 cm) cookie cutter. Lightly sprinkle each with starch and stack. Cover with a damp towel while you finish cutting the rest of the dough. They’re now ready to use or freeze for later. Make any delicious gyoza recipe you like! See variations below.

Nami’s Recipe Tips
- Use hot water – It partially cooks the flour to soften the proteins. This makes the dough elastic, smooth, and easy to roll for a tender, silky, and stretchy bite.
- Rest the dough – A 30-minute rest relaxes the gluten, makes rolling easier, and prevents shrinking.
- Leave edges slightly thicker – Don’t roll the top and bottom edges flat; this helps the wrappers stay round.
- Dust with starch, not flour – Potato starch (or cornstarch) prevents sticking, especially after freezing.
- Keep covered – Always cover dough and wrappers with a damp towel so they don’t dry out.
- Cut cleanly – Use a sharp cookie cutter or drinking glass for smooth edges that seal well.
- Freeze smart – Dust with starch, layer with parchment, or freeze flat before storing in the freezer.
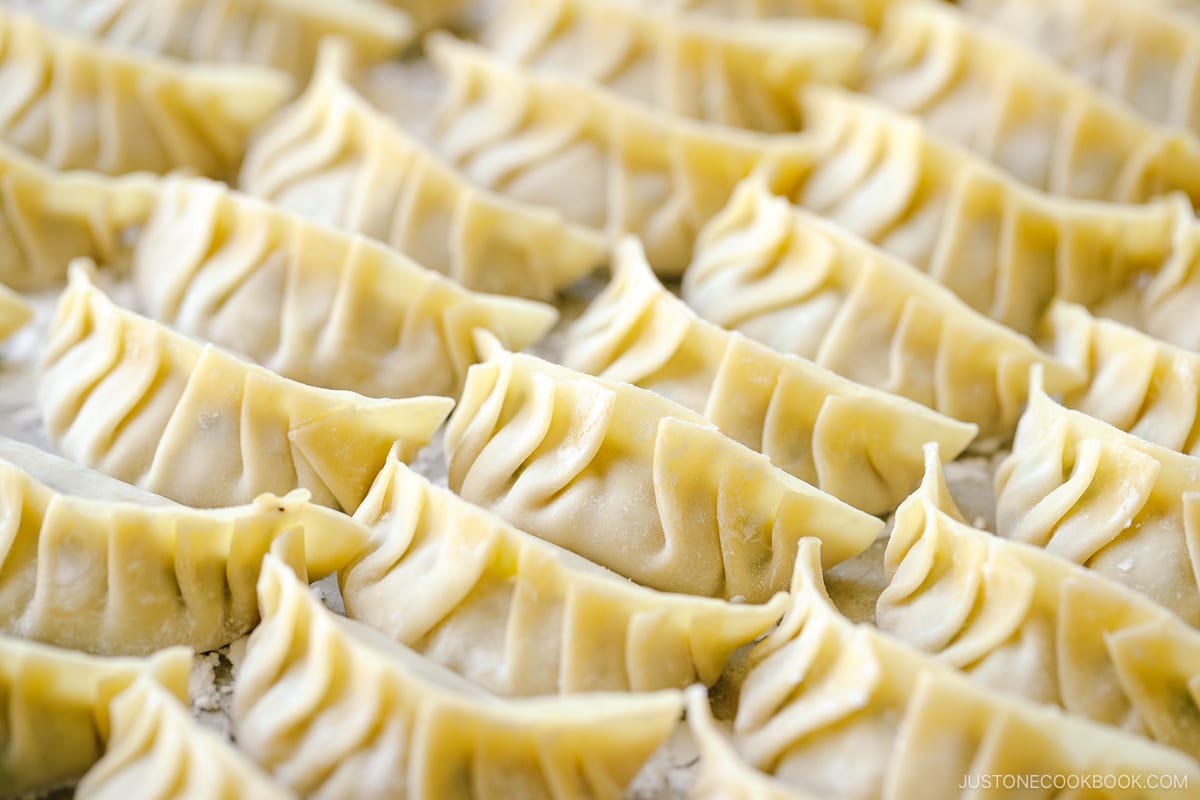
How to Fold Gyoza
Follow my step-by-step How to Fold Gyoza guide to learn how to wrap the dumplings and add pleats. Don’t worry if your folds aren’t perfect—homemade gyoza always taste delicious!
How to Use Gyoza Wrappers
In a total time of 75 minutes, you’ll have homemade wrappers for your favorite Japanese gyoza recipe. You also can freeze extra skins and enjoy quick dumplings on busy weeknights!
- Gyoza
- Gyoza with Miso Dipping Sauce (napa cabbage gyoza)
- Vegetable Gyoza (vegan/vegetarian)
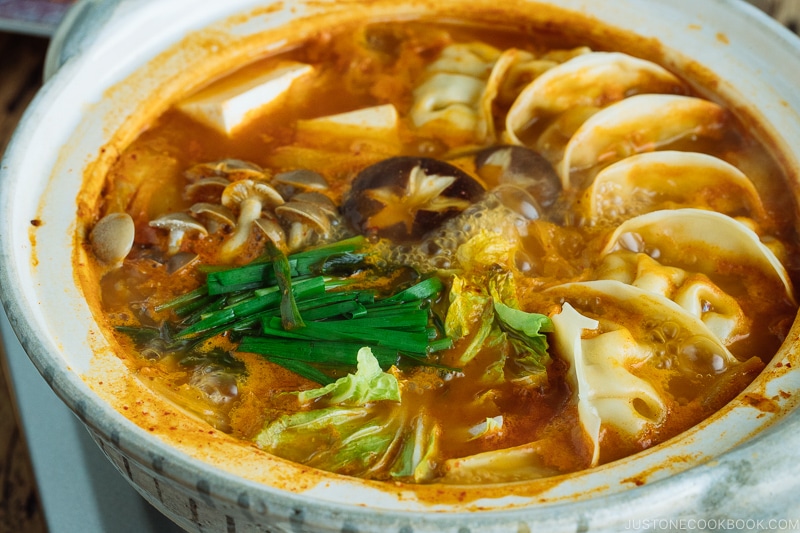
- Kimchi Gyoza Nabe (hot pot)
Storage Tips
To store: Seal stacked wrappers tightly in plastic wrap. Keep in the fridge for 3–4 days. You can also wrap well in a freezer bag and store in the freezer for up to 1 month.
To use: Thaw frozen gyoza wrappers overnight in the refrigerator or let them sit on the counter for about 1 hour. Never microwave to defrost—this makes the dough brittle.
Frequently Asked Questions
What is the difference between wonton wrappers and gyoza wrappers?
Wonton wrappers are square and a bit thicker—better for boiling or deep-frying. Meanwhile, gyoza wrappers are round and thinner—ideal for pan-frying and steaming. This thinner dough gives gyoza their delicate chew and makes folding pleats easier.
My wrappers keep shrinking as I roll. What should I do?
If your dough shrinks back, it means the gluten is still tight. Per my recipe instructions, let it rest longer—about 30 minutes after kneading, or 5 extra minutes between rolling attempts. This relaxes the gluten so the dough rolls out thin and keeps its shape.
Can I freeze the dough before rolling?
It’s best not freeze raw dough logs because it changes its texture and may not roll out smoothly once thawed. Instead, roll the wrappers first, dust with starch, and then freeze. This way, they keep their shape and are easy to use later.
Can I roll the dough ahead of time?
Yes! On Day 1, roll into logs, wrap well, and refrigerate up to one day. On Day 2, cut and roll into wrappers just before using. Don’t roll them too far in advance—they dry out quickly.
Making gyoza wrappers at home takes a little extra time, but the reward is worth it—soft, chewy dumplings with that unmistakably fresh taste. Once you try these wrappers, I think you’ll agree they’re a step up from store bought.
I’d love to hear how yours turned out! 💛 Please leave a star rating and comment below to share your experience. Your feedback not only supports Just One Cookbook but also helps other home cooks discover recipes they can trust.
- 2 cups all-purpose flour (plain flour) (or use equal parts of bread flour and cake flour; for best results, click the Metric button and weigh your flour; or see Step 1 for measuring tips)
- ½ tsp Diamond Crystal kosher salt
- ½ cup water (just-boiled hot water; plus more, as needed)
- potato starch or cornstarch (for rolling and dusting; or substitute regular flour if you‘re not freezing them)
To Measure the Flour
Gather all the ingredients. For best results, weigh your flour with a kitchen scale (click the Metric button above for weights). If measuring with a cup, fluff the flour with a spoon, spoon it into the cup, and level it off with a knife—1 US cup = 4.25 oz (120 g). You can read more about proper flour measuring here.
Nami's Tip: In Japan, we use medium-gluten flour (chūrikiko, 中力粉) with 8–10% protein for a chewy but easy-to-handle texture. For a closer match, I recommend using 1 cup (120 g) bread flour + 1 cup (120 g) cake flour.
To Make the Dough
Sift 2 cups all-purpose flour (plain flour) into a large bowl. Add ½ tsp Diamond Crystal kosher salt to the just-boiled hot water and stir until completely dissolved.
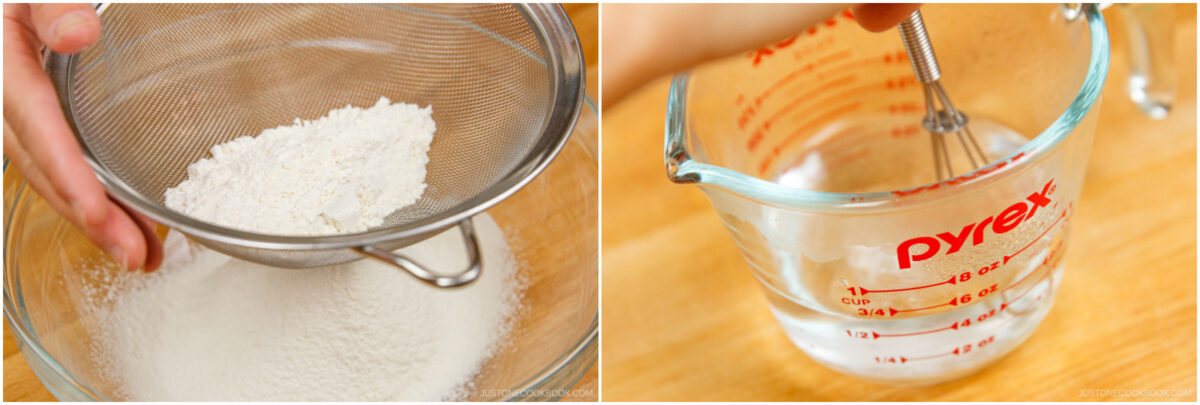
Slowly add ½ cup water (just-boiled and hot) to the flour, stirring with a spatula. Mix until the dough comes together. If it's still dry, add more hot water, ½ Tbsp at a time, until it forms a ball. Use your hands to finish mixing.
Nami's Tip: Different flours absorb water differently, so adjust as needed (I used about 120–150 ml for one batch).
To Knead and Rest
Transfer the dough to a work surface and knead for 10 minutes until smooth.

Cut it in half with a dough scraper. It doesn't have to be exact.
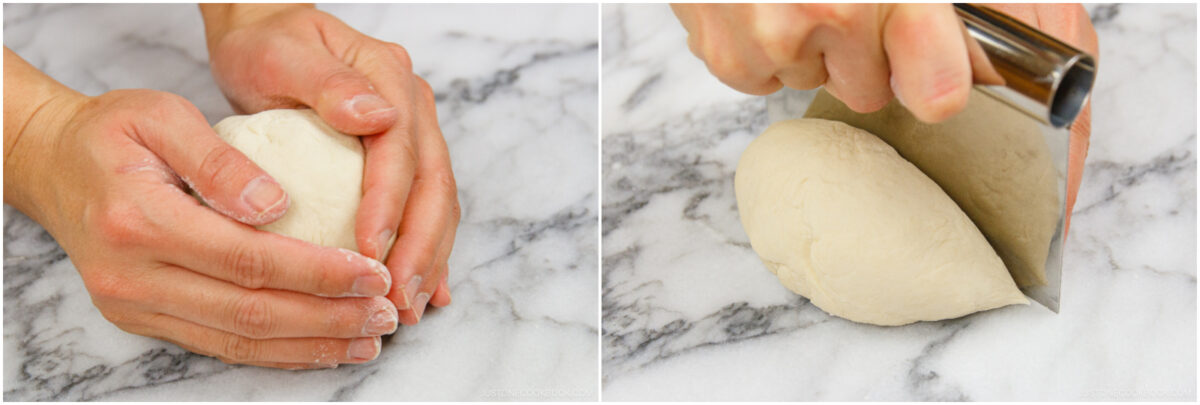
Shape each half into a log about 1½ inches (3.8 cm) thick. It doesn’t need to be perfect, especially if you’ll cut shapes later. Wrap each log in plastic wrap and let it rest for 30 minutes.
To Cut and Shape the Dough
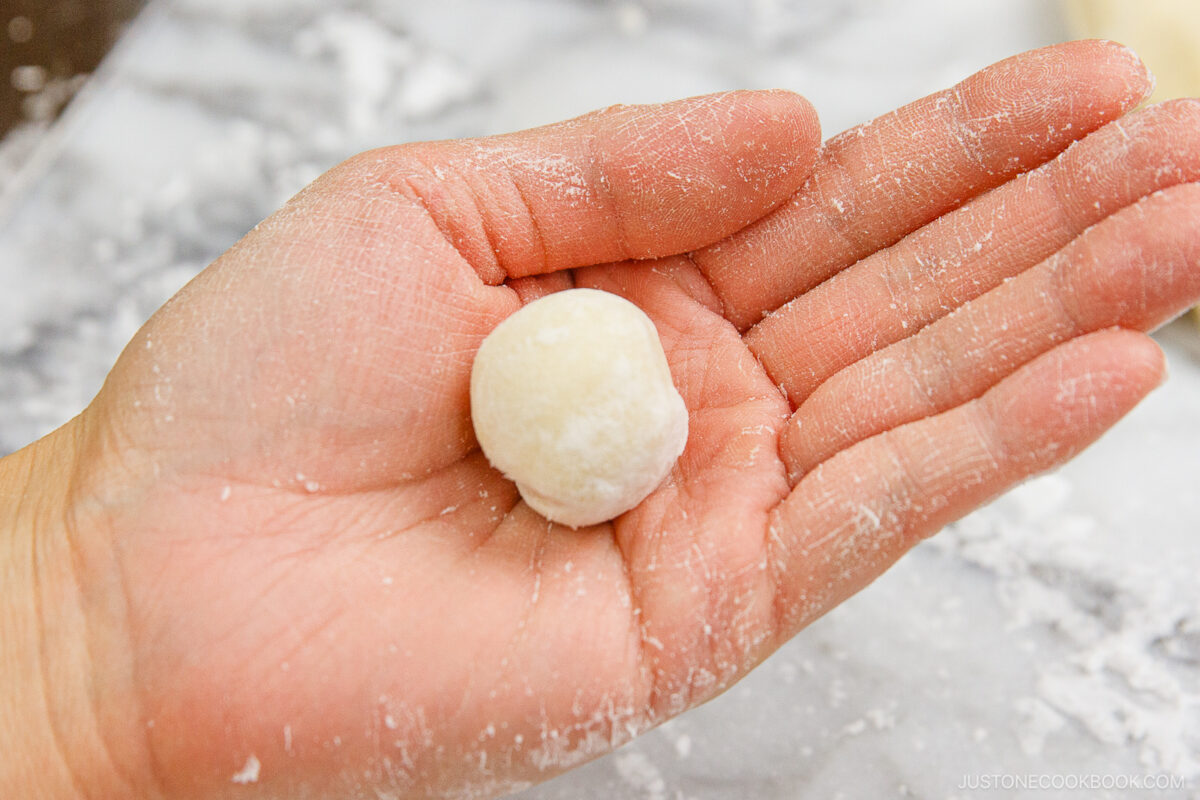
Unwrap the dough and lightly dust the work surface with potato starch or cornstarch. Cut each log into ¾-inch (2 cm) pieces. The sizes don’t have to match since you’ll cut them with a cookie cutter. Always keep the dough covered with a damp kitchen towel so it doesn't dry out.
Nami's Tip: If you plan to freeze the wrappers, dust them with potato starch or cornstarch. Flour makes the wrappers stick together.
Roll each dough piece into a ball.
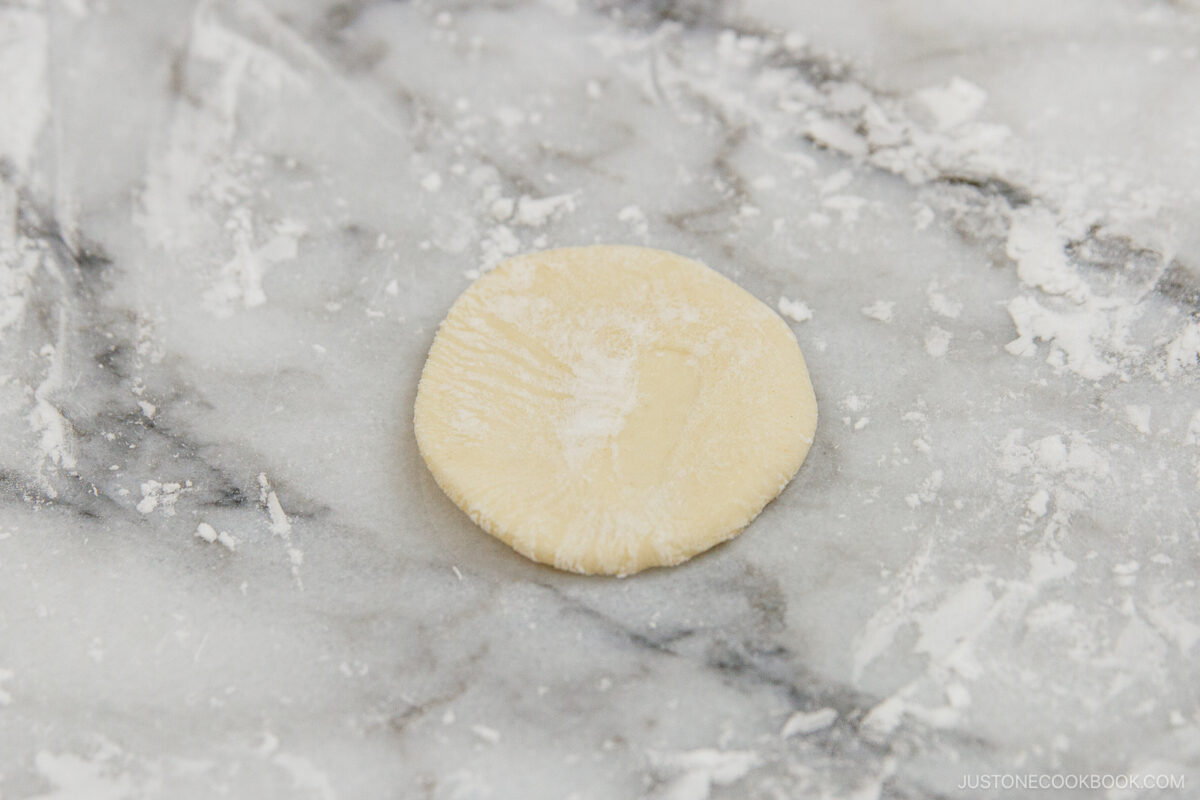
Lightly dust the work surface with starch, then press each ball flat.
To Roll and Cut Wrappers
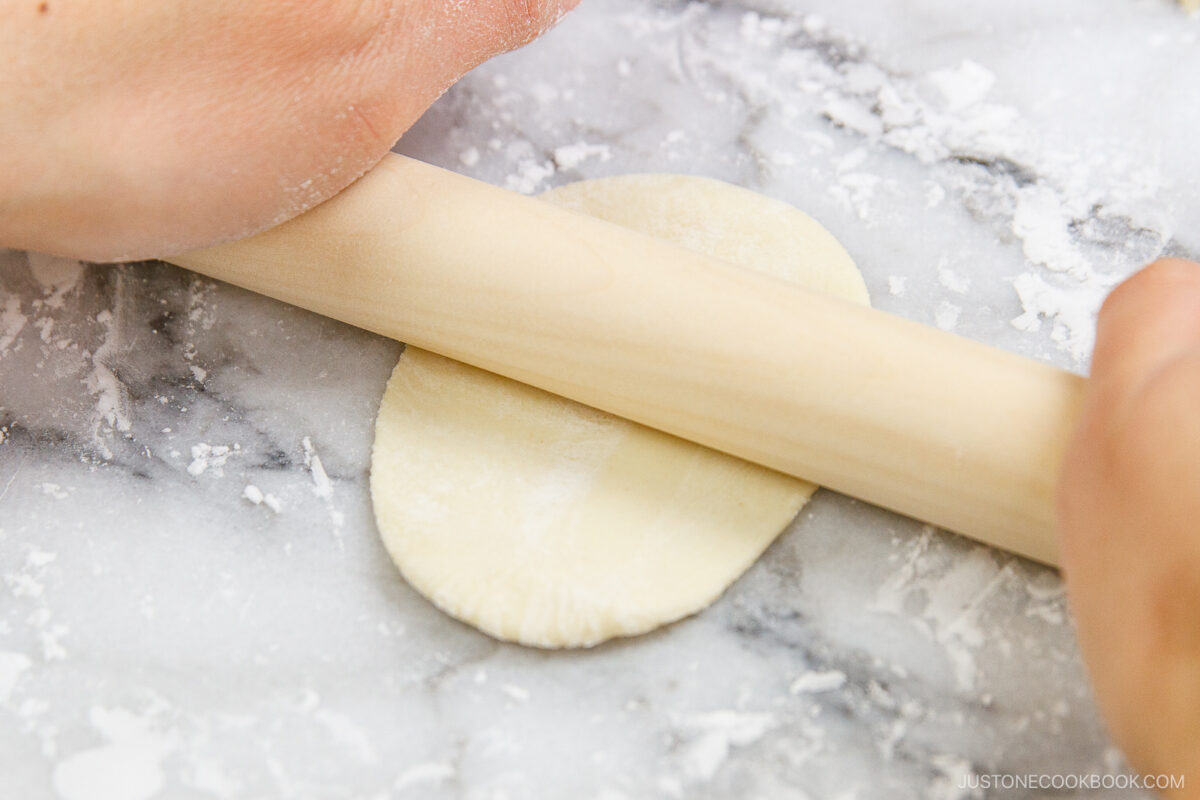
Using a rolling pin, roll out the dough, but leave the top and bottom edges slightly thicker. This trick helps keep the wrapper round. Rotate the dough 90 degrees and roll it into a thin circle, a bit wider than 3 inches (8 cm). If the dough resists or shrinks back, let it rest for a few minutes to relax the gluten, then roll again.
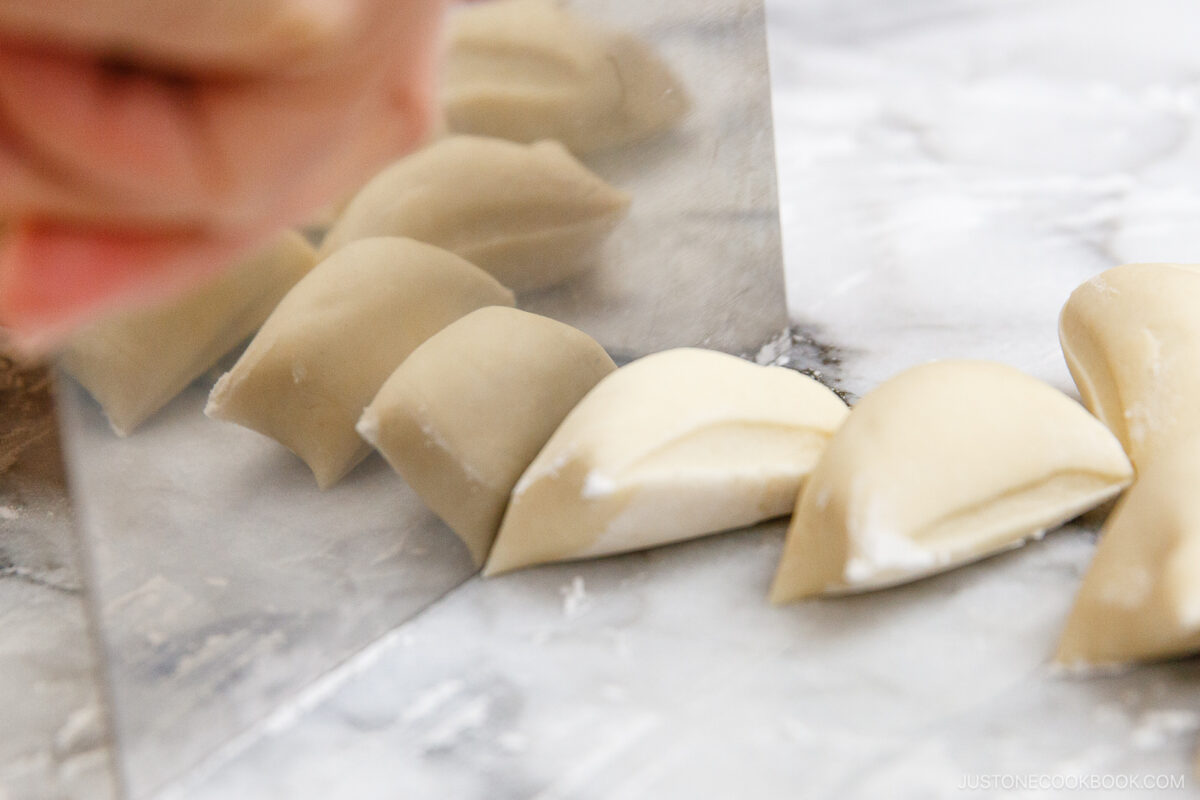
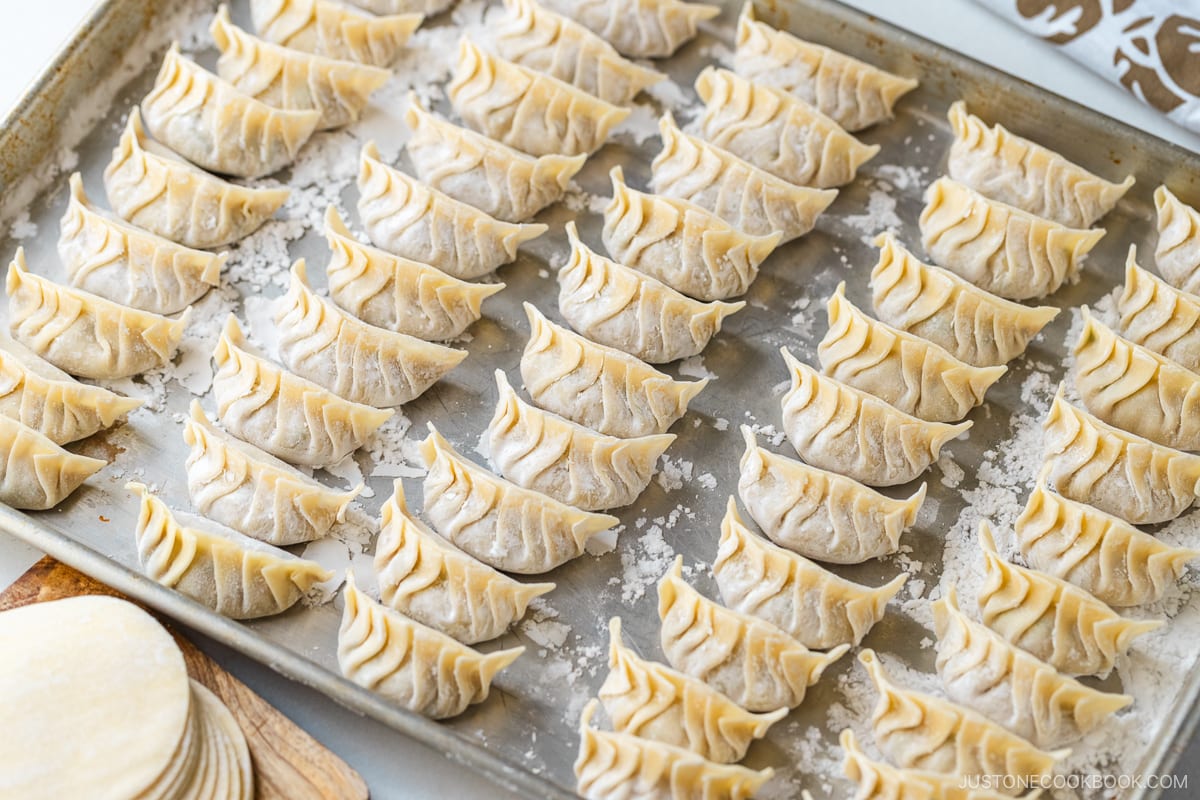
Cut the rolled dough with a 3-inch (8 cm) cookie cutter. If the dough shrinks back, wait a few seconds, then cut. Sprinkle each wrapper with potato starch and stack them, keeping the stack covered with a damp kitchen towel as you roll the rest.
Keep the scraps covered with a damp towel. If they’re still soft later, combine the scraps and re-roll them to make more wrappers.
One batch makes about 38–42 wrappers. They are now ready to use or freeze.

To Store for Later
Wrap the stacked gyoza wrappers in plastic wrap and store in the refrigerator for 3–4 days or in the freezer for up to 1 month. To use, defrost in the refrigerator overnight or leave on the counter for about 60 minutes, depending on the amount and room temperature. Do not defrost in the microwave.
Calories: 24kcal, Carbohydrates: 5g, Protein: 1g, Fat: 1g, Saturated Fat: 1g, Sodium: 15mg, Potassium: 7mg, Fiber: 1g, Sugar: 1g, Calcium: 1mg, Iron: 1mg
Did you make this recipe?
Tag @justonecookbook on Instagram so we can see your delicious creation!
Editor’s Note: This post was originally published on February 19, 2014, and updated on July 27, 2020. It was republished on September 10, 2025, with new tips and helpful content.


 English (US) ·