 18 hours ago
2
18 hours ago
2
Recipe Highlights
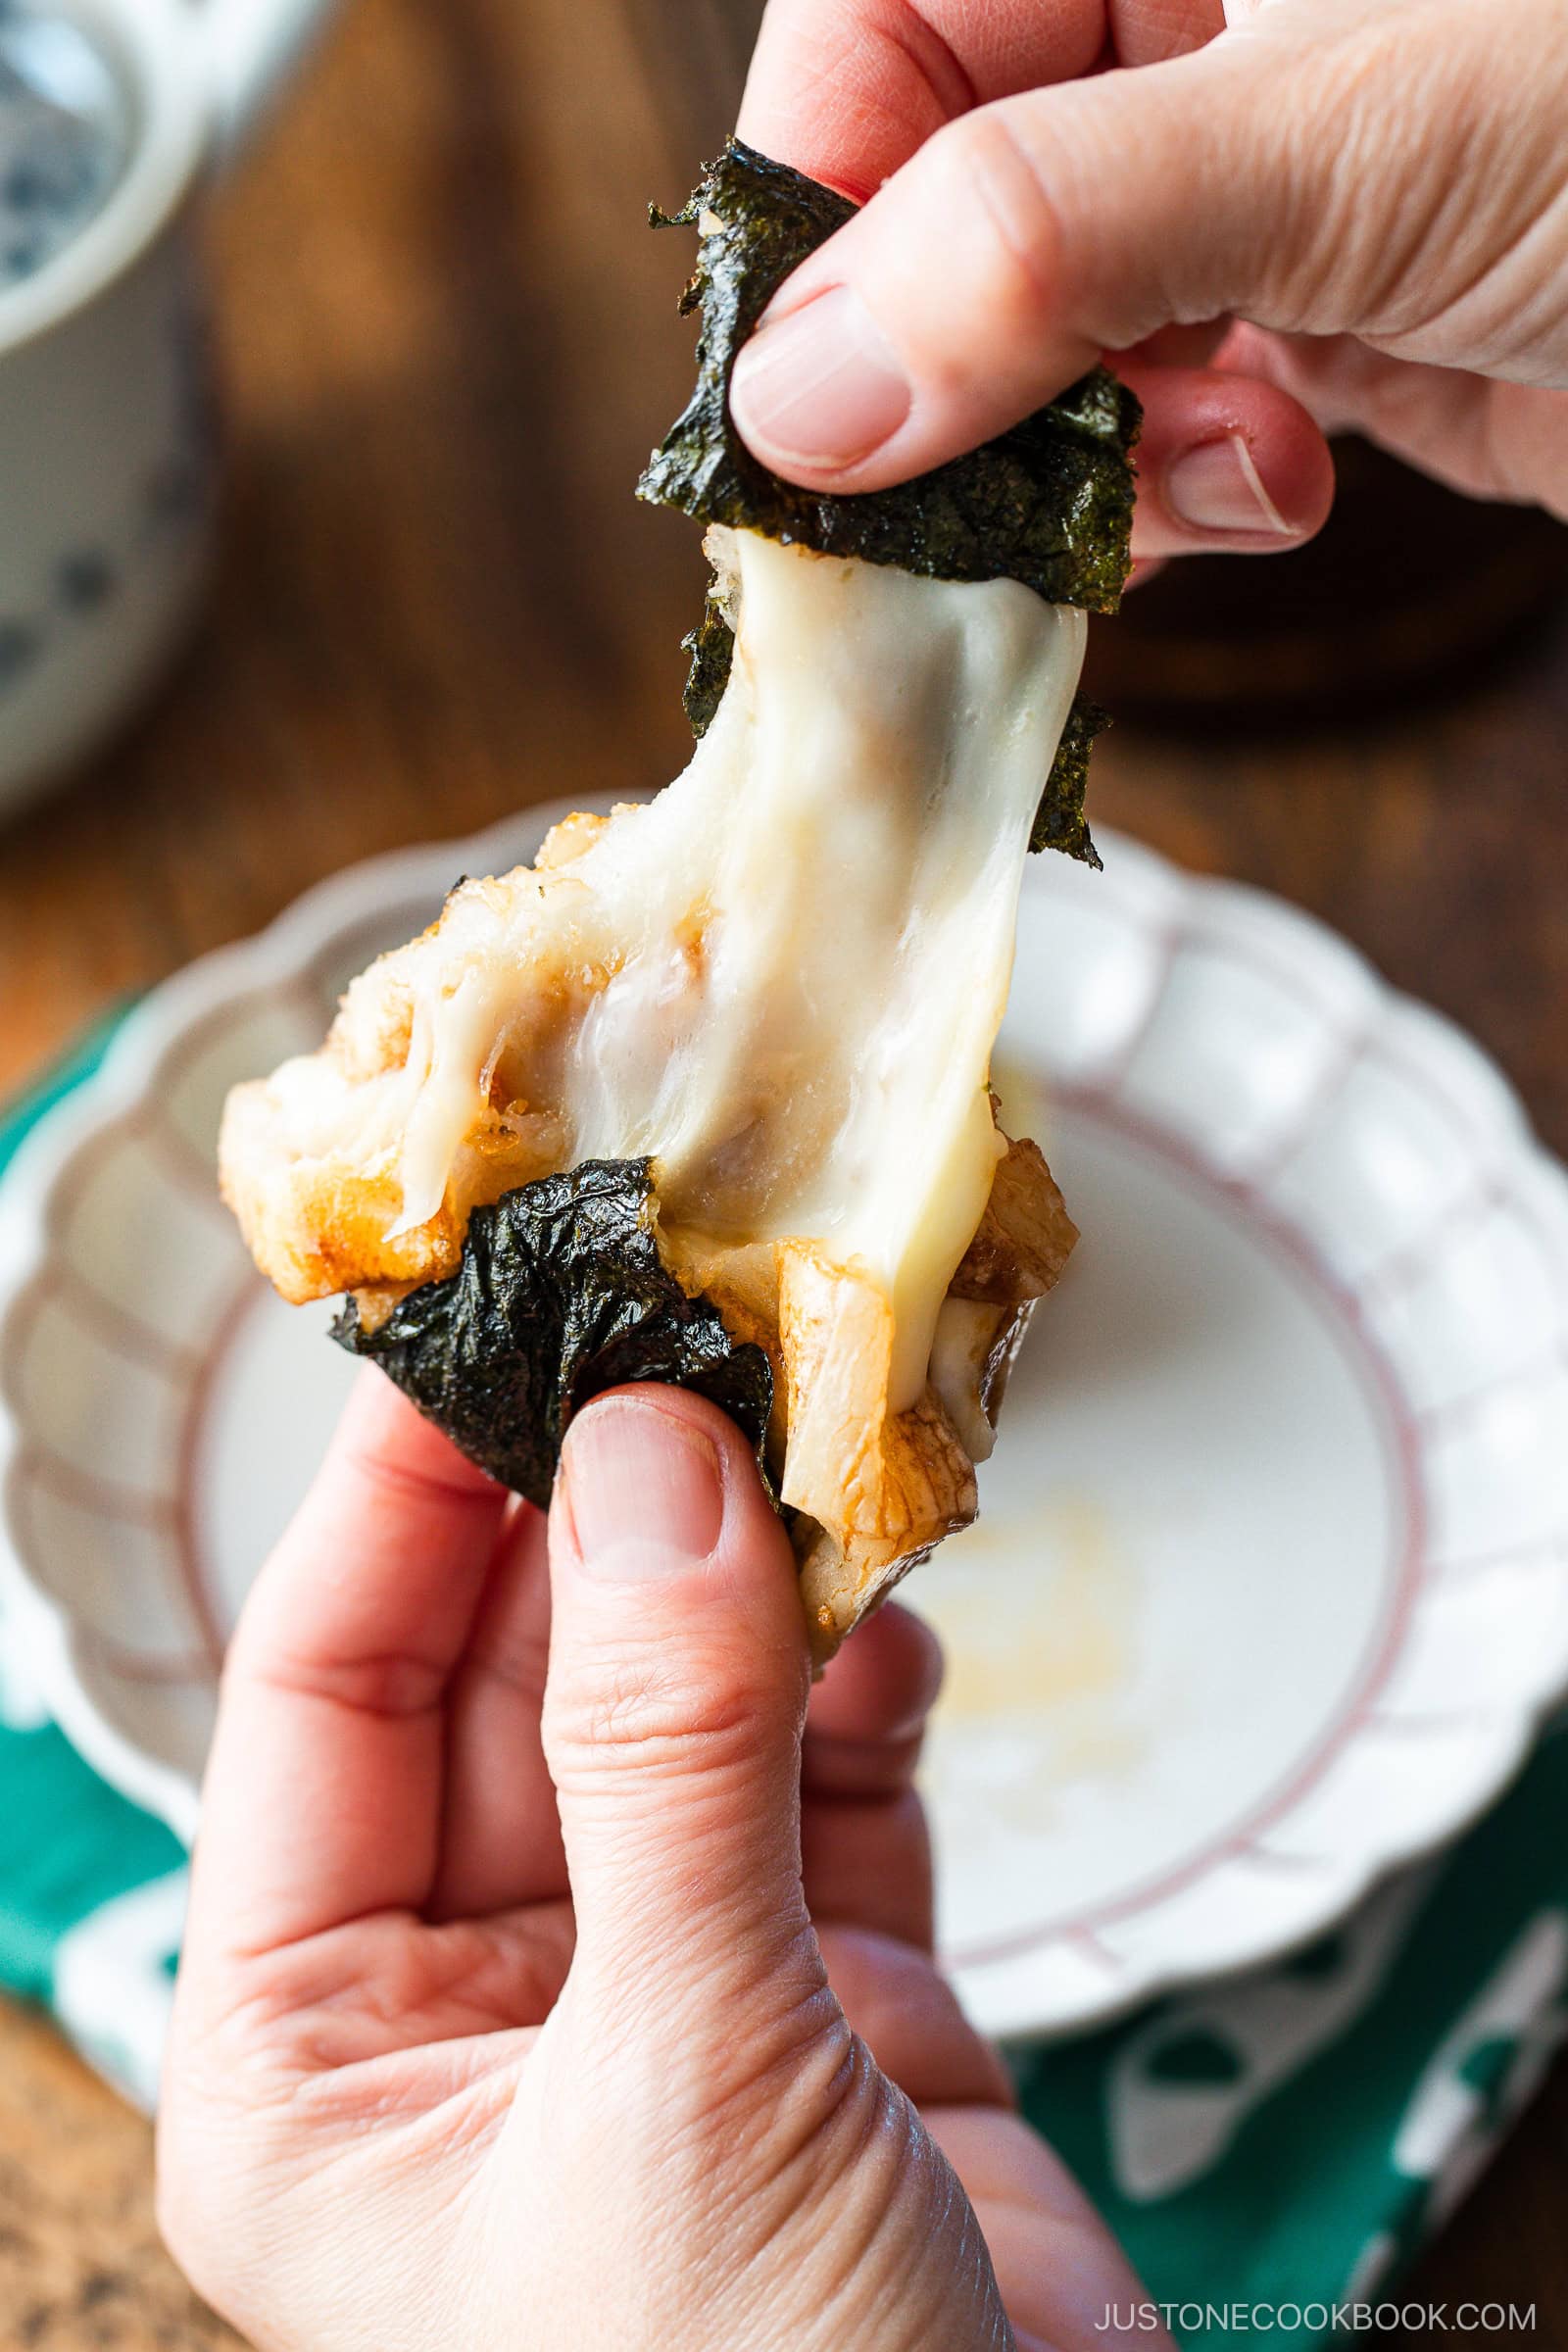
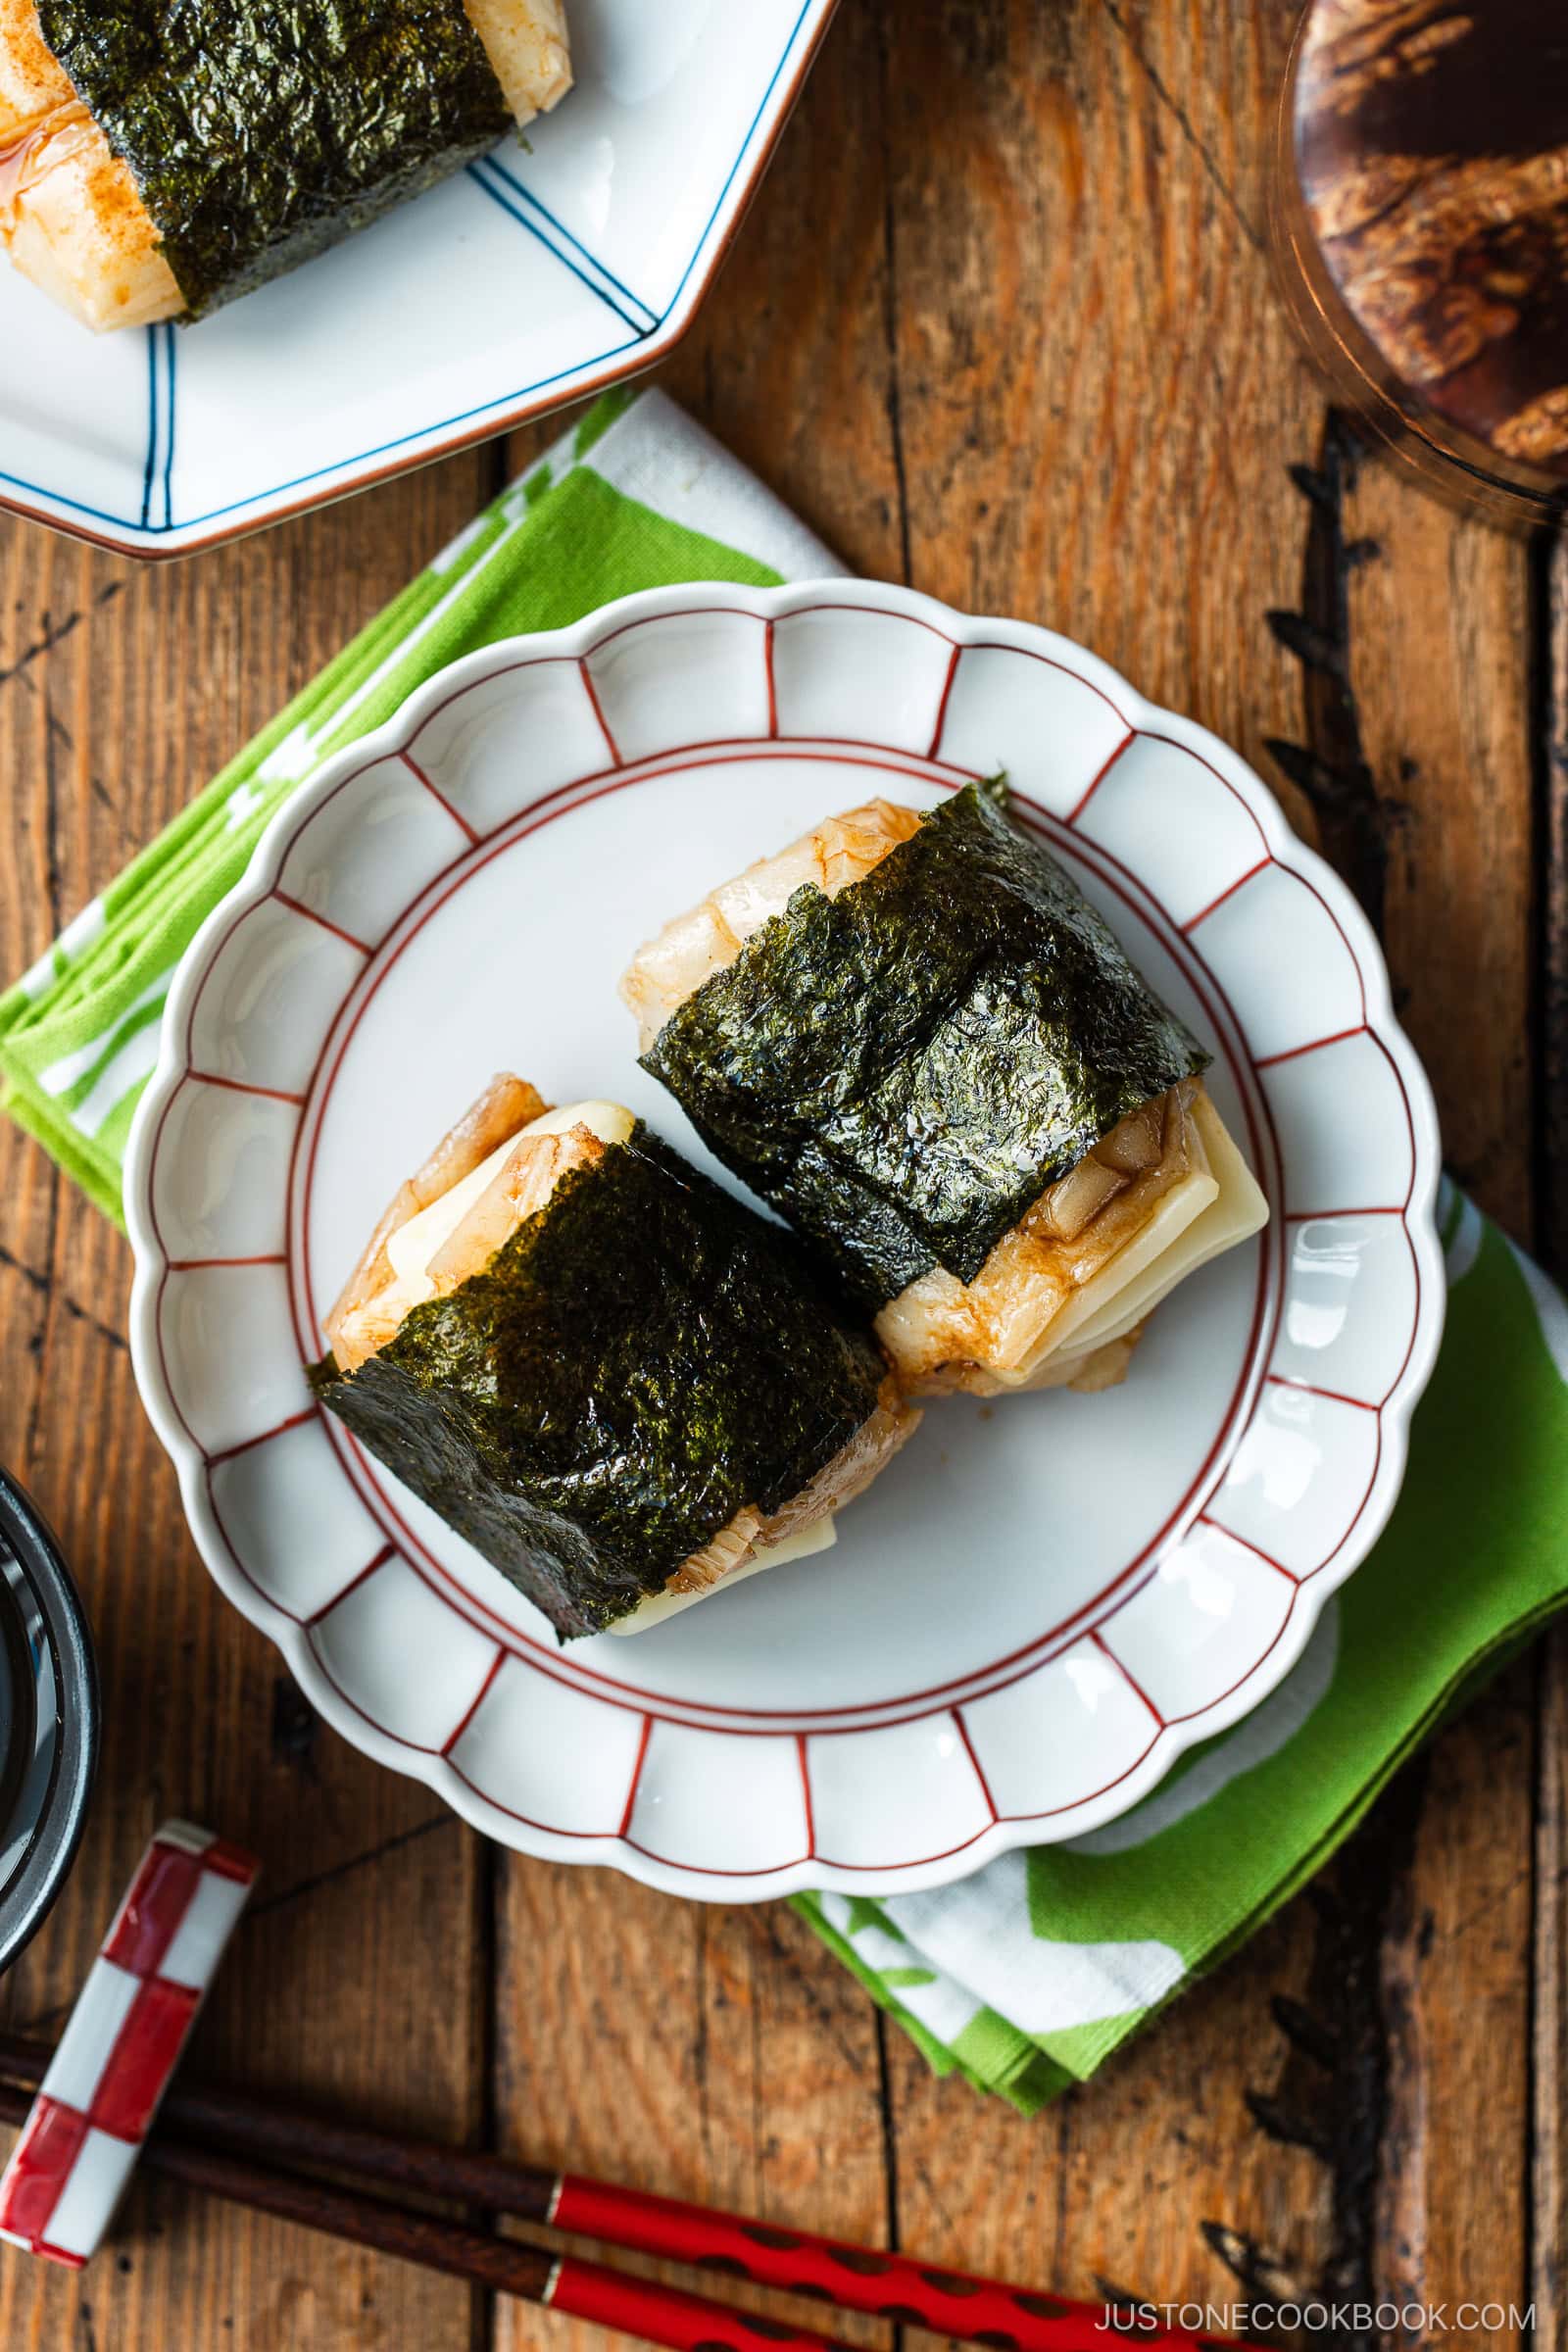
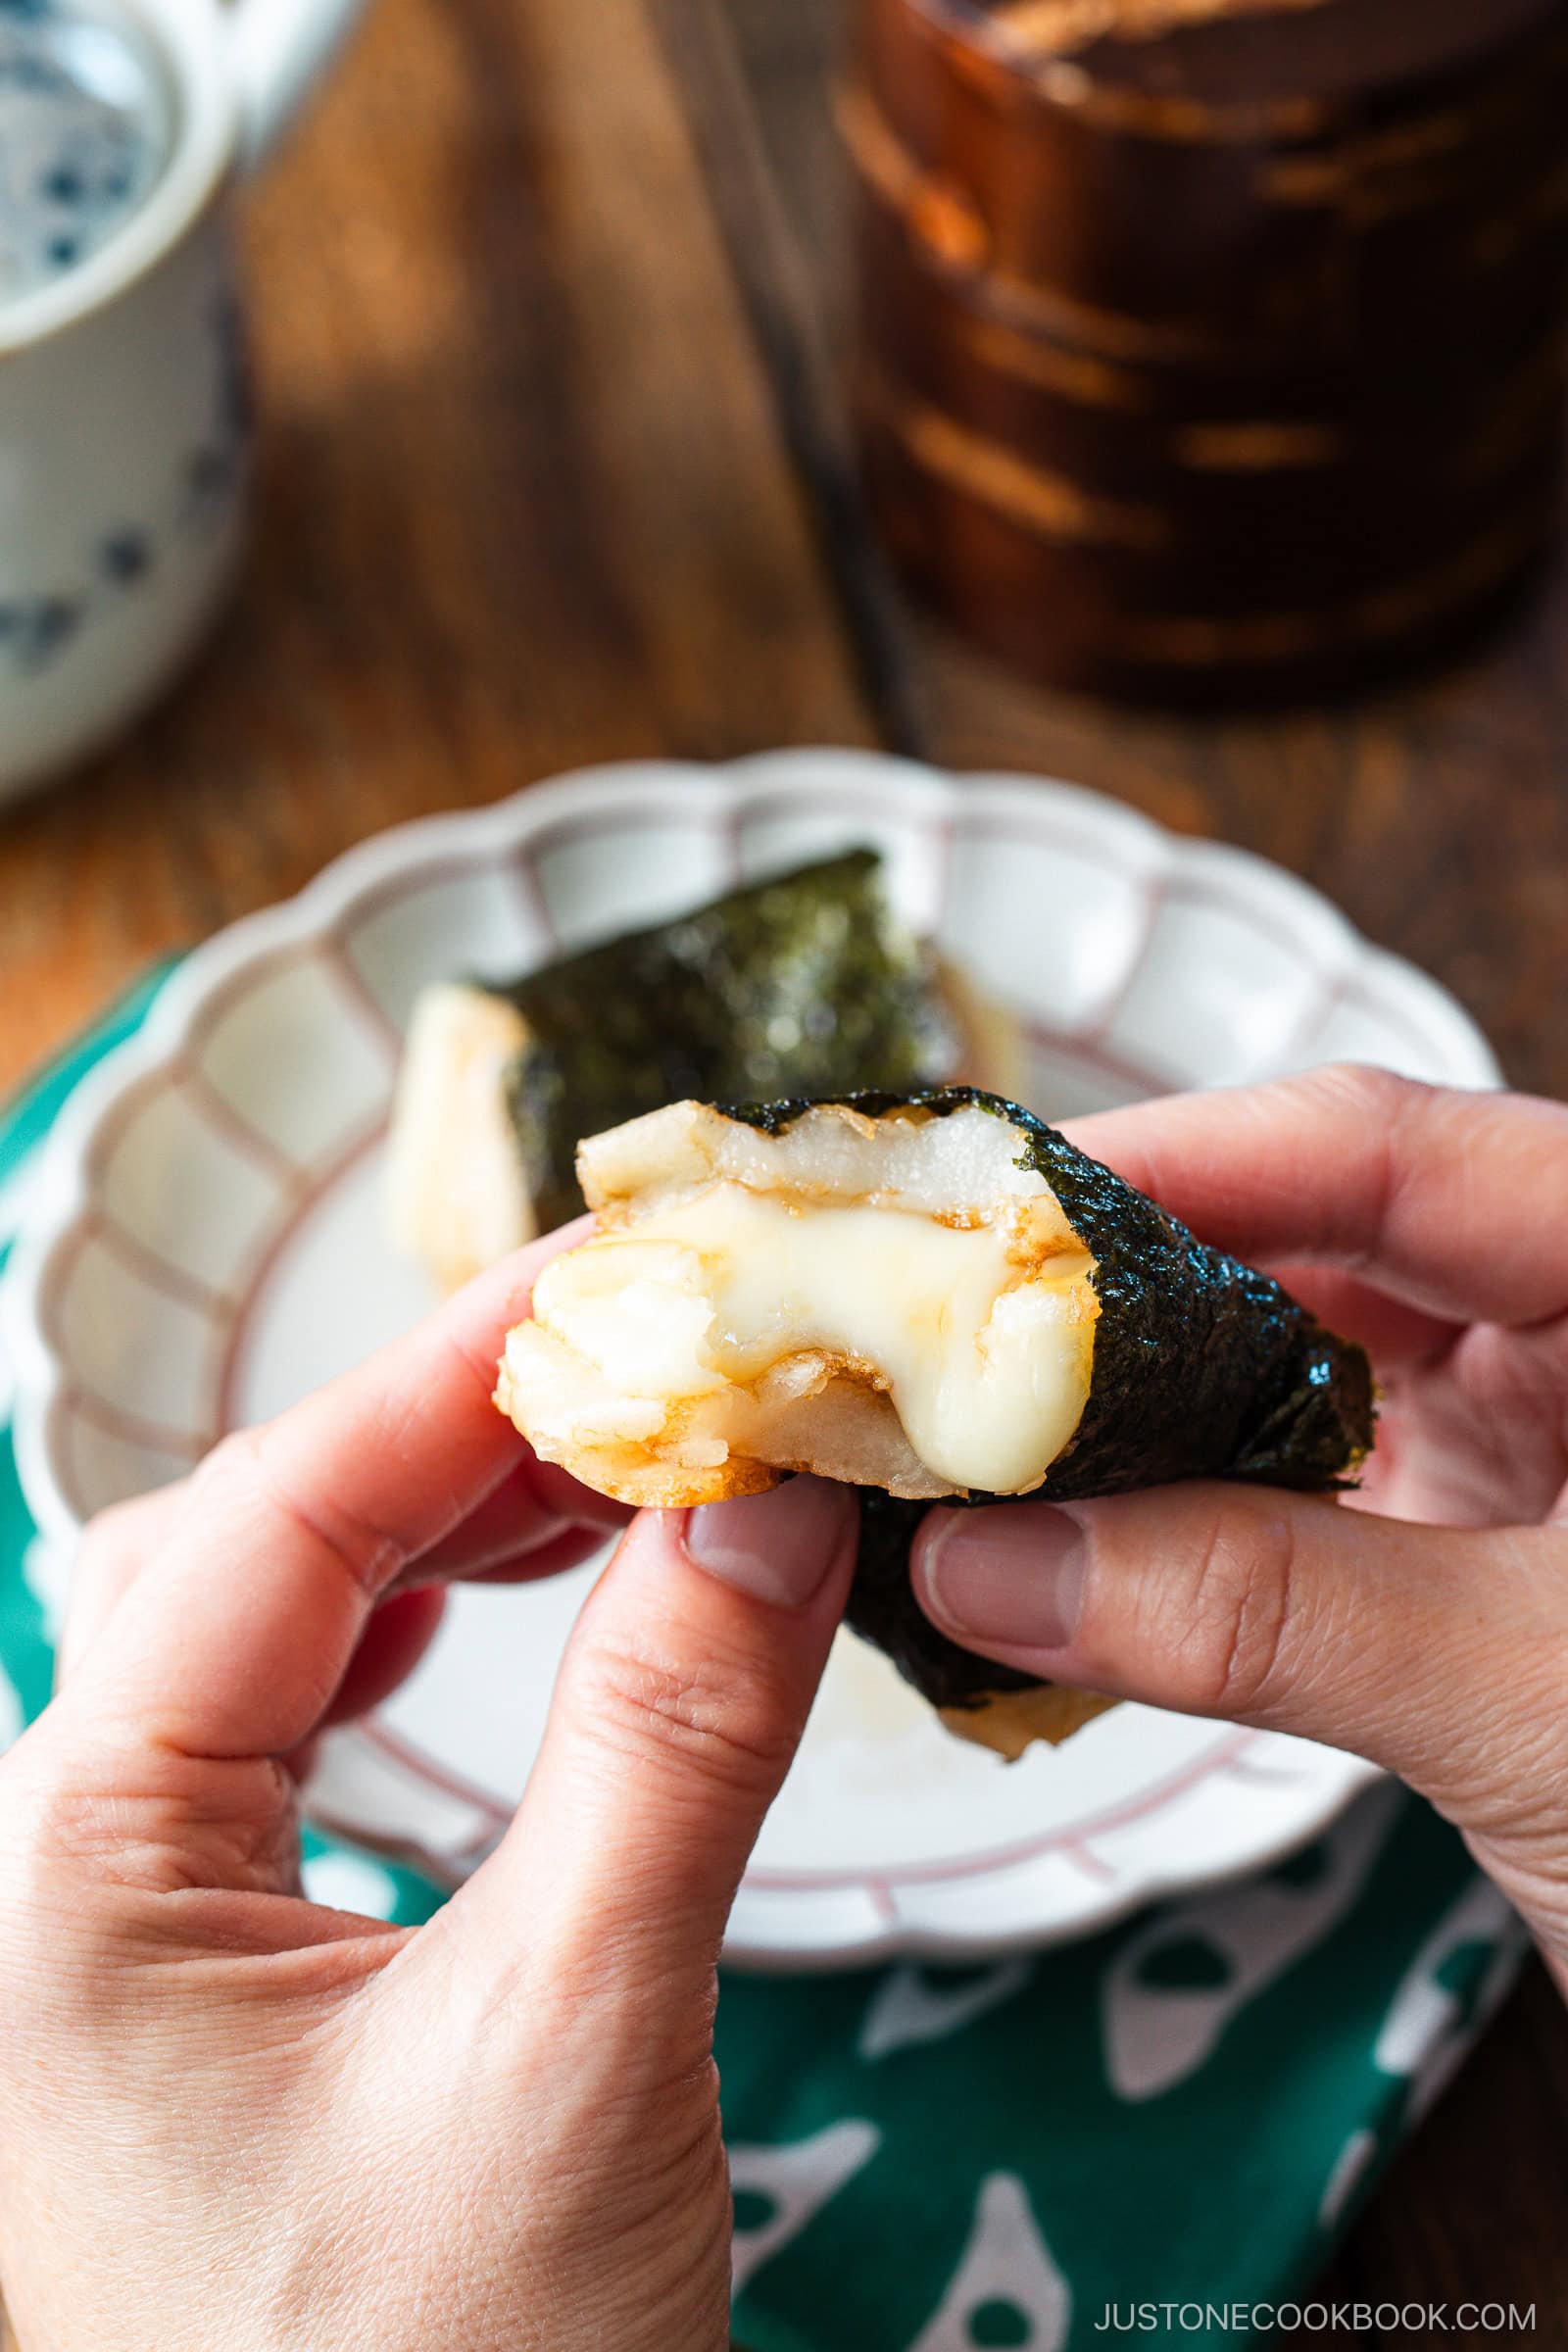
Isobeyaki Mochi with Cheese is one of my favorite ways to turn dried pantry rice cake into a cozy and savory snack. The outside gets lightly crisp, the inside stays soft and chewy, and the sweet soy sauce adds delicious umami. I’ll show you my family’s version with stretchy cheese that melts right into the hot mochi! It’s quick to make and always disappears fast in my house.
- Big umami flavor. Soy sauce, nori, and cheese deliver a salty and savory 1-2-3 punch!
- Fun textures. Crispy edges, chewy mochi, and a stretchy cheese pull make a satisfying combo.
- Fast and easy. It’s ready in just minutes with dried, shelf-stable kiri mochi.
If you love Japanese mochi snacks, try my Kinako Mochi (Rice Cake with Soybean Flour), Zenzai (Sweet Red Bean Soup), and Zunda Mochi (Sweet Edamame Mochi) next!
Table of Contents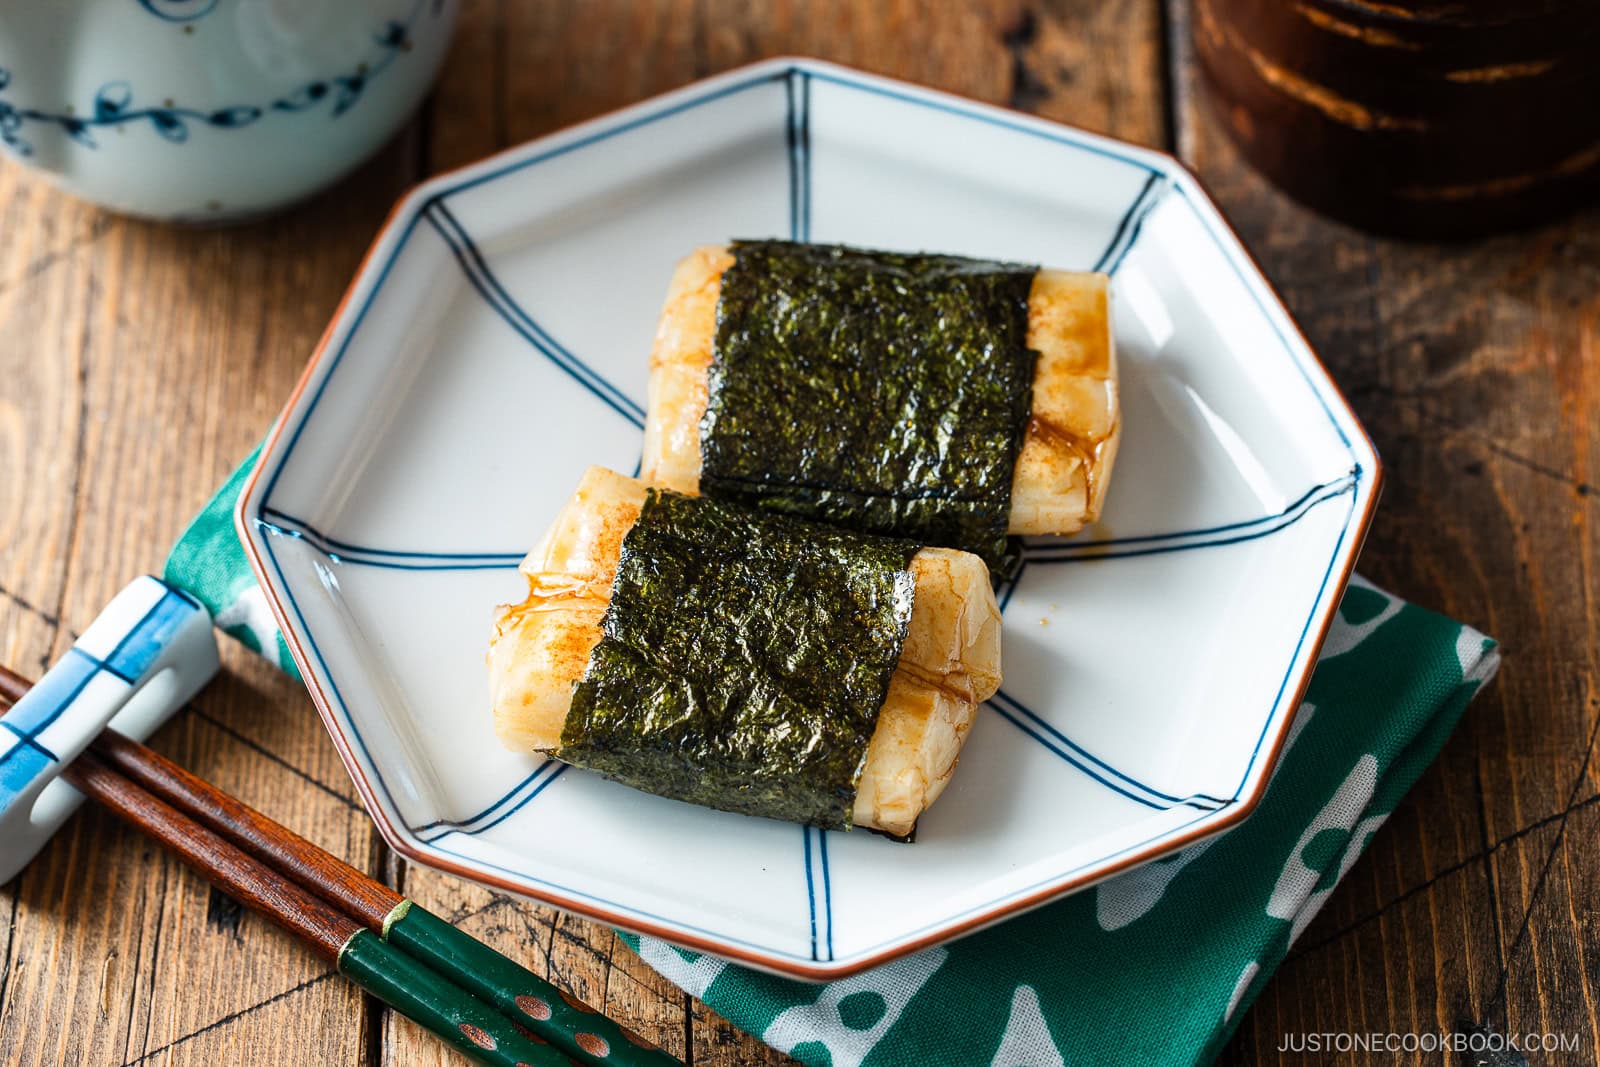
What is Isobeyaki Mochi?
Isobeyaki (磯辺焼き) mochi is grilled Japanese glutinous rice cake seasoned with soy sauce and wrapped in nori seaweed. The word isobe means “seashore,” and dishes using nori or coastal ingredients often carry this name. This style is especially popular in eastern Japan. It’s commonly enjoyed any time of year side dish or snack but particularly during Japanese New Year.
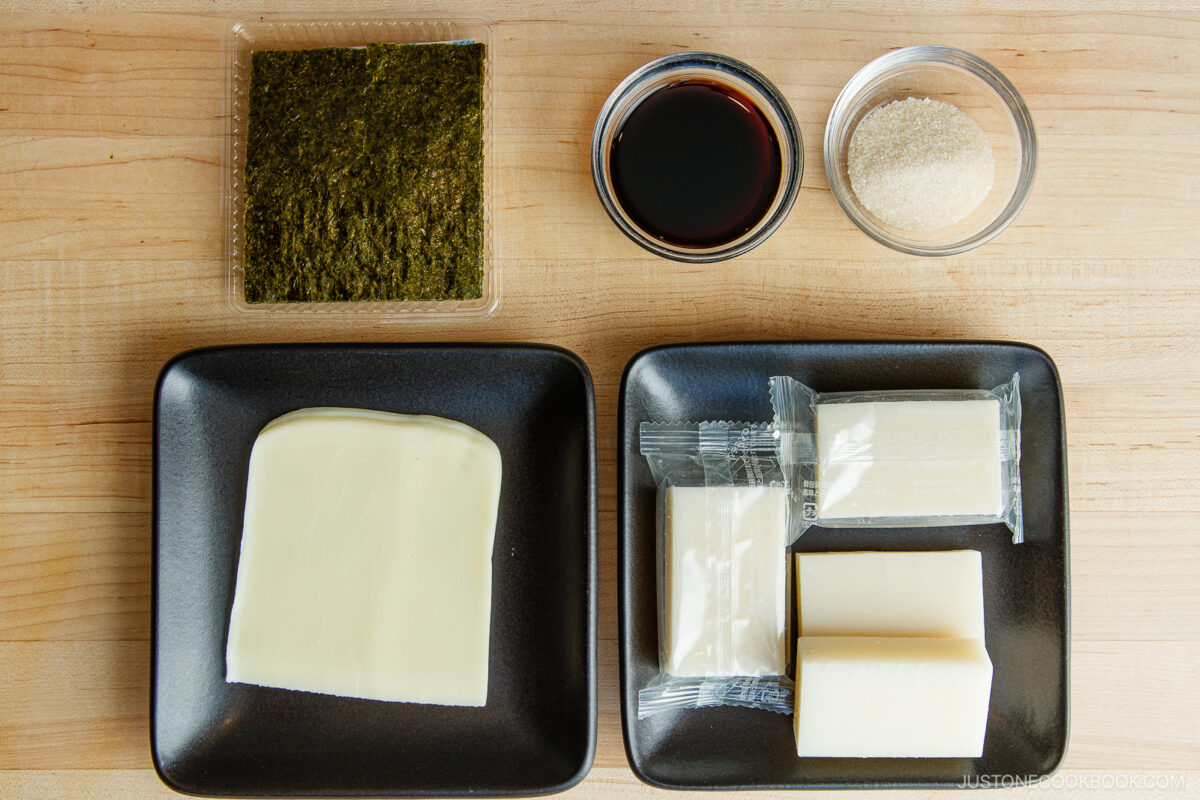
Ingredients for Isobeyaki Mochi with Cheese
- Japanese rice cakes (kiri mochi) – dried, cut, and individually wrapped; available at Japanese grocery stores or Amazon
- soy sauce
- sugar (optional)
- nori (dried laver seaweed) – I use seasoned nori called ajitsuke nori
- cheese slices – optional; any kind; I used mozzarella, but Swiss, provolone, Muenster, and Brie also work well
Find the printable recipe with measurements below.
Jump to RecipeHow to Make Isobeyaki Mochi
- Grill the mochi. Toast the dried rice cakes in a frying pan (left photo) or oven (right photo) until puffed, lightly golden brown, and soft in the center.

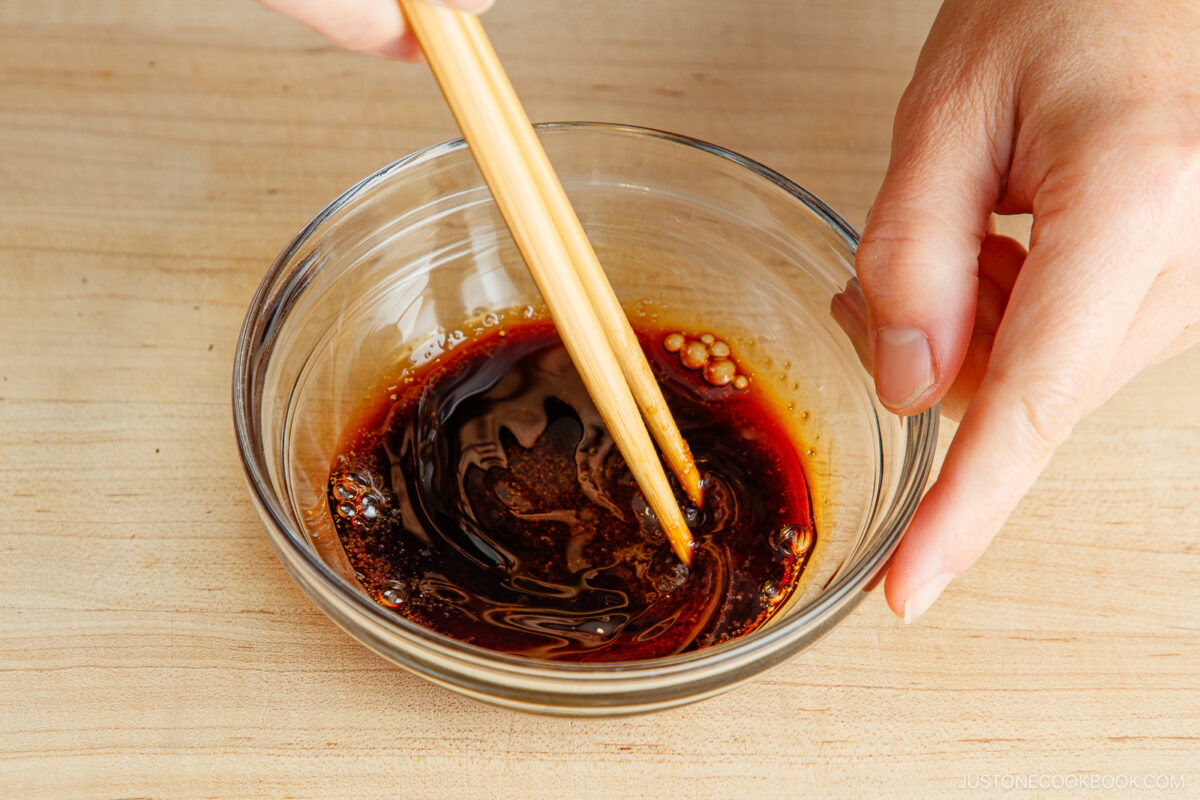
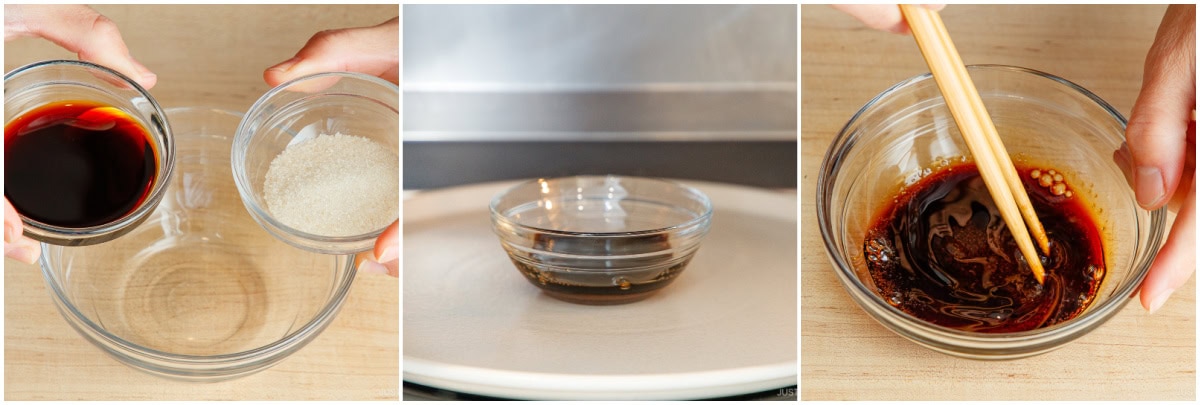
- Make the sauce. Heat soy sauce and sugar briefly. Stir well until the sugar dissolves. Gently smash the toasted mochi with your palm, then brush or dip it generously in the sweet soy sauce.
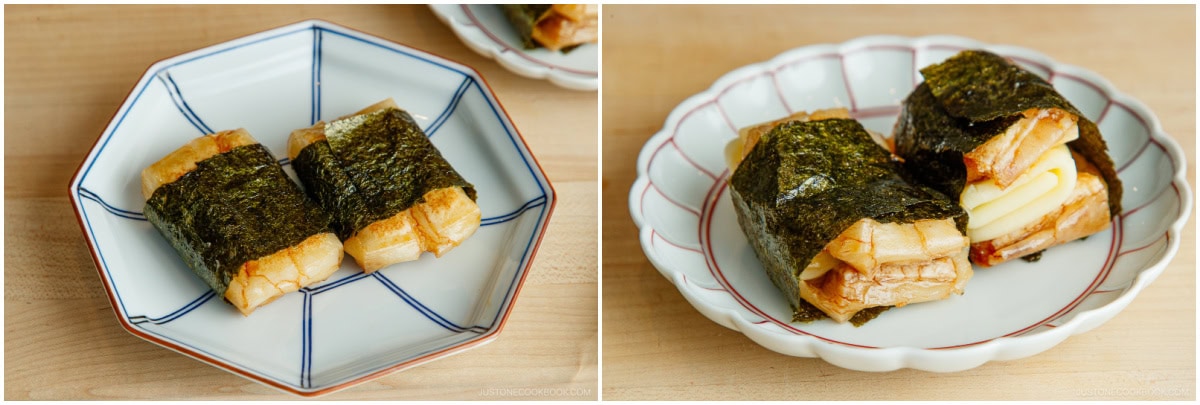
- Add optional cheese and wrap with seasoned nori. Stretch the hot mochi slightly, fold it over a slice of cheese. Wrap the seasoned mochi with nori seaweed.
- Serve. Enjoy right away while hot, chewy, and melty.

Nami’s Recipe Tips
These simple tips will help you make this Isobeyaki Mochi perfectly every time.
- Wait for the puff. Puffing means the inside is soft and ready.
- Cook gently. Medium-low heat cooks evenly and warms the center without burning.
- Serve immediately. Enjoy it hot, as mochi hardens as it cools.
- Use kiri mochi. Shelf-stable Japanese rice cake is what most Japanese homes use. Freshly made mochi is wonderful too, if you have it.
- Handle with care. Cooked mochi is very hot and sticky. Very careful when turning and wrapping.
Variations and Customizations
Looking to change things up? Try these easy and tasty ideas!
- Make it spicy. Sprinkle shichimi togarashi (Japanese seven spice) for gentle heat.
- Make butter soy sauce. Melt a little butter into the isobeyaki sauce for a rich twist.
- Add toppings. Beyond sliced cheese, try mentaiko (pollock roe), grated daikon, yuzu kosho, or wasabi.
- Gluten free. Use tamari or gluten-free soy sauce instead of regular soy sauce.
- Mochi swaps. Make isobeyaki-style bites with fish cake, scallops, sliced potatoes, or potato mochi!
Storage Tips
To store: Isobeyaki mochi is best enjoyed warm and fresh. Make only what you plan to eat since cooked mochi hardens as it cools.
To reheat: Reheating is not recommended, as the chewy texture will not return.
FAQs
Can I skip the sugar in isobeyaki sauce?
Yes. Plain soy sauce with nori is common for isobeyaki in eastern Japan, while soy sauce with sugar is popular in western Japan. Adjust sweetness to taste or omit it.
Can you use different cheeses in isobeyaki mochi?
Yes. Any sliced cheese works. I used mozzarella slices, but Swiss, provolone, Muenster, and Brie also work well.
Is nori required in isobeyaki mochi?
Yes—nori is what makes it “isobeyaki.” In cooking, isobe refers to dishes seasoned or wrapped with nori, like isobeyaki mochi. If you don’t use nori, simply don’t call it isobeyaki. You can skip the seaweed and enjoy the mochi however you like.
When do you eat isobeyaki mochi?
There’s no specific time. While it’s especially popular during Japanese New Year, isobeyaki mochi is enjoyed year-round as a snack or side dish.
I’d love to hear how yours turned out! 💛 Please leave a star rating and comment below to share your experience. Your feedback not only supports Just One Cookbook but also helps other home cooks discover recipes they can trust.
Gather all the ingredients.
To Make the Sweet Soy Sauce
Combine 2 Tbsp soy sauce and 1 Tbsp sugar in a microwave-safe bowl. Heat it briefly until the sugar melts. Stir to dissolve and set aside.
To Pan-Grill the Mochi (Stovetop)
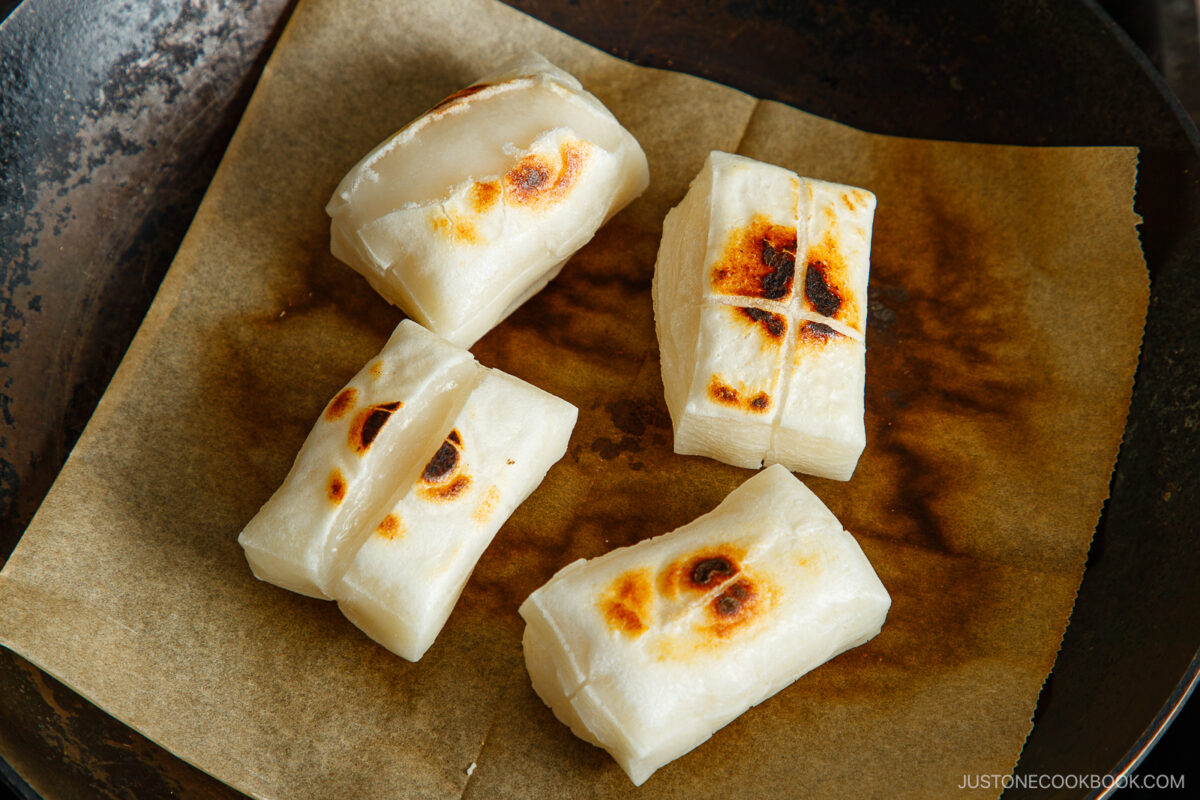
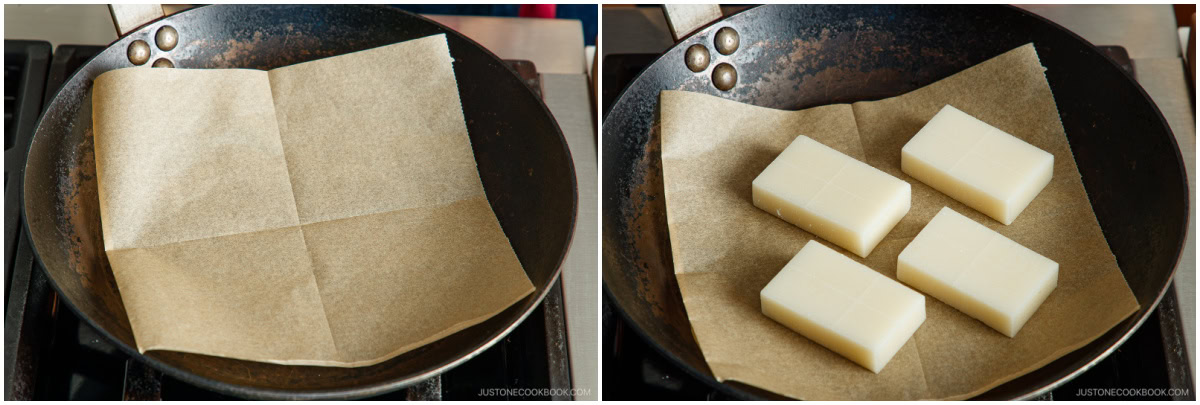
Line a cold frying pan with parchment paper and evenly space 4 Japanese rice cake (kiri mochi) on top.
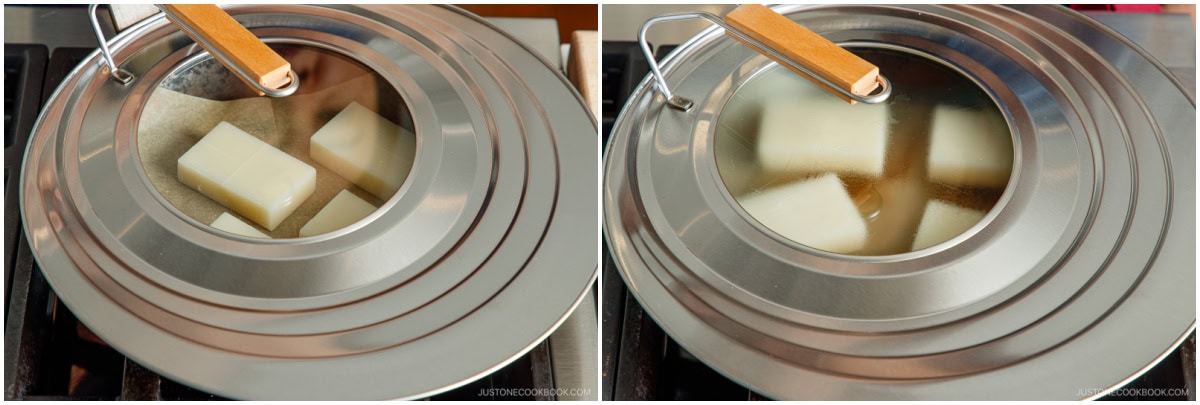
Turn on the heat to medium low and cover with a lid. Set the timer for 5 minutes. Remove the lid as the mochi begins to puff. (It's OK to occasionally lift the lid to check the mochi.)
Nami's Tip: Covering the pan traps heat and moisture so the mochi cooks evenly.
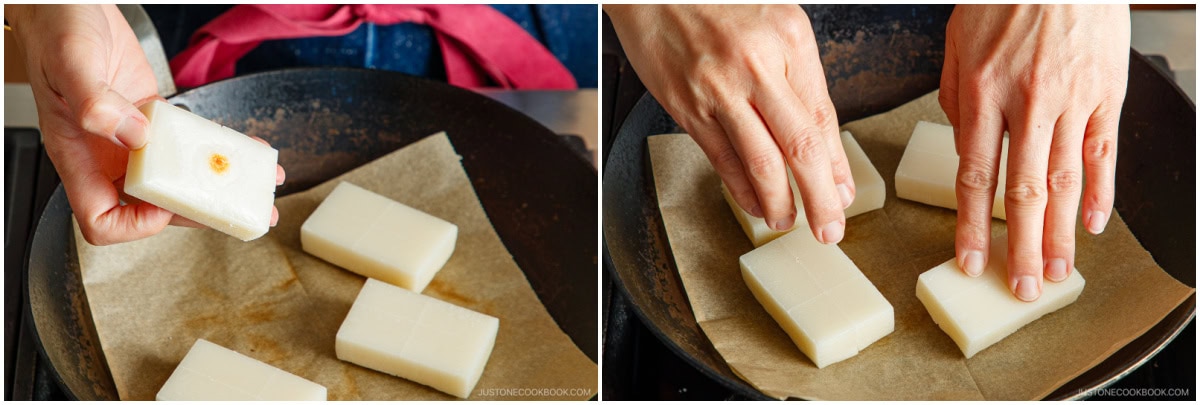
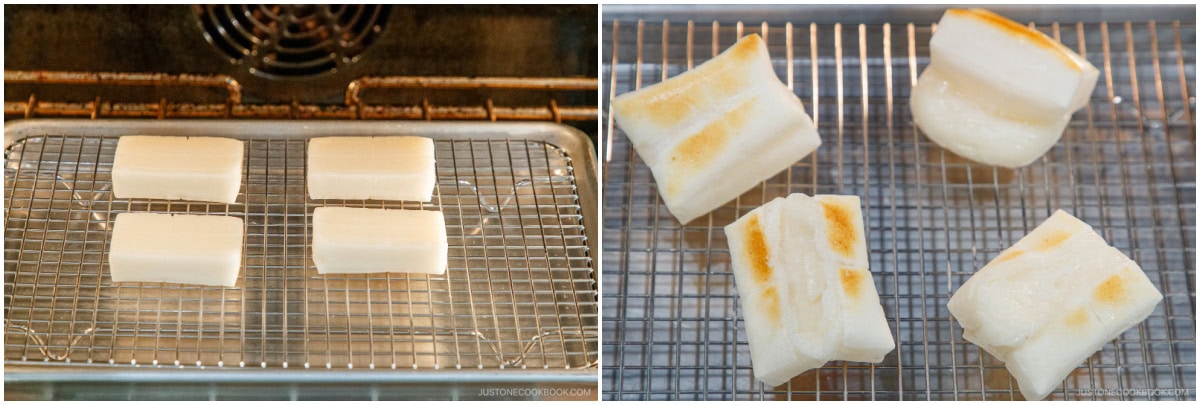
If the bottom develops golden toast marks in only one spot (see image), press down gently once to encourage even toasting.
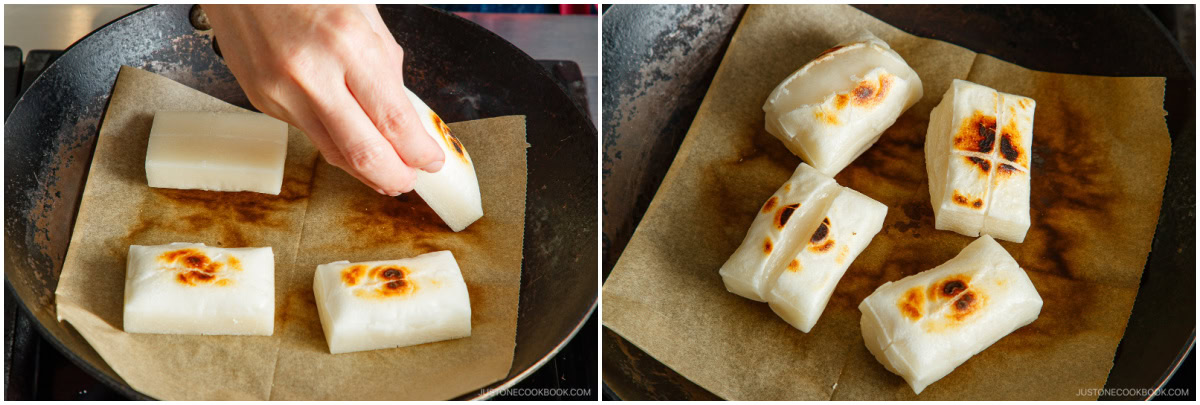
After 5 minutes, flip them over and grill on the other side for 5–6 minutes, until puffed, browned, and soft inside. Remove immediately.
Nami's Tip: Don't cook them too long, or the hot and molten mochi can burst from the center and overflow.
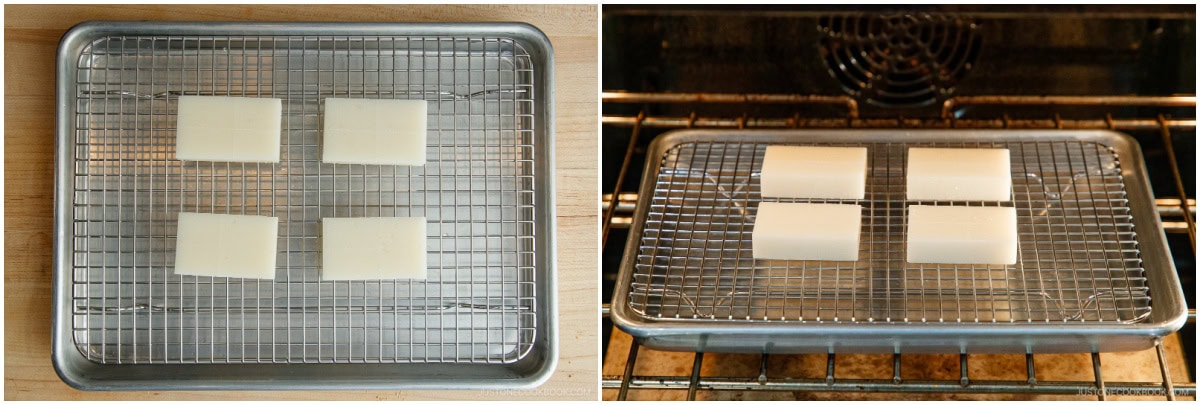
To Broil or Toast the Mochi (Oven)
Preheat: Place the oven rack in the middle position. Preheat the broiler on High or a toaster oven at 400ºF (200ºC) for 3 minutes.
Place the mochi on top of an ungreased, oven-safe wire rack set in a baking sheet.
Broil: Put in the preheated oven and set the timer for 3 minutes.
After 3 minutes, flip the mochi. The top should be light golden and slightly puffed.

Grill the other side until puffed, golden brown, soft inside, about 3 minutes. Remove immediately.
Nami's Tip: Remove from the oven as soon as they puff up. If you cook them too long, the hot and molten mochi can burst from the center and overflow.
To Make the Isobeyaki
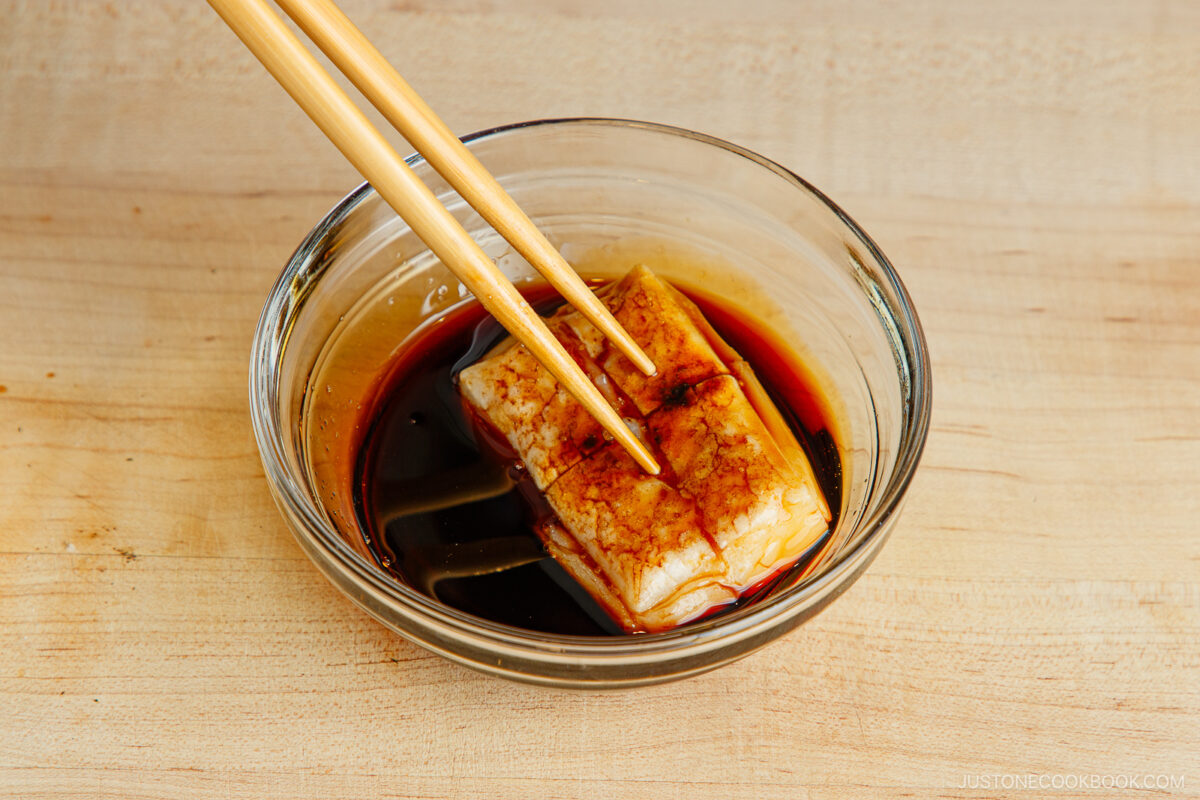
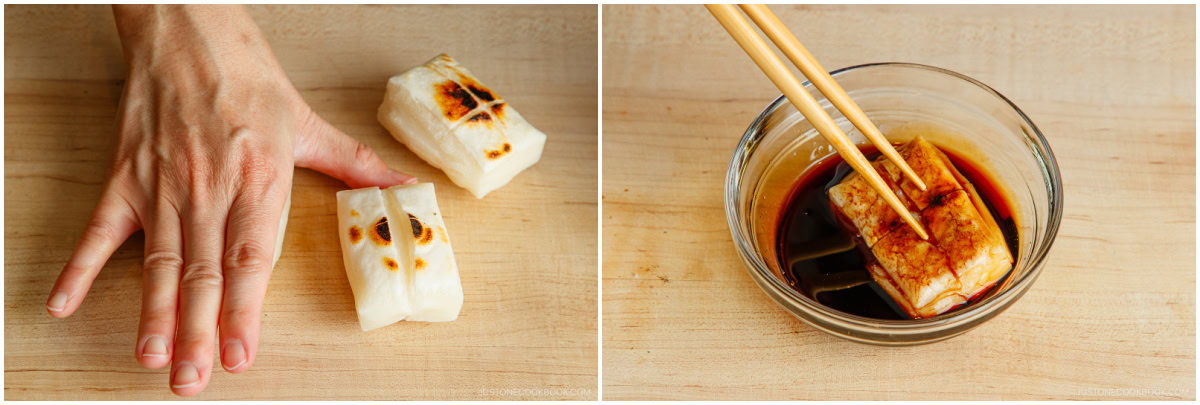
The classic version: Press down on the puffed mochi with your hand to flatten it. Then, roll it in the sweet soy sauce to coat completely. Wrap each mochi with two pieces of ajitsuke nori (dried laver seaweed).
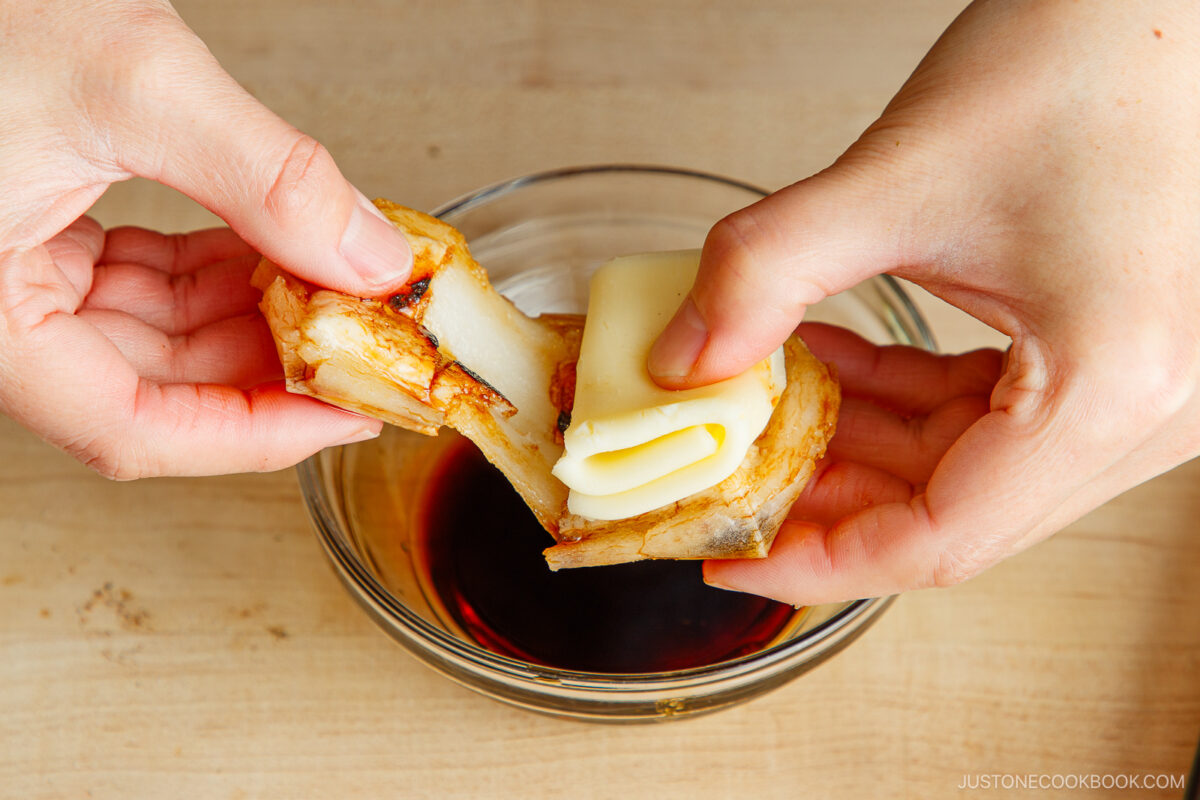
My family's version with cheese (optional): Cut 2 slices cheese in half. Fold each piece in thirds.
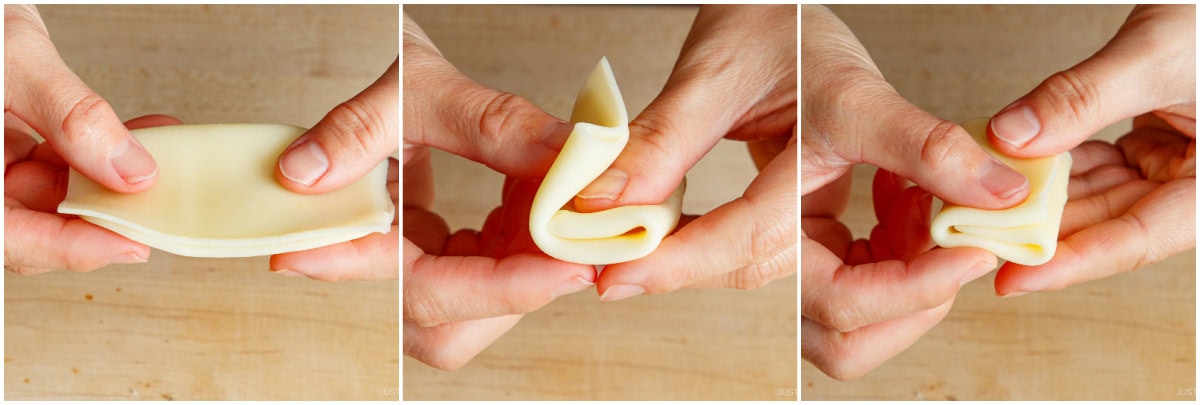
Press down and flatten the puffed mochi with your hand. Then, roll it in the sweet soy sauce to coat completely. Now, pull the mochi apart to extend it.
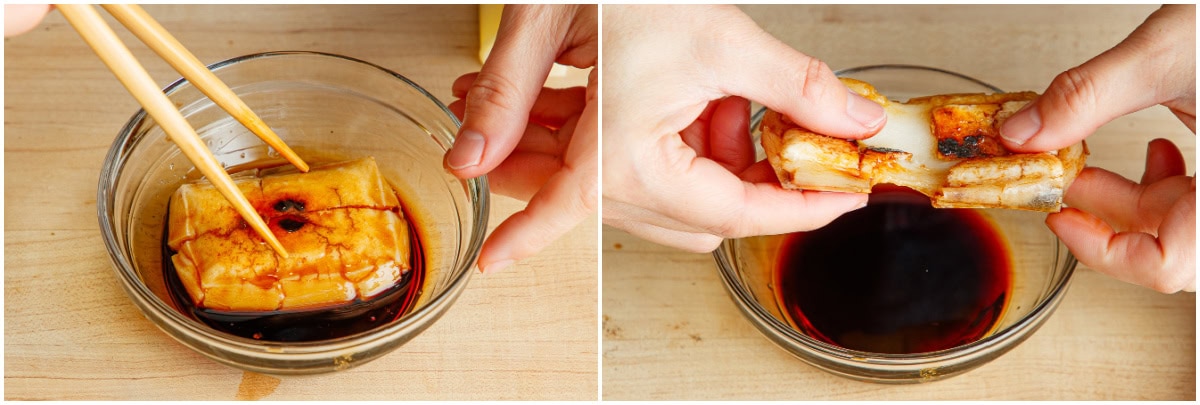
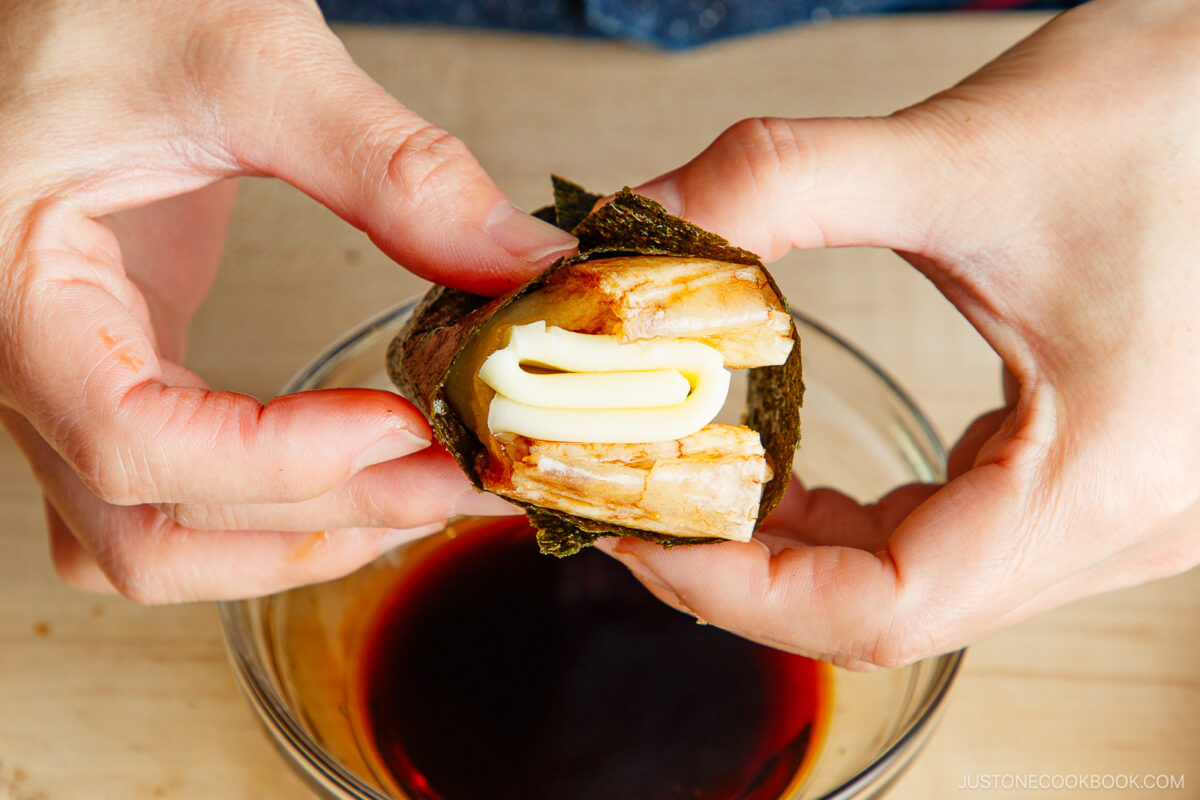
Place the cheese inside and fold the mochi over it to cover. Wrap each piece with two slices of ajitsuke nori (dried laver seaweed).

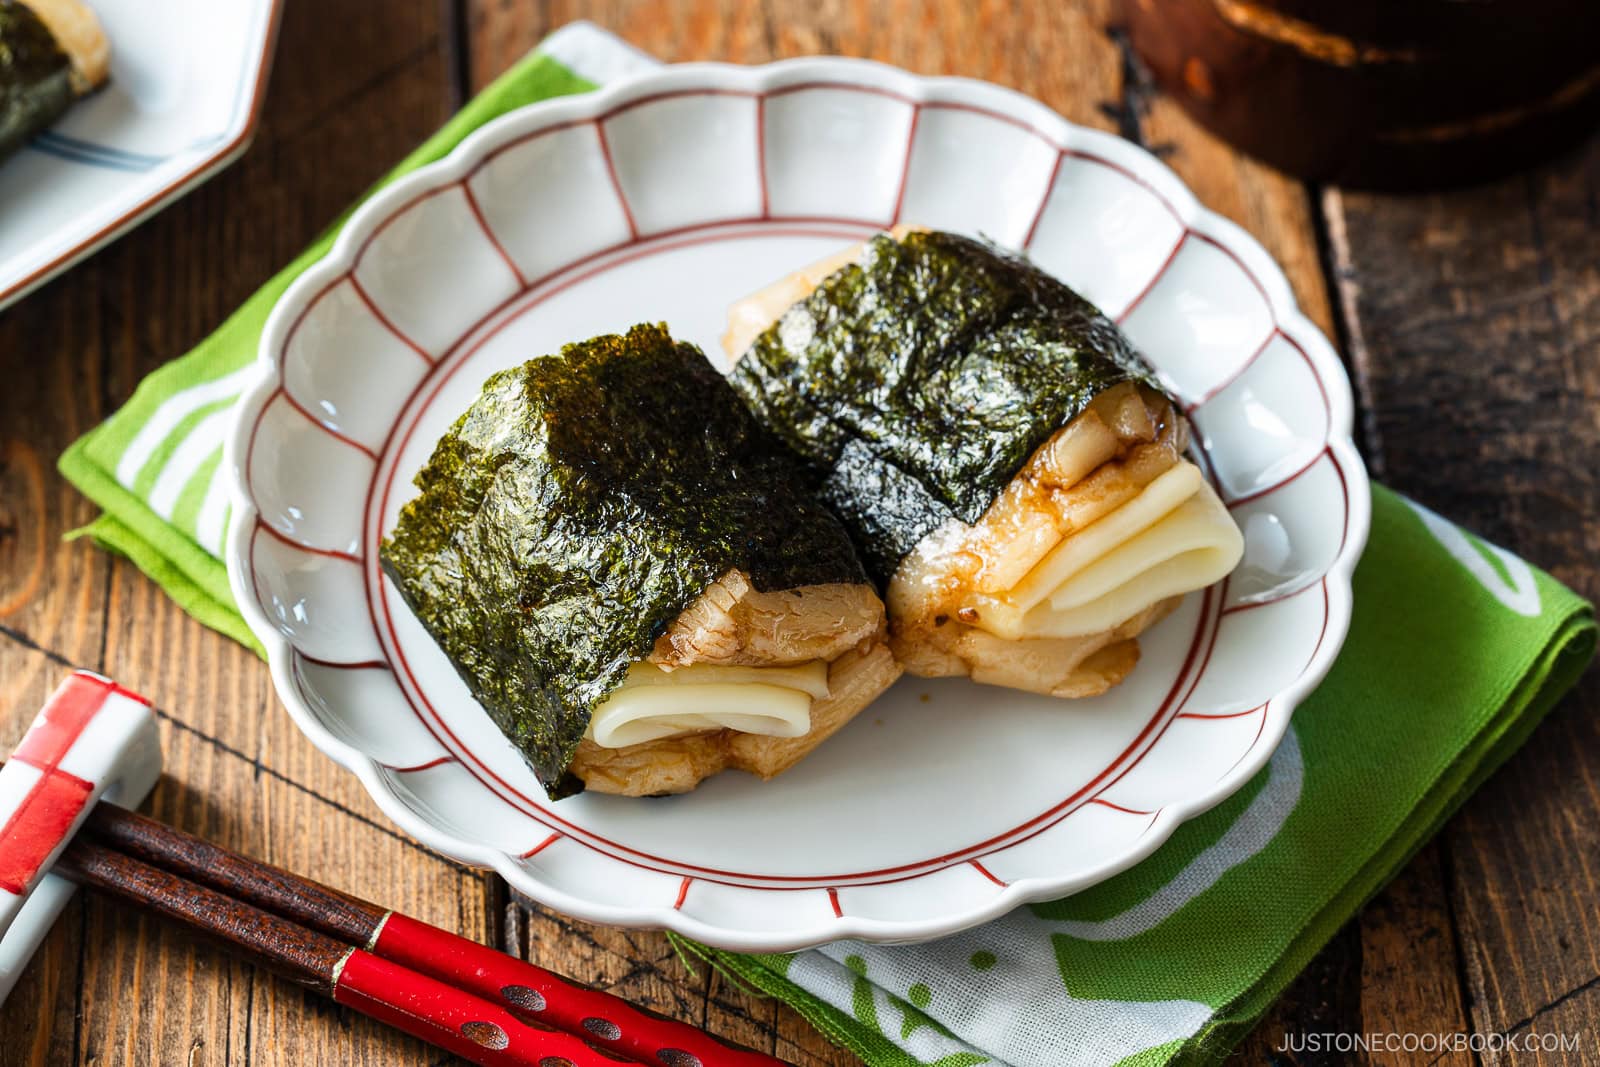
To Serve
Serve immediately with chopsticks and enjoy!
Nami's Tip: The grilled mochi will harden as it cools, so serve it hot for the best chewy texture!
To Store
It’s best to cook the mochi right before you serve it, as it will harden as it cools. I recommend preparing only as much as you can consume.
Variations and Customizations:
Looking to change things up? Try these easy and tasty ideas!
- Add shichimi togarashi. Sprinkle Japanese seven spice for gentle heat.
- Make butter soy sauce. Melt butter into the isobeyaki sauce for a rich variation.
- Change the filling. Use natto (fermented soybeans) instead, or simply skip the filling.
- Gluten-free. Use tamari or GF soy sauce instead of regular.
- Use tofu. Sandwich cheese between two slices of firm tofu, pan broil, dip in soy sauce, and wrap with nori.
- More mochi swaps. Make isobeyaki with fish cake, scallops, sliced potatoes, or potato mochi!
Calories: 479kcal, Carbohydrates: 112g, Protein: 10g, Fat: 0.03g, Sodium: 961mg, Potassium: 9mg, Fiber: 0.01g, Sugar: 110g, Vitamin A: 130IU, Vitamin C: 1mg, Calcium: 2mg, Iron: 0.1mg
Did you make this recipe?
Tag @justonecookbook on Instagram so we can see your delicious creation!
Editor’s Notes: This post was originally published on January 27, 2025. It was republished on January 11, 2026, with more helpful information.


 English (US) ·