
 4 weeks ago
35
4 weeks ago
35
Salt bread has a golden crust, a buttery, silky, soft inside, and a crispy brown-butter bottom. Finished with flaky salt crystals for the perfect sweet-savory balance.
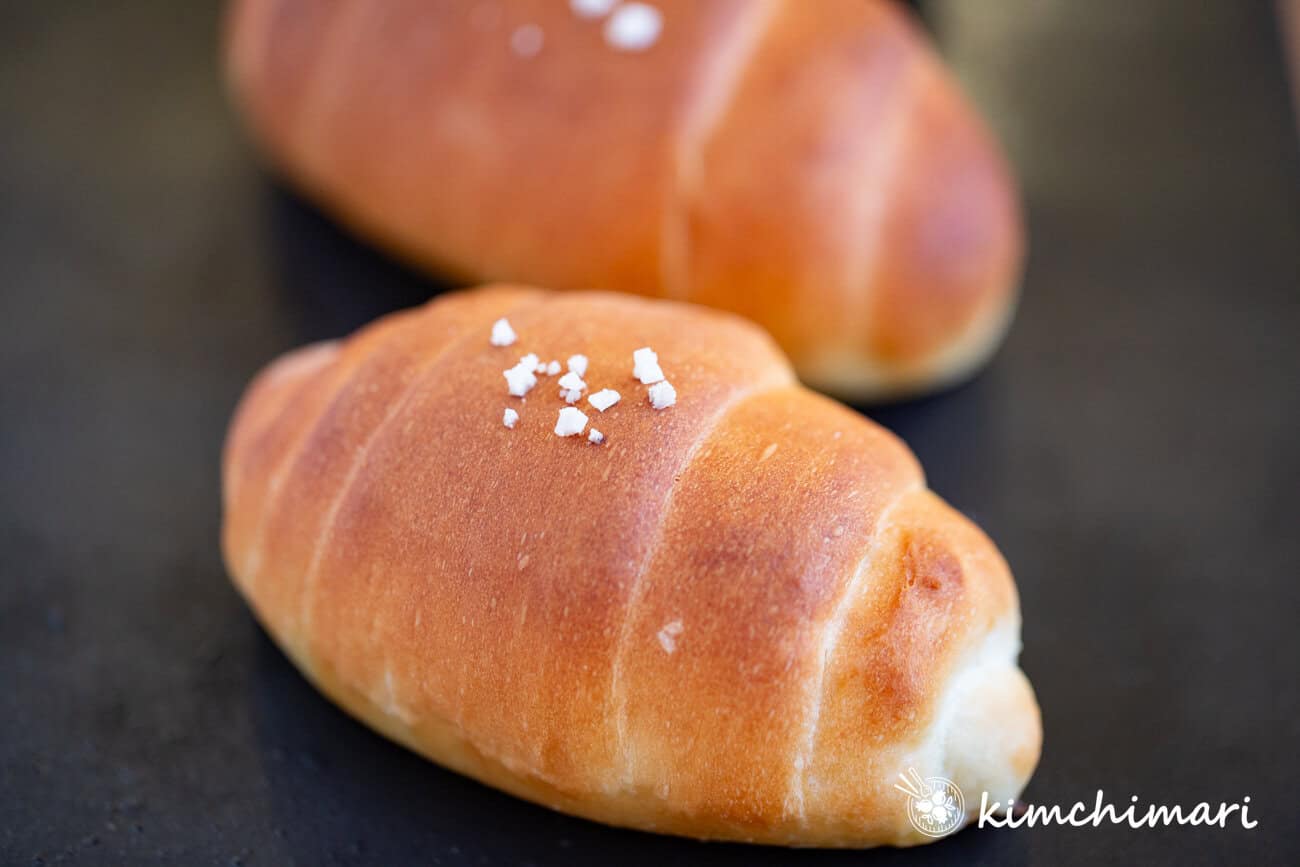
What Is Salt Bread? (What’s so special about it?)
Salt bread or Sogeum Ppang 소금빵 in Korean may look simple, but this Japanese bakery classic—also known as shio pan—has quietly become one of the most popular breads in both Japan and Korea.
When you look at it, it just looks like a regular golden roll.. with a sprinkle of salt.
The crust is slightly crispy, the inside is soft and slightly chewy, and then there’s that gentle richness from melted butter—nothing overwhelming but just enough richness to make you reach for another. And when I was visiting Korea a few years ago, I also got to taste an amazing version where it was filled with a big pat of cold butter and a dollop of sweet red bean paste.
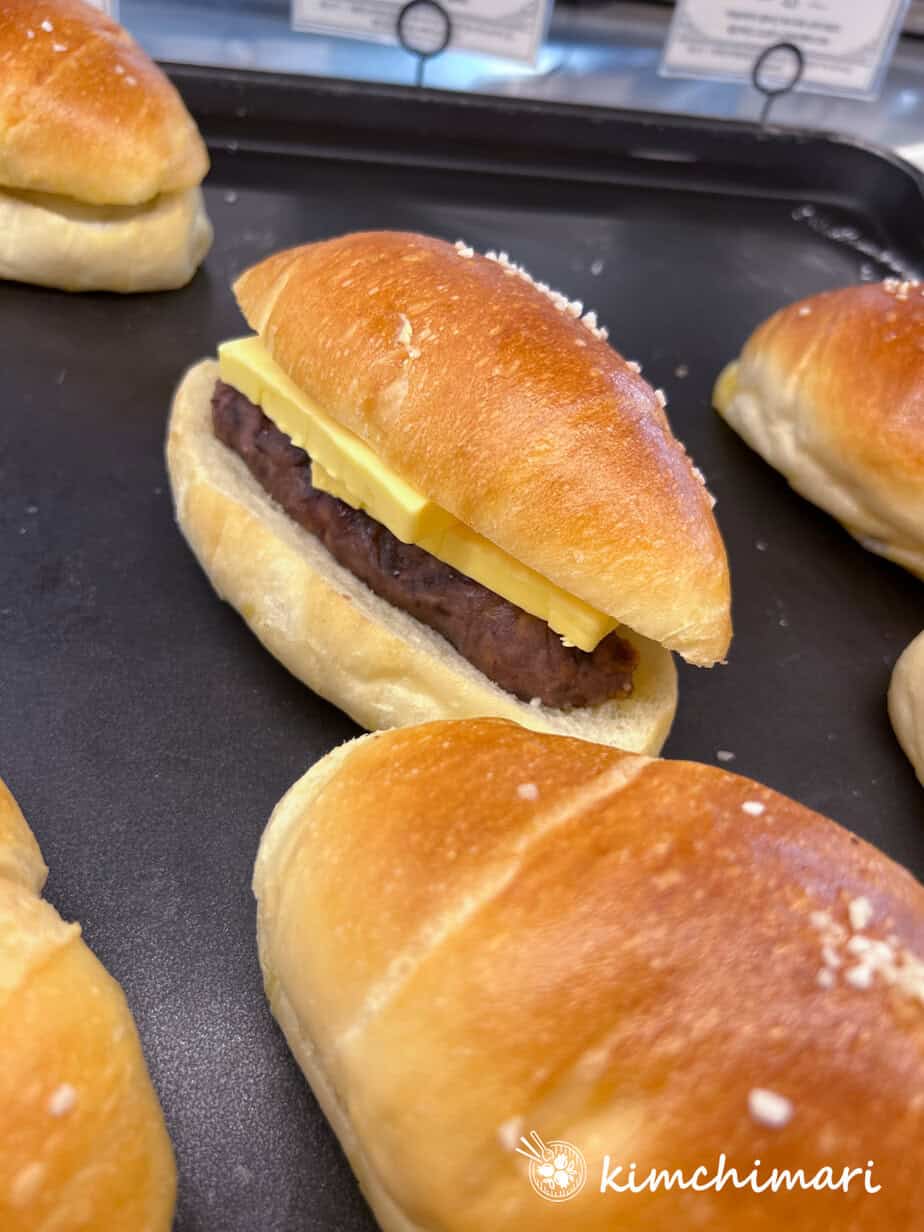 I took this picture at one of the famous bakeries in Korea. It is actually filled with sweet red bean paste and more butter!!
 Salt bread is baked with cold butter inside the roll with a light sprinkling of salt, creating a soft, buttery flavorful inside and a crusty butter-browned bottom. Here’s a picture of the crispy buttery bottom –
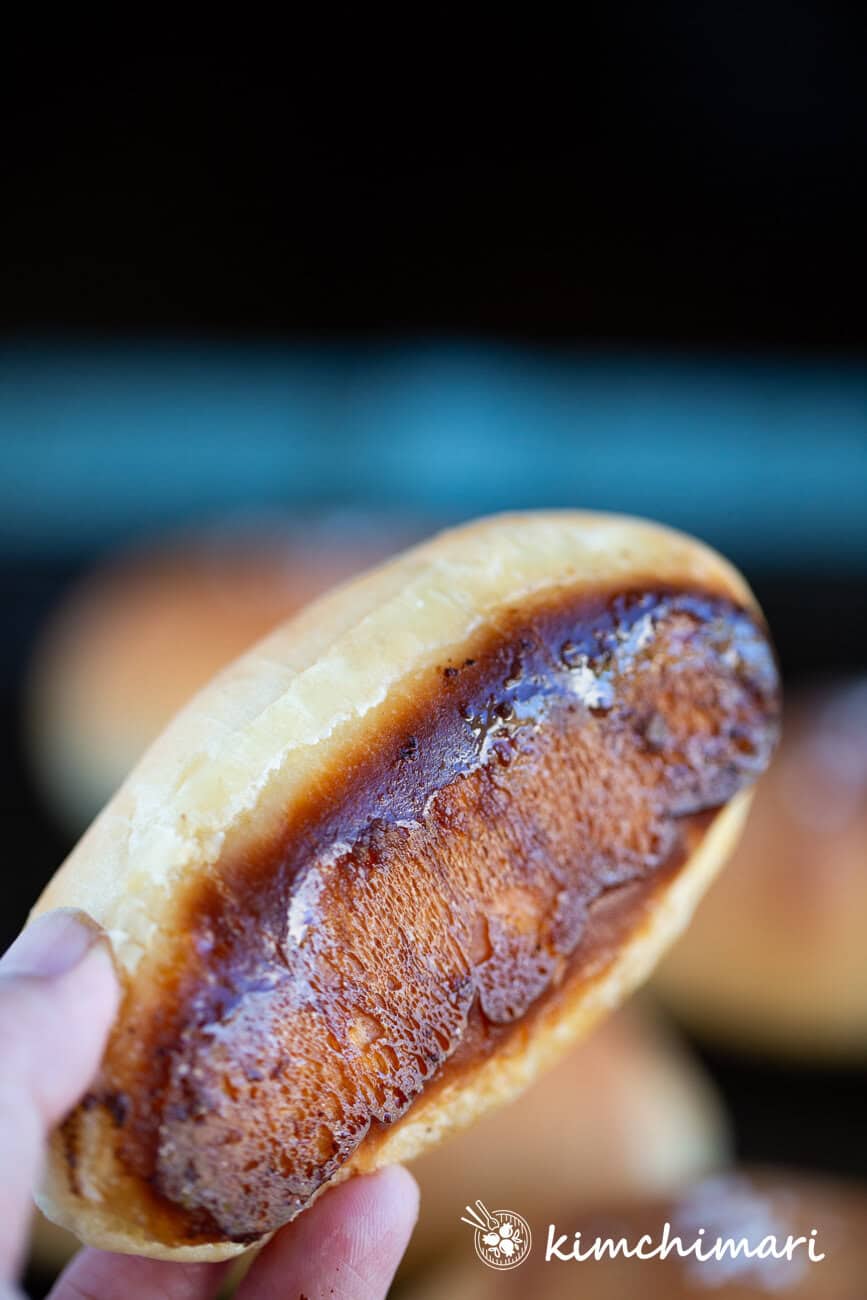
BTW, I’m so happy that my bread looks quite similar to the one in the picture above, which is from a famous bakery in Korea!
Origin of Salt Bread: From Japan to Korea
Salt bread, known as shio pan in Japan, is a relatively modern creation that has become popular in bakeries across the Country. It’s often traced back to Ehime Prefecture, where bakers created a bread that was simple, affordable, and deeply satisfying.
Instead of making something fancy, they focused on balance, getting the simple, basic things right by maximizing the butter’s flavor in contrast to the salt crystals on top.
As the salt bread bakes, the butter melts into the dough, creating a delicate aroma and sometimes a small hollow inside. And when the butter escapes the roll, it helps to create a very crusty bottom (not a soggy bottom!! HAHAHA) which is such a perfect contrast to the very soft pillowy inside. It doesn’t sound special but once you try it, you understand why it became so beloved.
When salt bread spread to South Korea, it quickly evolved into its own style.
While Japanese salt bread (shio pan) is lighter and more minimal, Korean salt bread (sogeum ppang) is softer, richer, and more buttery. Shio pan has a lighter, airier texture with a thin, crisp crust – often with a hollow interior. Sogeum Ppang is slightly richer, with a more pronounced butter flavor, a deeper golden crust, and often a crisp, butter-caramelized bottom.
Although in Seoul, I found that not all Sogeum Ppangs were the same, some were richer, sweeter and some where more light and savory – there’s quite a bit of variation—so don’t judge my recipe too strictly.😉 If you want to know, I would say my recipe is somewhere in between the two.
Remember, you can make it sweeter or less sweet by adjusting the sugar amount, or adjust the butter amount to your preference.
Ingredient Tips
- Flour – there are many differing opinions about which flour is best to use for Salt Bread. Some recipes use a combination of bread flour and cake flour, some call for 00 flour (aka pizza flour) but I feel just using bread flour that has a lower protein level of 11-12% works very well. If you want to know the brand, I use the Kirkland brand bread flour.
- Butter – butter is a very important ingredient in this recipe because it adds that amazing richness and soft, tender crumb to the roll. It also creates a hollow center and melts during baking, resulting in a crispy brown bottom. Some important things –
- Keep butter very cold for the filling; slightly frozen works well because if it melts too early, too much will leak out too quickly and reduce the hollow cavity.
- Unsalted butter is best because we are using a lot of butter and it will make things too salty if you use regular salted butter.
- Tip – cut butter into sticks ahead of time and keep them in the fridge or freezer while shaping.
- Milk Powder – Milk powder makes a big difference in both texture and flavor. Milk powder helps to make the bread more moist, adds a lovely milk flavor, and softens the crumb. If you don’t have milk powder, you can use Tangzhong instead. Check out my Milk Bread recipe on how to make it.
- If you want to use Tangzhong in lieu of milk powder, adjust the recipe to
- Flour: 480g (reduce by 20g) Water: 235g (reduce by 100g) Milk powder: omit Add tangzhong (20g flour + 100ml milk or water)
- Note that not all milk powder is the same. AVOID sweetened milk powders, malted milk powder but just use plain dry milk powder. I use King Arthur’s Whole Dry Milk powder for baking but regular nonfat dry milk powder (such as Carnation) works just as well. There’s no need to buy a special version as long as it’s plain, unsweetened milk powder.
- If you want to use Tangzhong in lieu of milk powder, adjust the recipe to
- Yeast – Instant Yeast is best because it mixes directly into the flour and is easy to use. If using active dry yeast, dissolve in warm liquid first and ferment the dough a little longer.
- Salt – Salt is what defines this bread and it’s what defines the flavor of this bread. In the dough, you can use regular fine sea salt or kosher salt but I use Korean cheonilyeom (small granules). For the topping, use the Coarse Korean cheonilyeom (굵은 소금). Using coarse Korean sea salt or flaky salt is crucial, as it gives the best flavor of saltiness. Do not use fine salt on top because it just dissolves and doesn’t give you that punch of flavor when you eat the bread.
FROM JINJOO!
Equipment Tips
- Use a dark-colored metal baking pan (black or nonstick) for the most crisper browned bottom.
- it absorbs heat better, gets hotter at the surface, which in turn helps brown the bread more deeply
- If using a light-colored pan, the bread will still bake fine but with a less browned and less crisp bottom.
- Avoid – insulated baking sheets or glass pans
- Oven & Rack Position – this is one of those recipes where the rack position matters if you want to maximize browning. Bake on the middle rack. If tops are pale, move tray slightly higher for last 3 minutes. If baking 2 trays, swap positions during the last 5 minutes.
- Bake on the middle rack. If tops are pale, move tray slightly higher for last 2–3 minutes
- DON’T use parchment paper if you want maximum crispness on the bottom.
PRO TIP: Baking Two Trays (for all rolls to look perfect)
👉Because shaping takes time, the first tray will always start proofing earlier than the second.
When I was testing this recipe, I noticed that just filling the first tray took several minutes, which meant the second tray was always behind. By the time both trays were ready to bake, the first tray was noticeably more proofed than the second. If you want your rolls to look almost exactly alike, do the following. If it’s too much trouble, you can ignore this tip and bake both trays at the same time.
- When the first tray is done proofing (35min), place both trays in the refrigerator
- Keep oven heated at 425℉ for 30 min while you wait proofing.
- Bake the first tray straight from the fridge.
- While the first tray bakes, take the second tray out and let it sit at room temperature for 10–15 minutes
- Bake the second tray
- This keeps both trays within the ideal proofing range and prevents over-proofing.
How to Shape Balls, Cone Shapes and Rolls
The hardest part of making this bread is shaping the individual rolls. Since a video is worth a million words (lol.. ), I made a quick short video of how to shape the salt bread rolls – from dough balls, cone shapes to the final croissant-like rolled shape.
I’m not a professional baker, so I totally failed the first couple of times I tried to make this. This is after many bakes and experiments, so please don’t feel bad if they don’t look like mine on your first try!
Follow along on social for more Korean recipe inspiration!
Salt Bread (Sogeum Ppang)
Best Korean salt bread recipe that will produce a wonderful soft and fluffy interior with crisp butter browned bottom.
Prep: 5 minutes
Cook: 15 minutes
Total Time: 3 hours 50 minutes
serves: 16 pieces
Ingredients
- ▢ 500 g bread flour 11~12% protein
- ▢ 25 g milk powder
- ▢ 45 g sugar
- ▢ 10 g sea salt or 8 g Korean sea salt
- ▢ 5 g instant yeast
- ▢ 50 g whole milk
- ▢ 335 ml water room temp
- ▢ 25 g unsalted butter softened
- ▢ Coarse Korean Sea Salt (flaky salt like Maldon)
Filling
- ▢ 160 g unsalted butter for filling
Instructions
Prepare Ingredients
Warm up water, milk to room temp. Also, warm up butter so it's soft.
Mix Dough
In the stand mixer bowl, combine flour, milk powder, sugar, yeast, milk and water. Do not add butter. We will add that later.
Use the dough mixing hook on the mixer and mix everything at LOW speed for 3 min.
Increase mixing speed to MEDIUM speed (I set it to 6 on my Kitchenmaid mixer) and mix for 5 min. The dough should be now one nice dough ball.
Add butter to the the dough and mix at MEDIUM speed for 6-7 min.
Bulk Fermentation
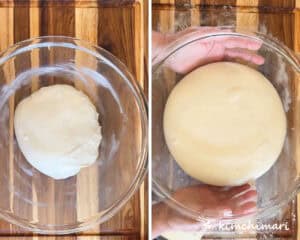
Transfer dough into a lightly buttered bowl. Put the dough either in a proofing drawer or in the oven at about 78-82℉ (25-28℃) or at room temp if the weather is warm. Let it proof for 60-90 minutes until the dough increases about 80-90% in size. Don't let the dough double completely.
If your kitchen is cool, warm oven for 1 minutes then turn off, leave oven light on and proof inside.

Divide and Pre-Shape
While you are waiting, cut cold butter into 10g long blocks. Place them in a container and put in the freezer about 20 minutes before the ending your proofing cycle.
Pour the dough out onto a lightly floured wooden cutting board. Also, prepare two baking pans. Divide the dough into 60g size pieces and by rolling the piece on the floured wooden board in your hand, shape each one into a ball. Place and space out the balls on the baking pans and cover it with plastic wrap. Do not put more than 12 per pan. Let it rest for 15 minutes in a warm place. 78-82℉ if possible. Watch video above.

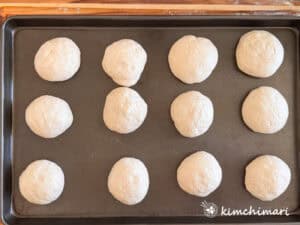
Shape into cones
On a lightly floured surface, shape each ball into a cone shape. You can do this by pressing lightly and rolling the ball under your hand on one side. Cover and let it rest for 10-15 minutes. Watch Video above.
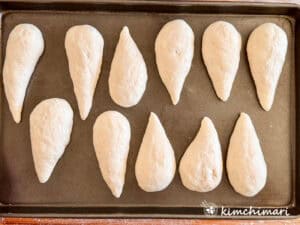
Shape into croissant like rolls (watch video above)
Take butter out of the freezer.
Lightly flour a wooden board and also sprinkle flour on each ball and then roll it out using a roller. Don't press too hard, roll out lightly. Into about 8-10 inch long triangles with the wider bottom towards you.
Then take one piece of 10g cold butter and put it on the wide end. And then roll the dough into a croissant like shape with the butter in the center. Place the seam -side down on a lightly buttered dark metal baking sheet. Don't use parchment paper to achieve crisp bottoms.

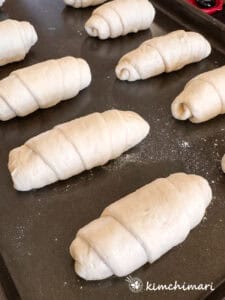
Final Proofing
Cover and proof the rolls at 80-85℉ for 35-50 min. Dough should look puffy but slightly under-proofed. When gently pressed, it should spring back slowly. DO NOT use a proof function in your oven – that will be too warm and the butter will start to melt. Err on the side of proofing at lower temperature.
Bake
Preheat oven to 425℉ (convection bake) for 30 min. Sprinkle flaky salt on top just before baking. Lower heat to 410℉, for 14 min. If you are baking 2 trays, during the last 5 minutes, swap the pan so they bake evenly. See my tip box for more details. Bread is done when it has a deep amber brown color on top and internal temperature reaches 195-198℉.
Cool on rack.
Equipment
1 stand mixer
2 dark metal baking sheet
1 wooden board granite or marble counter
1 dough cutter knife
Tips & Notes:
Why is my bottom not crispy?
Use a dark pan and avoid parchment.
Why did butter leak out?
Some butter will leak out but if butter was too warm and soft or dough was over-proofed, too much butter may leak. Be sure to not keep the butter stuffed rolls too warm during the last proofing step.
Why no hollow inside?
Use cold butter and avoid rolling too tightly. Honestly, I found the hollow inside happens on and off even between the rolls on the same pan so it’s kind of tricky to achieve.
Why is my bread spreading?
Likely over-proofed or oven not hot enough.
Nutrition Information:
Calories: 217kcal (11%)| Carbohydrates: 26g (9%)| Protein: 4g (8%)| Fat: 10g (15%)| Saturated Fat: 6g (38%)| Polyunsaturated Fat: 1g| Monounsaturated Fat: 3g| Trans Fat: 0.4g| Cholesterol: 27mg (9%)| Sodium: 256mg (11%)| Potassium: 63mg (2%)| Fiber: 1g (4%)| Sugar: 4g (4%)| Vitamin A: 309IU (6%)| Vitamin C: 0.1mg| Calcium: 26mg (3%)| Iron: 0.3mg (2%)
Course:Snack
Cuisine:Korean
KoreanCategory:Bread (빵)
Did You Make This?I love seeing what you’ve made! Tag me on Instagram at @Kimchimari or #kimchimari and don’t forget to leave a comment & rating below!







 English (US) ·