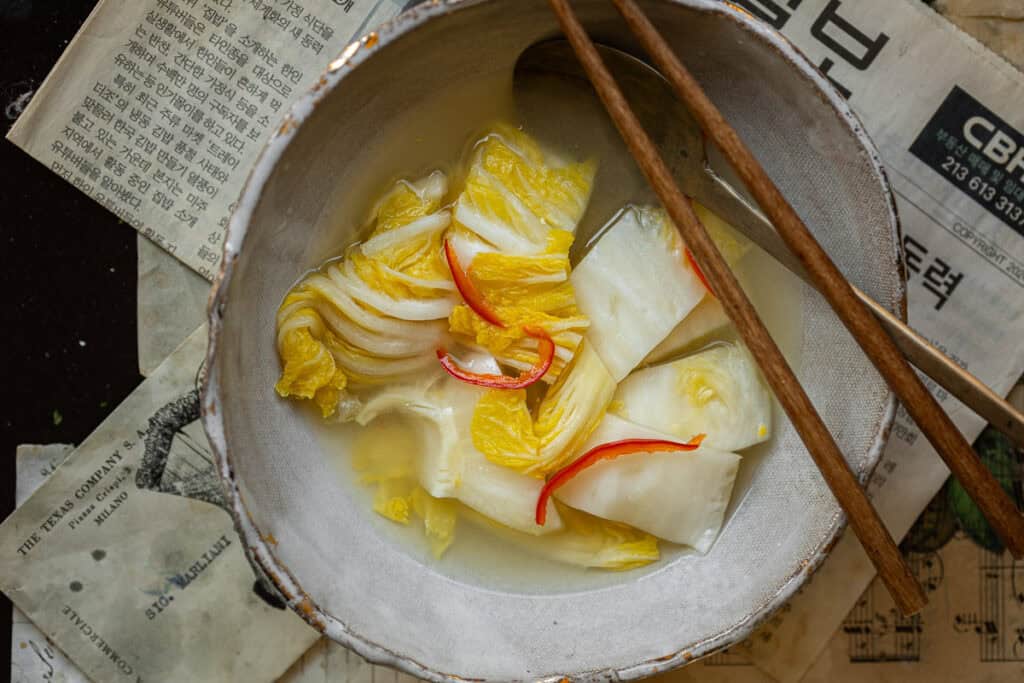
Easy.
Refreshing.
Delicious.
My mom shared this recipe with me the last time I was in Chicago and I fell in love with it–mostly because it’s so freaking simple to make! If you want to take your kimchi game to the next level, this white kimchi recipe is a must. It is as vital a part of Korean cuisine as any of the other kimchi recipes. It will be a delicious addition to a healthy fermentation collection, offering a flavor-packed contribution to your dining table, your gut health, and your immune system.
If this is your first time making kimchi, you should check out my Best Vegan Kimchi recipe, as this will provide you with the basics on the more popular napa cabbage kimchi (red kimchi).
Otherwise, if you’re ready to dive into another traditional kimchi recipe, let’s get to it!
Disclaimer: Some of the links in this post may be affiliate links for products I use and love. If you make a purchase after clicking one of those links, I may earn a small affiliate commission, perhaps enough to buy some extra gochujang or gochugaru 🙂
What Even is White Kimchi?
As I mentioned in my Best Vegan Kimchi Recipe, contrary to what most people think, there are over 200 different types of kimchi. Not all of them are spicy. Not all of them are made of cabbage. And not all of them are red! White kimchi or “baek kimchi” is one of them. White kimchi is a baechu kimchi (a kimchi made primarily out of cabbage) that does not contain the iconic Korean red chili pepper powder, gochugaru.
Sometimes referred to as “mul kimchi” (which literally means “water kimchi”), white kimchi ferments in a chilled broth or kimchi brine. This recipe does not include rice flour or any rice (the “glue” that thickens and binds the paste for red kimchi). The pickling brine is served with the kimchi and is meant to be enjoyed with the vegetables (slurp!!). White kimchi is typically served in summer–ice cubes are sometimes added to chill the broth further. Combined with the satisfying crunch of the cabbage leaf and radish, that ice cold broth is one of the most refreshing things you’ll ever have!
Is white kimchi considered a spicy kimchi? While white kimchi is often less spicy than regular kimchi because it doesn’t contain Korean chili flakes, it isn’t completely bereft of heat–at least not my mom’s recipe! Omma includes red peppers in hers (she used serrano peppers; all I could find were red jalapeños) to give it a little heat. Obviously, it’s much easier to regulate the spicy level of white kimchi, since you can add milder chilis, less chili, or even no chili. In general, though, most people do add some kind of pepper to this kimchi–it’s hard to find non-spicy food in Korean cuisine!
What Does White Kimchi Taste Like?
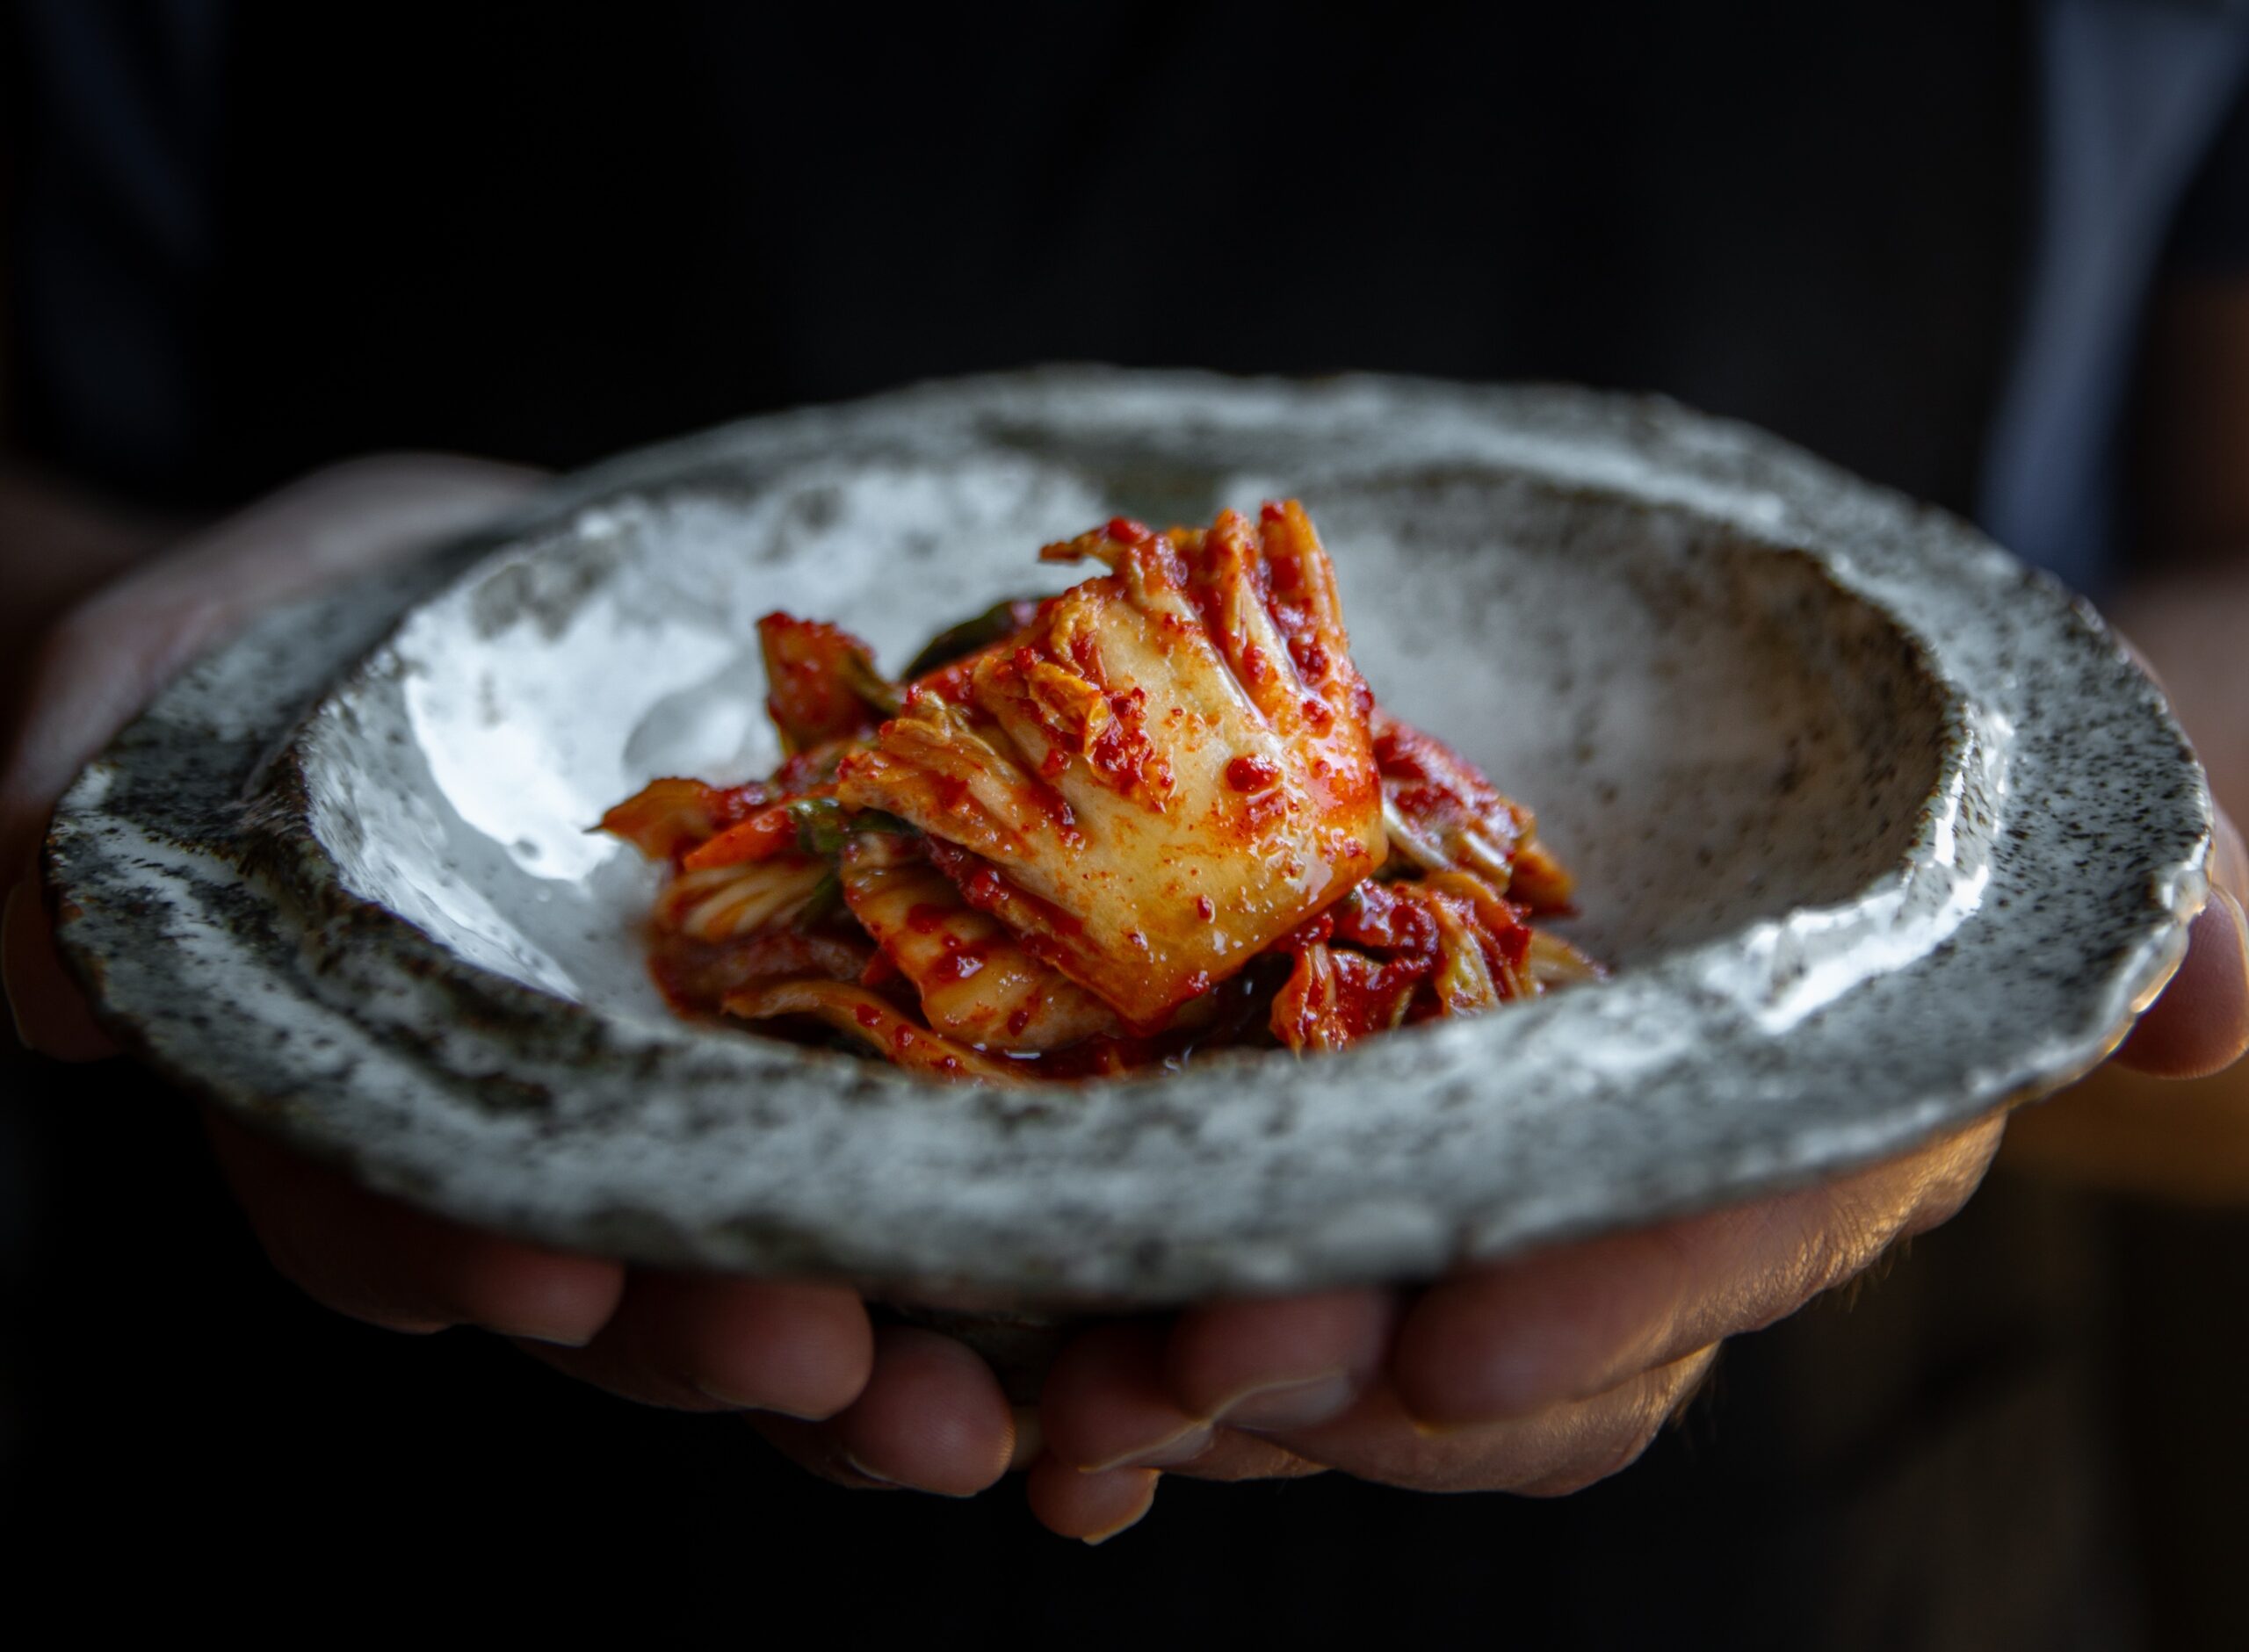
White kimchi is very similar to red kimchi in flavor. It’ll be:
- Salty
- Sweet
- Tart
- Crunchy

Because there is no gochugaru, you won’t have the sweet smokiness or nearly as much heat as red kimchi. I always say that good kimchi reminds me of bread and butter pickles, though less sweet. White kimchi is spicier, more ginger-y, more sour, and far crunchier than bread and butter pickles, but hopefully, this’ll give you some idea in terms of the flavor one can expect. Plus, I’ve never seen anyone drink the liquid in a jar of bread and butter pickles, but it is totally normal–even expected–that one would enjoy the liquid in a jar of white kimchi.
Why You’ll Love This Recipe For White Kimchi.
This vegan version of white kimchi is:
- Easy
- Simple
- Authentic
- Delicious
One of the reasons my mom shared this recipe with me is because it was so shockingly easy. There’s very little work involved–it’s mostly just a waiting game, as is the case with most fermented foods. Moreover, unlike red kimchi or tong kimchi (the traditional kimchi recipe in my cookbook), white kimchi is typically prepared in small batches. You’re not going to see 20 people kimchi-squatting around a massive bowl of white kimchi.
Accordingly, this is one you can make quite handily by yourself on your kitchen counter (not on the floor!). There’s far less labor involved and, conveniently, far fewer ingredients. That doesn’t mean less flavor though–as you’ll see, the fermentation process creates extraordinary flavor in a short period of time!
Health Benefits of White Kimchi.
Many people already know of the abundant health benefits of kimchi. Fortunately, nothing changes with white kimchi. All the same health benefits–fiber, antioxidants, and beneficial bacteria–exist in white kimchi.
The biggest concern with any kimchi is salt content. Does the salt content nullify the other health benefits of white kimchi? As you’ll see, salt plays a vital role in the preparation of good kimchi–including white kimchi. Does all that salt lead to hypertension? Multiple studies, including this one, have shown that consumption of kimchi does not lead to an increase of hypertension in humans. In fact, one study even suggests that the lactic acid found in kimchi (including white kimchi) can actually help to prevent certain types of cancer.
Key Ingredients and Notes on Substitutions for white kimchi recipe.

The following are the key ingredients for this white kimchi recipe:
Napa cabbage.

As described above, white kimchi is a cabbage-based kimchi or baechu kimchi (배추김치). Thus, you need Napa cabbage. In this recipe, we utilize one large head of Napa cabbage. These days, you can find Napa cabbage at both Western and Asian grocery stores. They can be small and skinny or very large (the one I picked up for this recipe was over 4 pounds!). The best way to pick out a good Napa cabbage is to find one with lots of green. You want to avoid those that are definitely more yellowish.

As with my red cabbage recipe, you can substitute a different kind of cabbage (green cabbage, Savoy cabbage, red cabbage); however, it won’t be traditional kimchi and both the salting period and fermentation process will be different.
Sea salt.
The next most important ingredient to making this white kimchi is sea salt. The best would be to get some Korean kimchi salt. Korean kimchi salt will be very coarse. When you go to the Korean grocery store, you can tell the salt is designed for kimchi because it’ll sometimes be called “kimchi” salt. If you cannot find a kimchi salt, a coarse Kosher sea salt is your next best option.
Apple and/or Korean Pear.
The sweetness in this white kimchi comes exclusively from fruit. There’s no cane sugar, there’s no syrup. There’s just fruit. That’s another reason I like this recipe so much, though it is a lot less sweet than my red kimchi recipe. My mom utilizes both a Fuji apple, along with an Asian pear. If you can’t find that particular apple or pear, you can substitute with a sweet apple (I’ve used honeycrisp and gala for kimchi in the past and they’ve both turned out great).
Korean Radish.
As discussed, white kimchi is as much about the vegetables as the refreshing broth that’s served with the cabbage. In order to create that broth, you need flavor. And one of the most iconic flavors in Korean broths is, of course, the Korean radish. As I talk about in my Korean Radish Salad (Musaengchae) recipe, Korean radish is similar to, but different from daikon radish. Korean radish is larger and sweeter than daikon, and visually, will have a pale green tinge from the root end that extends towards the tip (much like a Napa cabbage head!).
If you can’t find Korean radish (you can only find it at a Korean grocery store), you can substitute with daikon radish (which I’ve found at just about any old regular grocery store). Can you substitute with regular Western style radishes? The flavor will be totally different and you’ll need a lot more of them. The radish will also change the color of your broth. White kimchi is supposed to be white. Including red or purple radish might make that description inaccurate!
Green Onion, Regular Onion, Garlic, and Ginger.

Green onion, regular onion, garlic, and ginger–these are the hallmarks of Korean kimchi flavors. All of these will be included in this white kimchi recipe. If you don’t like onion, you can exclude it. However, you’ll be missing out on a key flavor component of the white kimchi. If it makes you feel better, the regular onion will be pureed so you won’t see it and the green onions are there mostly to flavor the brine (my mom doesn’t actually eat the green onions–she doesn’t like them, though I do!!).
Same goes for the ginger and the garlic. You can omit these if you don’t like them, but you’ll be missing out on massive flavor. The garlic provides umami, while the fresh ginger gives you that extra kick.
Red Chiles.
The final component to your white kimchi will be thinly sliced red chiles. I do think it’s important to use red peppers, as the bright red accents in your white kimchi is as much about the way it looks as the way it tastes. My mom used extremely spicy red serrano chiles, but all I could find at the Korean grocery store was red jalapeños; so, you can use whatever red chiles are available to you for this white kimchi.
Step-by-Step Instructions to Making white Kimchi.
There are generally three parts to making most kimchi recipes, including this white kimchi recipe: (a) salting, (b) saucing, and (c) fermenting.
Step 1: Create the Salt Brine.
Begin by creating the brine for your white kimchi–in a large bowl, mix 3/4 cups of salt with 1 quart of very cold water, until the salt dissolves. Set aside.

Step 2: Prep the Cabbage.
Remove any extra “stub” at the butt or root end of your cabbage head (mine usually come quite neatly trimmed). Cut a 2-inch slit down the root end of your cabbage end. Then, using your hands, split the cabbage head in two. Why not just cut the thing in half with the knife? Because that’s bush league? LOL. Because, when you use your hands to tear the cabbage heads, you’ll preserve the delicate leaves.
Repeat with the two halves of cabbage–cut a slit at the root end and use your bare hands to split them in half. You should have four cabbage quarters.
Step 3: Salt the Cabbage.
Sprinkle the sea salt over each individual cabbage leaf by pulling the inner leaves of each quarter towards you and sprinkling a little salt on the bottom leaf. You want to pay particular attention to the white part of the cabbage, which is the thickest. This part will require more salt to wilt and pickle than the leafier, green parts. Repeat with each leaf of the cabbage quarter.
Then, place each quarter face down in the bowl of the salt brine you created in Step 1. For the next 2 to 6 hours, flip the cabbage quarters every 30 to 45 minutes so that they are equally exposed to the salt water. You will know that your cabbage is ready when the thickest parts of the cabbage head are quite pliable. Depending on how large and thick your cabbage head is, this can take anywhere from 2 to 6 hours.
Tip: The most helpful “visual cue” that your cabbage is ready for saucing is that it is “bendy.” You should be able to bend the thickest part of the cabbage leaf (i.e., the part closest to the end) without snapping it. The other helpful cue is taste: rinse off the excess salt on a single cabbage leaf and give it a taste. It should taste “too salty” even after being thoroughly rinsed.
Step 4. Make the White Kimchi Broth.
While your cabbage is pickling, make the sauce by blending together your onion, Korean pear, Korean radish, apple, garlic, and ginger, with 1 cup of water. Then, strain the blended ingredients through a mesh strainer into a large container that’s large enough to house your cabbage heads (remember, they will shrink considerably in the next several hours).
I used a kimchi container that my mom gave me, but you can use a large 1 gallon mason jar or anything with an airtight lid. My mom likes to strain the sauce because it creates a clearer broth.
Add 1 quart of cold water to the strained ingredients (I like to strain the water together with the blended ingredients, a little bit at a time, as it helps with straining). Mix in 4 to 6 tablespoons of salt to the liquid–it should taste “too salty,” my mother advises. However, that saltiness will dissipate over time and optimize the fermentation process.

Step 5. Rinse the Cabbage.
Once you’ve determined that your cabbage leaves are ready, drain all the salt water and make sure you rinse the cabbage leaves thoroughly in cold water. The general rule is to rinse them each twice. Squeeze out excess liquid and pat them dry as best you can with a kitchen towel. Then, place them, face down, in the large container containing your white kimchi broth. Press down on them to remove any air bubbles.
Step 6. Ferment Your White Kimchi.
Add your green onion, whole (including the hairy tops–make sure you wash them!!), directly to your cabbage heads. My mom likes to squeeze them between the cabbage heads. Ideally, your cabbage heads should be in a container where they are completely submerged or pressed down (which is why the kimchi container is nice). If you don’t have a container that fits the cabbage heads, add a layer of plastic wrap to the top of the kimchi before closing the lid.

Leave your white kimchi out at room temperature for 3 days. Give your kimchi a taste. If it hasn’t fermented as much as you’d like (i.e., because your cabbage leaves are very thick), let it sit at room temperature another day. Afterwards, store in the refrigerator.
Storing WHITE Kimchi.
How long will white kimchi stay “good” for? Technically speaking, like red kimchi, white kimchi never goes “bad,” at least not in the traditional sense. It just gets more and more sour and soggy, over time. I tend to find that white kimchi tastes best after it’s been sitting in the fridge for about a week to 10 days.
Frequently Asked Questions.
What is the difference between white kimchi and regular kimchi?
White kimchi does not include gochugaru or Korean red pepper powder and is therefore less spicy than regular kimchi. White kimchi is also served with its pickling liquid, which is meant to be enjoyed along with the cabbage.
What is white kimchi good for?
White kimchi is an iconic side dish or banchan in Korean cuisine. It is particularly enjoyed in warm weather–the crunchy cabbage is served in a chilled broth that goes well with rice and other parts of a Korean meal.
How long does white kimchi last?
White kimchi is best served approximately 7 to 10 days after it is made. However, white kimchi, like all kimchi, can be enjoyed for several months, because it is a fermented food. After three months, however, the cabbage heads will grow soggy and quite sour.
Want More Pickled Recipes?
3
4
Video: My Mom Makes White Kimchi.
Recipe Card.
Vegan White Kimchi (Baek Kimchi).
Joanne Molinaro
A delicious and easy to follow vegan white kimchi recipe.
Prep Time 30 minutes
Pickling Time 4 hours
Course Side Dish
Cuisine Korean
Servings 32 2 ounce servings
Calories 15 kcal
For Salting Cabbage Heads
- 1 cup coarse sea salt
- 1 head Napa cabbage (~3 pounds)
For White Kimchi Broth
- 1 cup peeled, rough chopped apple
- 1/2 cup peeled, rough chopped onion
- 10 green onions (untrimmed but thoroughly washed)
- 7 to 8 peeled garlic cloves
- 1 thumb peeled ginger
- 1 cup rough chopped Korean radish
- 1 cup peeled rough chopped Korean pear
- 3 red chile peppers, seeded and thinly sliced
- 4 to 6 tbsp sea salt
Salting the Cabbage.
Begin by creating the brine for your white kimchi–in a large bowl, mix 3/4 cups of salt with 1 quart of very cold water, until the salt dissolves. Set aside.
Remove any extra "stub" at the butt or root end of your cabbage head (mine usually come quite neatly trimmed). Cut a 2-inch slit down the root end of your cabbage end. Then, using your hands, split the cabbage head in two. Repeat with the two halves of cabbage–cut a slit at the root end and use your bare hands to split them in half. You should have four cabbage quarters.
Use the remaining 1/4 cup of salt to sprinkle over each individual cabbage leaf by pulling the inner leaves of each quarter towards you and sprinkling a little salt on the bottom leaf. You want to pay particular attention to the white part of the cabbage, which is the thickest. This part will require more salt to wilt and pickle than the leafier, green parts. Repeat with each leaf of the cabbage quarter.
Then, place each quarter face down in the bowl of the salt brine you created in Step 1. For the next 2 to 6 hours, flip the cabbage quarters every 30 to 45 minutes so that they are equally exposed to the salt water. You will know that your cabbage is ready when the thickest parts of the cabbage head are quite pliable. Depending on how large and thick your cabbage head is, this can take anywhere from 2 to 6 hours.
Make the White Kimchi Broth.
While your cabbage is pickling, make the kimchi broth by blending together your onion, Korean pear, Korean radish, apple, garlic, and ginger, with 1 cup of water. Then, strain the blended ingredients through a mesh strainer into a large container that's large enough to house your cabbage heads (remember, they will shrink considerably in the next several hours). Add 1 quart of cold water to the strained ingredients (you can strain the water together with the blended ingredients, a little bit at a time, as it helps with straining). Mix in 4 to 6 tablespoons of salt to the liquid–it should taste "too salty," but that saltiness will dissipate over time and optimize the fermentation process.
Once you've determined that your cabbage leaves are ready, drain all the salt water and make sure you rinse the cabbage leaves thoroughly in cold water. The general rule is to rinse them each twice. Squeeze out excess liquid and pat them dry as best you can with a kitchen towel. Then, place them, face down, in the large container containing your white kimchi broth. Press down on them to remove any air bubbles.
Add your green onion, whole, directly to your cabbage heads. Ideally, your cabbage heads should be in a container where they are completely submerged or pressed down. If you don't have a container that fits the cabbage heads, add a layer of plastic wrap to the top of the kimchi before closing the lid.
Leave your white kimchi out at room temperature for 3 days. Give your kimchi a taste. If it hasn't fermented as much as you'd like (i.e., because your cabbage leaves are very thick), let it sit at room temperature another day. Afterwards, store in the refrigerator.
Serving: 2ouncesCalories: 15kcalCarbohydrates: 3gProtein: 1gFat: 0.1gSaturated Fat: 0.02gPolyunsaturated Fat: 0.04gMonounsaturated Fat: 0.01gSodium: 2100mgPotassium: 116mgFiber: 1gSugar: 2gVitamin A: 170IUVitamin C: 16mgCalcium: 31mgIron: 0.3mg
Keyword baek kimchi, white kimchi






![Korean Style Vietnamese Spring Rolls❗️ Korean BBQ Bulgogi Spring Rolls [Rice Paper Recipe 3 of 3]](https://i.ytimg.com/vi/Nl_ceoEr8Fc/maxresdefault.jpg)



 English (US) ·