 1 month ago
54
1 month ago
54

Recipe Highlights
Walk into any izakaya in Japan, and you’ll likely spot housemade tamagoyaki on the menu—and it’s almost always Dashimaki Tamago. Soft, custardy, savory, and slightly sweet, it’s my all-time favorite version of Japanese rolled omelette. This recipe takes a bit of practice, but I’ll guide you through every step so you can make it at home in no time.
- Ready in 10 minutes
- A rewarding technique that you can master at home with my tips
- The most challenging tamagoyaki style, but worth the effort
If you love Japanese egg dishes, try my Onsen Tamago, Ramen Eggs, and Omurice recipes next!
Table of Contents
What is Dashimaki Tamago?
Dashimaki tamago (だし巻き玉子) is a type of Japanese rolled omelette where a high ratio of Japanese soup stock (dashi) is mixed into the beaten egg, making it silkier, more savory, and harder to roll than other tamagoyaki. It’s the Kansai (Osaka) style and must be eaten fresh. Atsuyaki tamago (厚焼き玉子) is the Kanto (Tokyo) style and uses less dashi and more sugar, making it sweeter, firmer, and more bento-friendly.
Ingredients for Japanese Dashi Rolled Omelette
- large eggs
- dashi (Japanese soup stock) – see below
- sugar, soy sauce, mirin, and salt
- neutral oil – for cooking
- daikon radish and soy sauce – optional, for garnish
Find the printable recipe with measurements below.
Jump to RecipeDashi Types
- Kombu and Bonito Dashi or Vegan Dashi (20 minutes) – Classic homemade dashi; most flavorful option.
- Dashi Packet (3 minutes) – Easy and flavorful; my everyday choice!
- Dashi Powder (3 minutes) – Quick and convenient, but lacks depth.
How to Make Dashimaki Tamago
- Prepare the egg mixture. Whisk the eggs gently without overmixing. Combine with dashi, sugar, soy sauce, mirin, and salt until the sugar dissolves and the color is uniform.
- Heat and oil the pan. Preheat on medium heat and apply a thin layer of oil with a folded paper towel. The pan is ready when a drop of egg mixture sizzles on contact.
- Cook and roll the first layer. Pour a thin layer of the egg mixture into the pan, tilting to coat evenly. Pop any air bubbles with chopsticks. When the bottom sets but the top is still soft, roll from the far side of the pan toward the handle.
- Build the layers. Oil the pan, pour a new layer of egg, and lift the cooked egg so the mixture flows underneath. Roll again once set. Repeat until all the egg is used.
- Shape and serve. Roll in a bamboo sushi mat while hot to set the shape. Let stand 5 minutes, then slice into bite-sized pieces and serve immediately with grated daikon and soy sauce.


Nami’s Recipe Tips
These simple tips will help you make Dashimaki Tamago perfectly every time.
- Dashi ratio – You can use up to 100 ml of dashi for 3 eggs for a more pronounced flavor, but more moisture makes rolling significantly harder. Start with less and work your way up as you practice.
- Don’t overmix the eggs – Use chopsticks with the tips touching the bowl bottom and cut through rather than whisking; avoid creating bubbles.
- Preheat before pouring – An under-heated pan causes the egg to spread too slowly and stick before you can roll it.
- Oil the pan every time – Grease before each layer to prevent tearing and sticking, even on a nonstick pan.
- Control heat by lifting – Keep the stove on medium throughout. If the pan gets too hot, lift it off the burner or briefly rest it on a damp kitchen towel.

- The first roll doesn’t need to be perfect – It becomes the hidden center.
- Roll when the bottom is set but the top is still slightly runny – This helps each layer bond together for a smooth, cohesive roll.
- Shape with a bamboo mat – If the shape is uneven, wrap it in a bamboo mat while it’s hot and let it set to create a rounded oval shape.
- Eat it fresh – The high dashi content means dashimaki tamago will release liquid as it sits, so serve immediately.

Variations and Customizations
Looking to change things up? Try these easy ideas!
- Plain and simple. Skip the dashi for a firmer, easier omelette. Try my 3-Ingredient Simple Tamagoyaki.
- Sweeter style. Add more sugar to make atsuyaki tamago—the Tokyo-style sweeter, firmer version. See my Japanese Sweet Rolled Omelet recipe.
- Add nori. Tuck sheets of nori seaweed between layers before rolling for extra flavor.
- Cut diagonally to make a heart shape. 💛

What to Serve with Dashimaki Tamago
Here are my favorite main and side dishes to pair with this omelette:
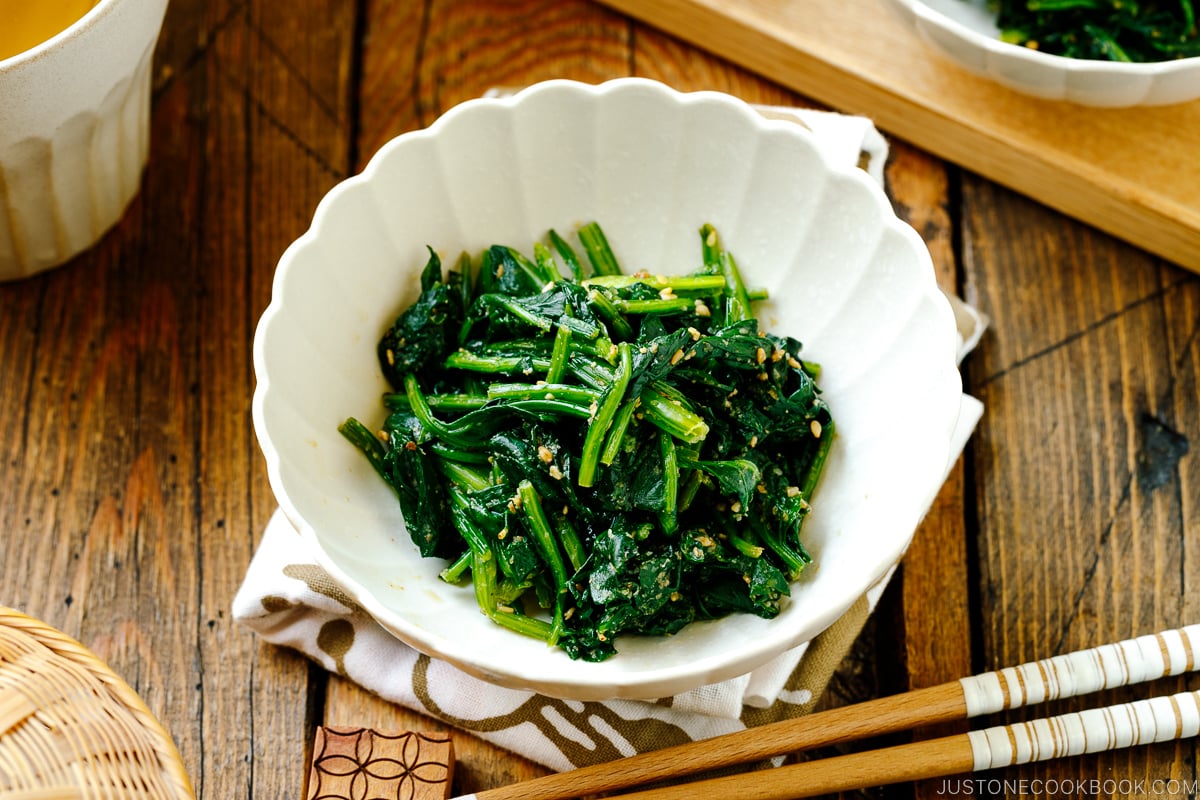
- Japanese Spinach Salad with Sesame Dressing – The fresh and light taste balances the rich egg.
- Japanese Salted Salmon – Pairs with the omelette to anchor a classic Japanese breakfast along with miso soup, steamed rice, and pickles.
- Pickled Cucumbers with Ginger – Crunchy and zesty alongside the soft omelette.

Storage and Reheating Tips
To store: Place leftovers in an airtight container and refrigerate for up to 1–2 days. The texture will soften faster than other tamagoyaki styles. You can also freeze for up to 2 weeks and thaw overnight in the refrigerator.
To reheat: Warm gently in the microwave or enjoy at room temperature. Avoid overheating, as the egg can dry out.
FAQs
Is dashimaki tamago sweet or savory?
Dashimaki tamago is primarily savory with light sweetness. Unlike atsuyaki tamago—the Tokyo-style version that leans sweet—dashimaki is defined by its dashi-forward, umami-rich flavor. The large amount of stock gives it a delicate, savory depth that plain tamagoyaki or atsuyaki can’t match.
Do I need a special tamagoyaki pan?
No. A rectangular tamagoyaki pan creates the neatest shape, but a regular round frying pan works just as well, especially for beginners. For a thicker omelette, use a 9- or 10-inch nonstick pan.
What pan do you recommend for tamagoyaki?
If you make tamagoyaki often, a good pan makes a difference. Over the years I’ve tried many—non-stick, carbon steel, and copper—before landing on my favorite: a cast iron tamagoyaki pan from Iwachu, a 120-year-old Nambu ironware (南部鉄器) maker in Japan. It’s heavy, but it heats evenly and becomes nearly non-stick over time.
That said, the pan only takes you so far. Beautiful tamagoyaki takes practice—don’t give up!
What’s the difference between dashimaki tamago and atsuyaki tamago?
Dashimaki tamago uses a higher ratio of dashi, making it silkier, more savory, and harder to roll. It’s the Kansai (Osaka) style and must be eaten fresh. Atsuyaki tamago is the Kanto (Tokyo) style that uses less dashi and more sugar, making it sweeter, firmer, and more bento-friendly.
I’d love to hear how yours turned out! 💛 Please leave a star rating and comment below to share your experience. Your feedback not only supports Just One Cookbook but also helps other home cooks discover recipes they can trust.
Before You Start
Tamagoyaki with dashi is the most challenging to roll as the egg mixture is watery. If you're a beginner, practice first with my 3-Ingredient Simple Tamagoyaki recipe.
Gather all the ingredients.

Crack 3 large eggs (50 g w/o shell) into a bowl. Whisk by "cutting" through the eggs with chopsticks in a zig-zag motion, taking care not to overmix.

Combine the seasonings in another bowl: 3 Tbsp dashi (Japanese soup stock), 2 tsp sugar, 1 tsp soy sauce, 1 tsp mirin, and 2 pinches Diamond Crystal kosher salt. Mix well.

Add the seasonings to the eggs and whisk to combine. Don't overmix. Transfer the mixture to a measuring cup with a spout.

To Cook
Heat the pan over medium heat. Dip a folded paper towel in 2 Tbsp neutral oil and apply a thin layer to the pan. Add a drop of egg mixture — if it sizzles, the pan is ready.

Pour a thin layer of egg into the pan and quickly tilt it so the mixture coats the entire cooking surface. Poke any air bubbles with cooking chopsticks.

When the bottom is set but the top is still runny, roll the egg into a log shape using chopsticks or a spatula, starting from the far side of the pan toward the handle. Move the rolled omelette to the far side. Apply more oil to the pan with a paper towel, even under the omelette.
Nami's Tip: Don't worry about rolling perfectly at this stage, since the inner layers will be hidden inside.

Pour the second thin layer of egg, just enough to cover the bottom of the pan. Lift the rolled omelette and tilt the pan to spread the egg mixture underneath. When the new layer of egg has set and is still soft on top, roll it as before from the far side toward the handle.
Nami's Tip: Control the cooking temperature by lifting the frying pan rather than adjusting the stove heat. If the heat is too weak, the egg will stick to the frying pan, so be careful.

Move the rolled omelette to the far side. Reapply oil on the pan and under the omelette. Pour the next thin layer of egg and tilt to coat the entire surface—including under the omelette.

Roll again when the bottom is set and the top is still soft.

Repeat until all the egg mixture is used.

On the final round, brown the omelette lightly on each side, if desired.

Remove the omelette from the pan. While still hot, place it on a bamboo sushi mat and roll tightly to set the shape. Let stand for 5 minutes.
Nami's Tip: Rolling in the bamboo mat is optional but recommended for a neat log shape.

To Serve
Slice the omelette crosswise into ½-inch (1-cm) pieces. Optionally, serve with a mound of grated daikon and a splash of soy sauce on the side.
Nami's Tip: Gently squeeze out any excess water from grated daikon.

To Store
Cool and transfer to an airtight container. Refrigerate for up to 1–2 days or freeze for up to 2 weeks. Thaw overnight in the refrigerator, or reheat directly from frozen in the microwave.
To Cook in a Round Frying Pan
If you don't have a rectangular tamagoyaki pan, a round frying pan works too. As you roll, tuck in both rounded edges of the egg layer before each roll to keep the shape straight—or trim the edges with a knife once finished. The roll will be shorter, but just as delicious.

If you'd like to add a filling such as a nori sheet, place it on top of the egg layer when the bottom is set and the top is still slightly runny, then roll as usual.

Variations and Customizations
- Plain and simple. Skip the dashi for a firmer, easier omelette. Try my 3-Ingredient Simple Tamagoyaki.
- Sweeter style. Add more sugar to make atsuyaki tamago—a thicker, sweeter version. See my Japanese Sweet Rolled Omelet recipe.
- Add nori. Tuck sheets of nori seaweed between layers before rolling for extra flavor. I show this in method 2 in the recipe card below.
- Make it restaurant style. Add more dashi than I do to make oven-baked castella tamago. It’s similar to my Datemaki recipe.
Calories: 199kcal, Carbohydrates: 7g, Protein: 10g, Fat: 14g, Saturated Fat: 8g, Trans Fat: 1g, Cholesterol: 279mg, Sodium: 347mg, Potassium: 207mg, Fiber: 1g, Sugar: 6g, Vitamin A: 503IU, Vitamin C: 10mg, Calcium: 55mg, Iron: 2mg
Did you make this recipe?
Tag @justonecookbook on Instagram so we can see your delicious creation!
Editor’s Note: This post was originally published in March 2012, updated with new photos and video in January 2016, and revised with additional information in August 2019. It has been republished with expanded content on April 12, 2026.


 English (US) ·